Take an extensive deep dive into ILM’s creation of the original X-wing fighter miniatures for Star Wars: A New Hope.
By Jason Eaton
50 years ago, in an industrial park far, far away, an unassuming team of young artists and craftspeople created something that would capture the hearts and imaginations of an entire generation, becoming an icon for decades to come: the X-wing fighter.
Seemingly against all odds, these men and women would work in what was initially a bare-bones environment. It was a warehouse with no air conditioning in a lackluster part of town. It would bake in the summer with little shade. There were hardly any trees, just taco stands and aviation supply shops. Cinderblock buildings with no labs, institutes, or studios nearby. And yet, with no fanfare, and against all odds, magic was made.
A roughly two-foot miniature made of acrylic, styrene, metal, and resin, the X-wing was the on-screen vessel that carried heroes to triumph. It moved impossibly before our eyes against surreal pinwheeling star fields, giving a sense of desperate energy. For myself, a child at the time, it would become a totem for my imagination, never really leaving my brain, to one day push my curiosity as an adult: What exactly were the models made from, and how did they come to be?
I collected various die-cast and plastic toys and built the model kit of the X-wing. I was captured by a design that was both rugged and sleek. Building that first model of the X-wing was not only an enjoyable pastime, but it also began the building of skill sets, and it was a way to imagine myself as an ILM modelmaker. I found incredible joy in building impossibly realistic-looking ships that inadvertently created our modern Star Wars mythology and redefined a multigenerational, visual science fiction “style guide.”
The onset of the internet facilitated a fan community with a shared curiosity about ILM and its creations. I found my tribe through gatherings, parties, and, eventually, ILM artisans’ living rooms. My curiosity transformed into a personal mission to preserve and record the nuanced details behind these Star Wars miniatures – specifically the processes, dimensions, and stories that inspired me as an artist. The X-wing was not just a focus, but an artistic and intellectual obsession.
Origins: Colin Cantwell
Memory alone is understandably an unreliable narrator, and over the last 50 years, the storied history of the X-wing has been both apocryphal and often contradictory. Focusing on period photographs, paired with the recollections from people who were there for production, we can establish a more comprehensive understanding of the X-wing’s history. I always value the time and generosity of those helping me on my journey. Sadly, many of the artists and incredible people who were part of the production’s journey are no longer with us, and my sense of urgency about this “mission” has only grown stronger. The photographic record is a window into this incredible time, when no one realized how they were changing the world of entertainment. Each photo contains little glimpses of magic being made in an extraordinarily unassuming environment.
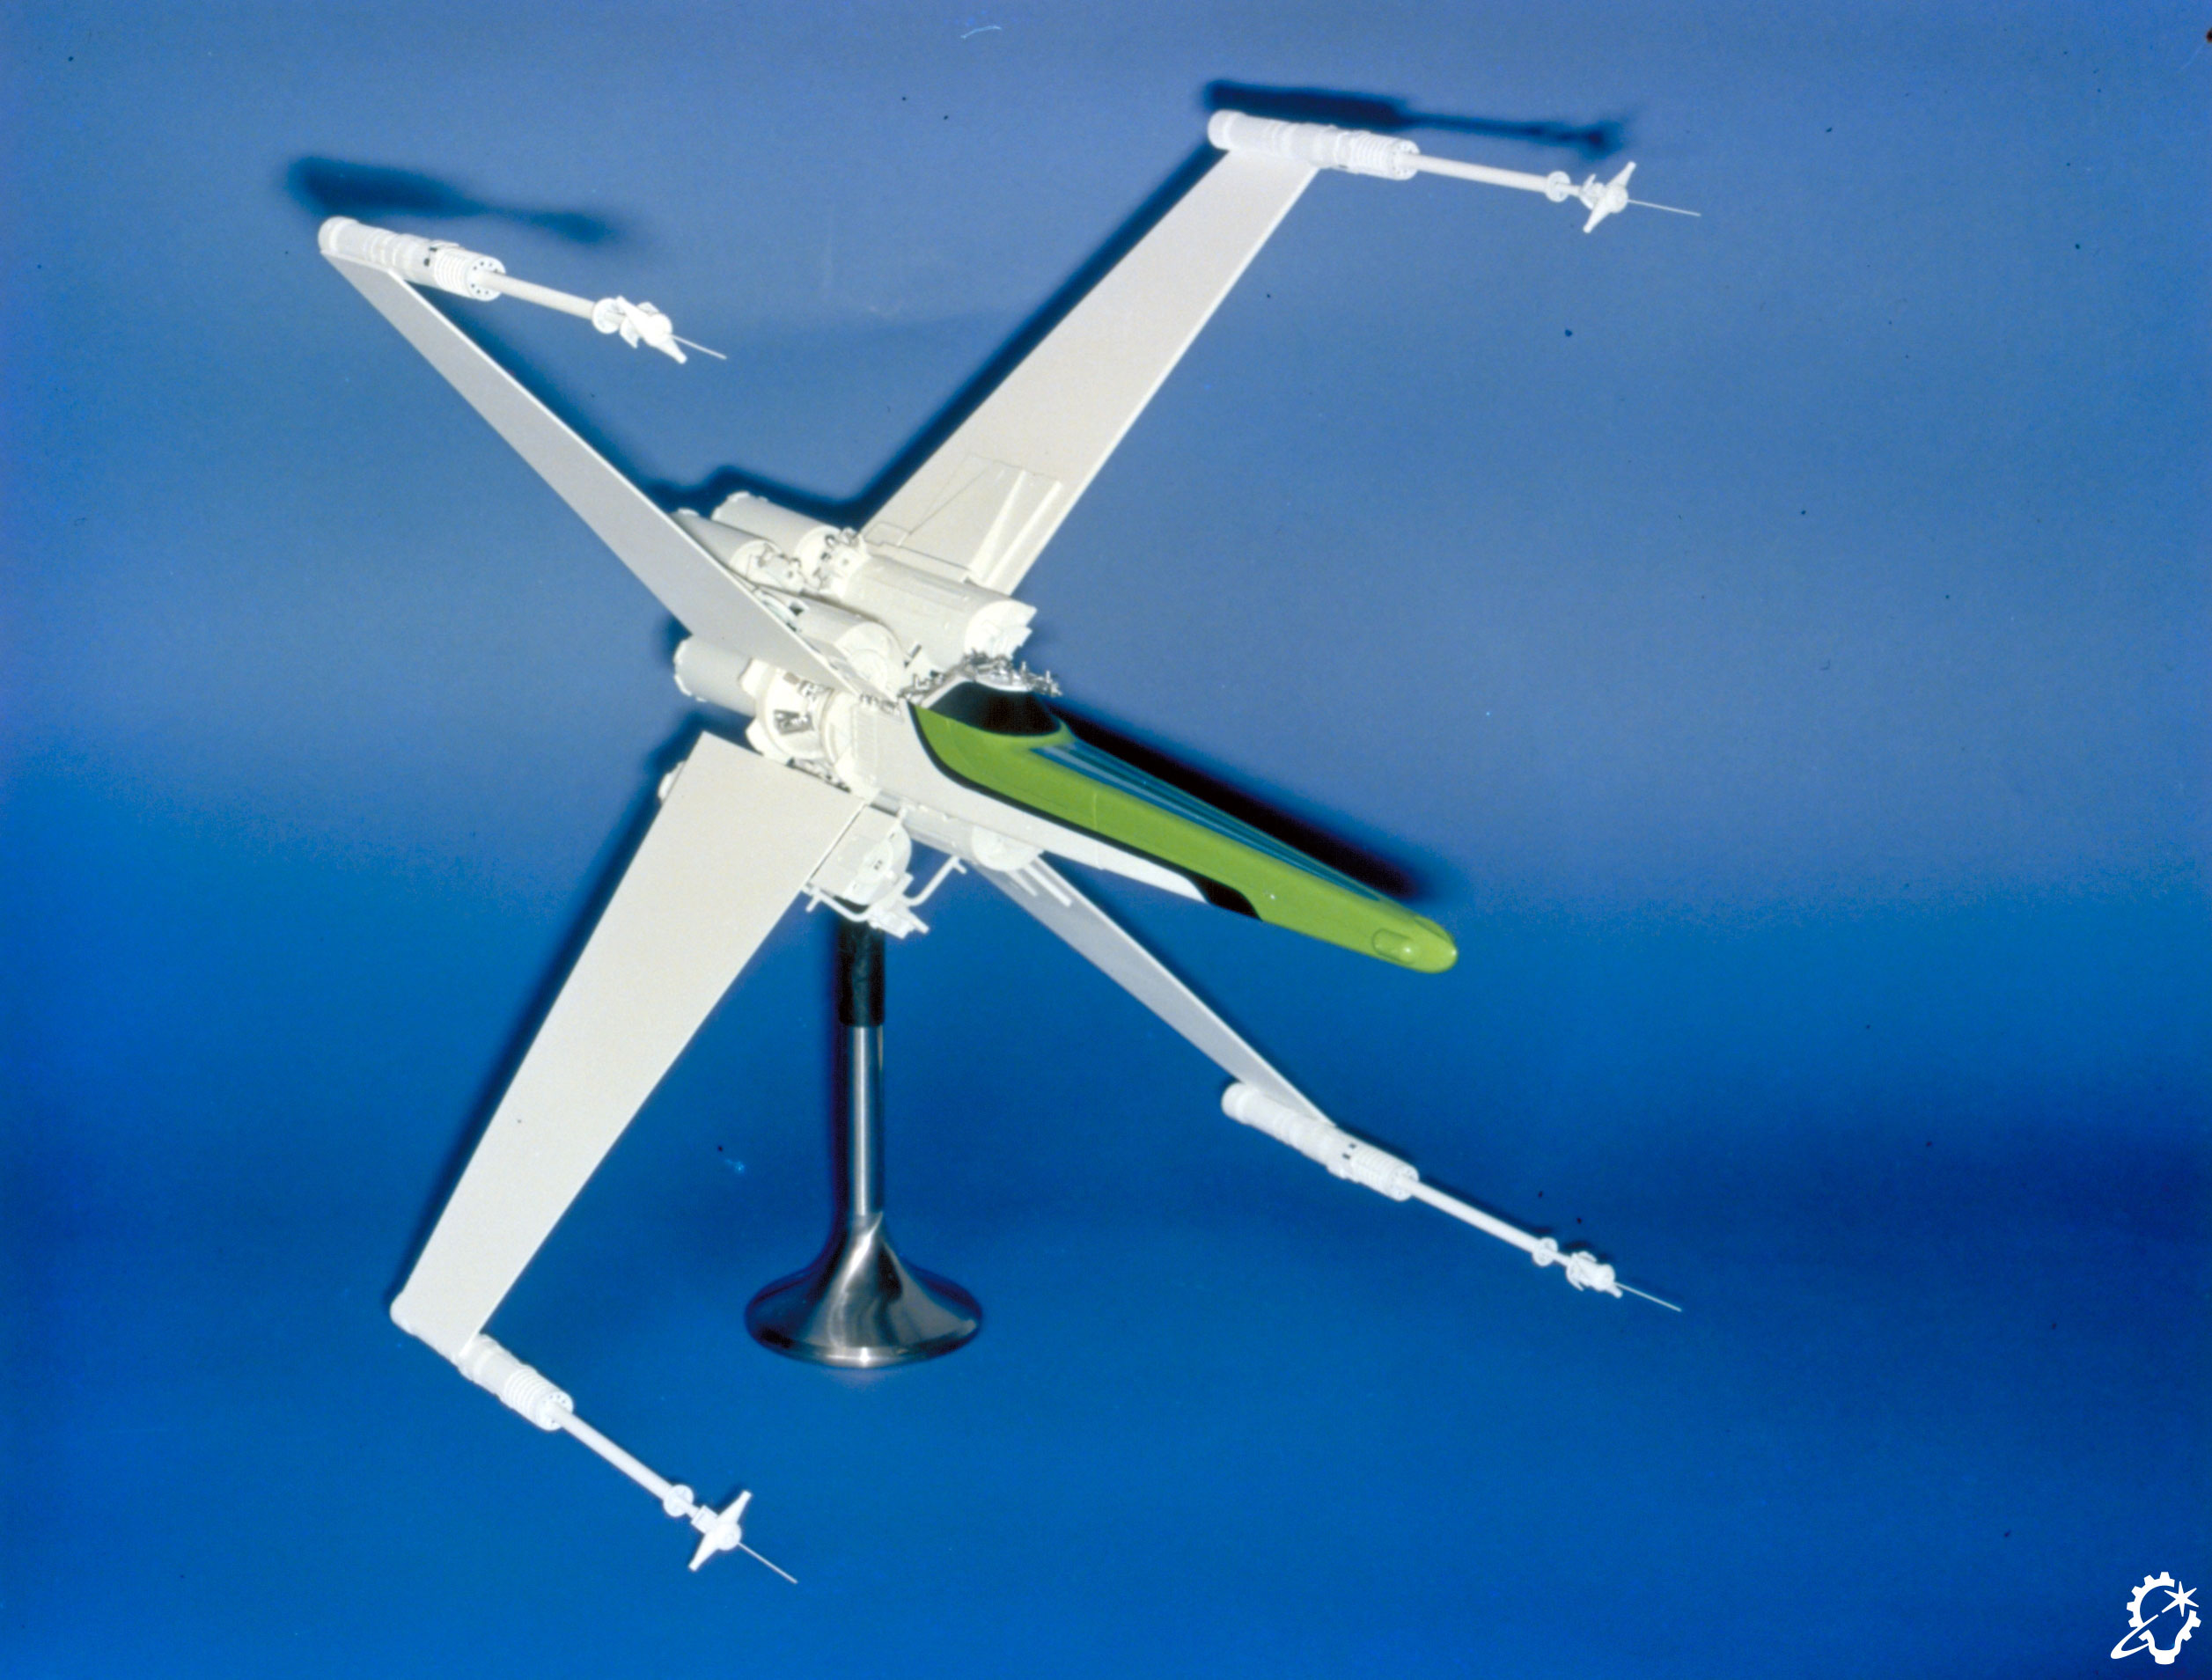
Colin Cantwell was the first to put glue to model kit, creating a series of prototype designs very early in 1975 from George Lucas’s thumbnails and descriptions. It was fascinating to talk with Colin about the X-wing, as his mind saw objects and concepts in uniquely creative ways. His model was built from the body of a Jeb Allen’s “Praying Mantis” top fuel dragster model kit, with wings hinged at the center rear of the fuselage that would spring open in an “X” shape. He said he imagined it as a fast craft and as a Wild West gunslinger. The “X” was analogous to the quick draw of a pistol at high noon.
The Cantwell concept models were unsuitable for filming, however, as internal armatures were not included for support or mounting to production equipment, and the details were too fine for the blue screen compositing system being developed by ILM at the time.
Refining the X-wing Design
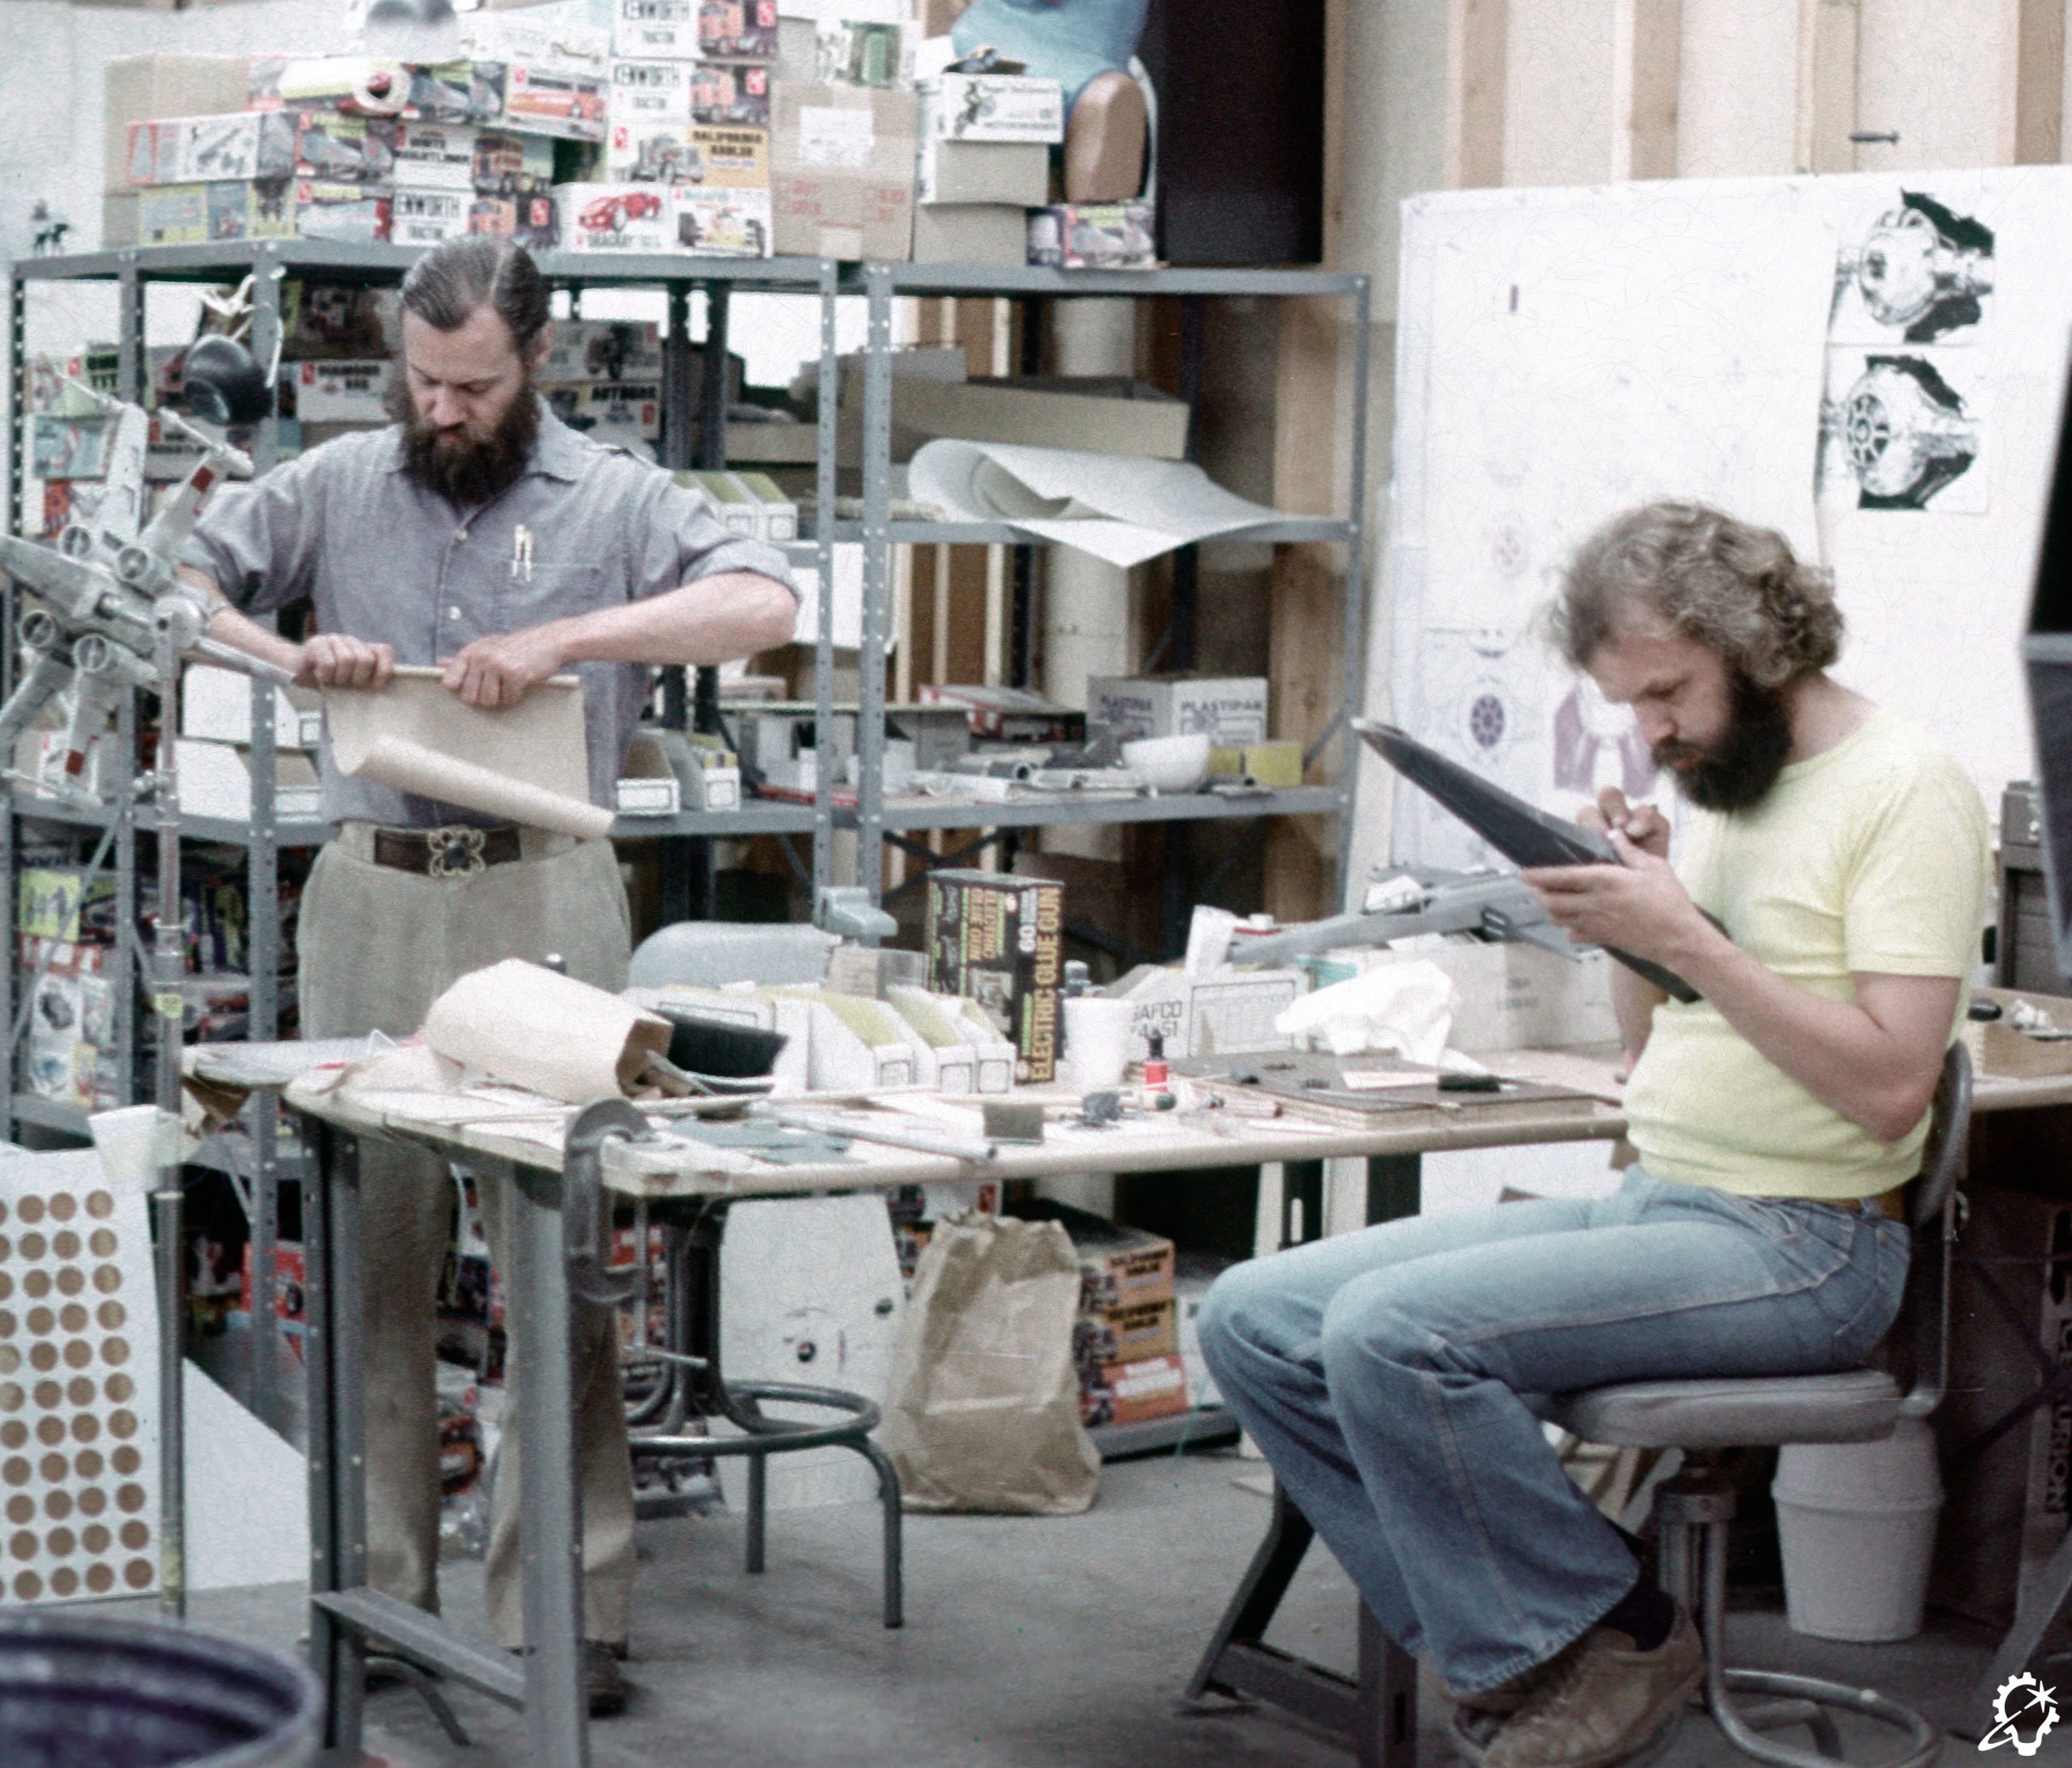
What was the launch point for the iconic ILM X-wing fighter design that we know today? Enter art director Joe Johnston, who worked with the modelmakers and technicians to bring what was internally dubbed “Project 504” to life, with the first unfinished “hero” example being completed in December 1975. “Hero” meaning a filming miniature that would have the best fit, finish, and all of the adornments needed for specific shots, as opposed to a “pyro,” which was a simpler construction built for pyrotechnic detonation. But before we talk about blowing up models, let’s back up a little to the early fall in that industrial park in Van Nuys.
From a series of photographs and an internal document tracking the progress of each project with names assigned to tasks, David Beasley carved the X-wing fuselage as a “buck” from wood. This first prototype fuselage appears to be made from a top and bottom shell, both in vacuum-formed styrene. There was an internal armature made from machined aluminum by Grant McCune, with David Grell assisting, with the wings being made from a combination of machined acrylic and sheet styrene. Motors and some, if not all, of the electrical wiring are in place.
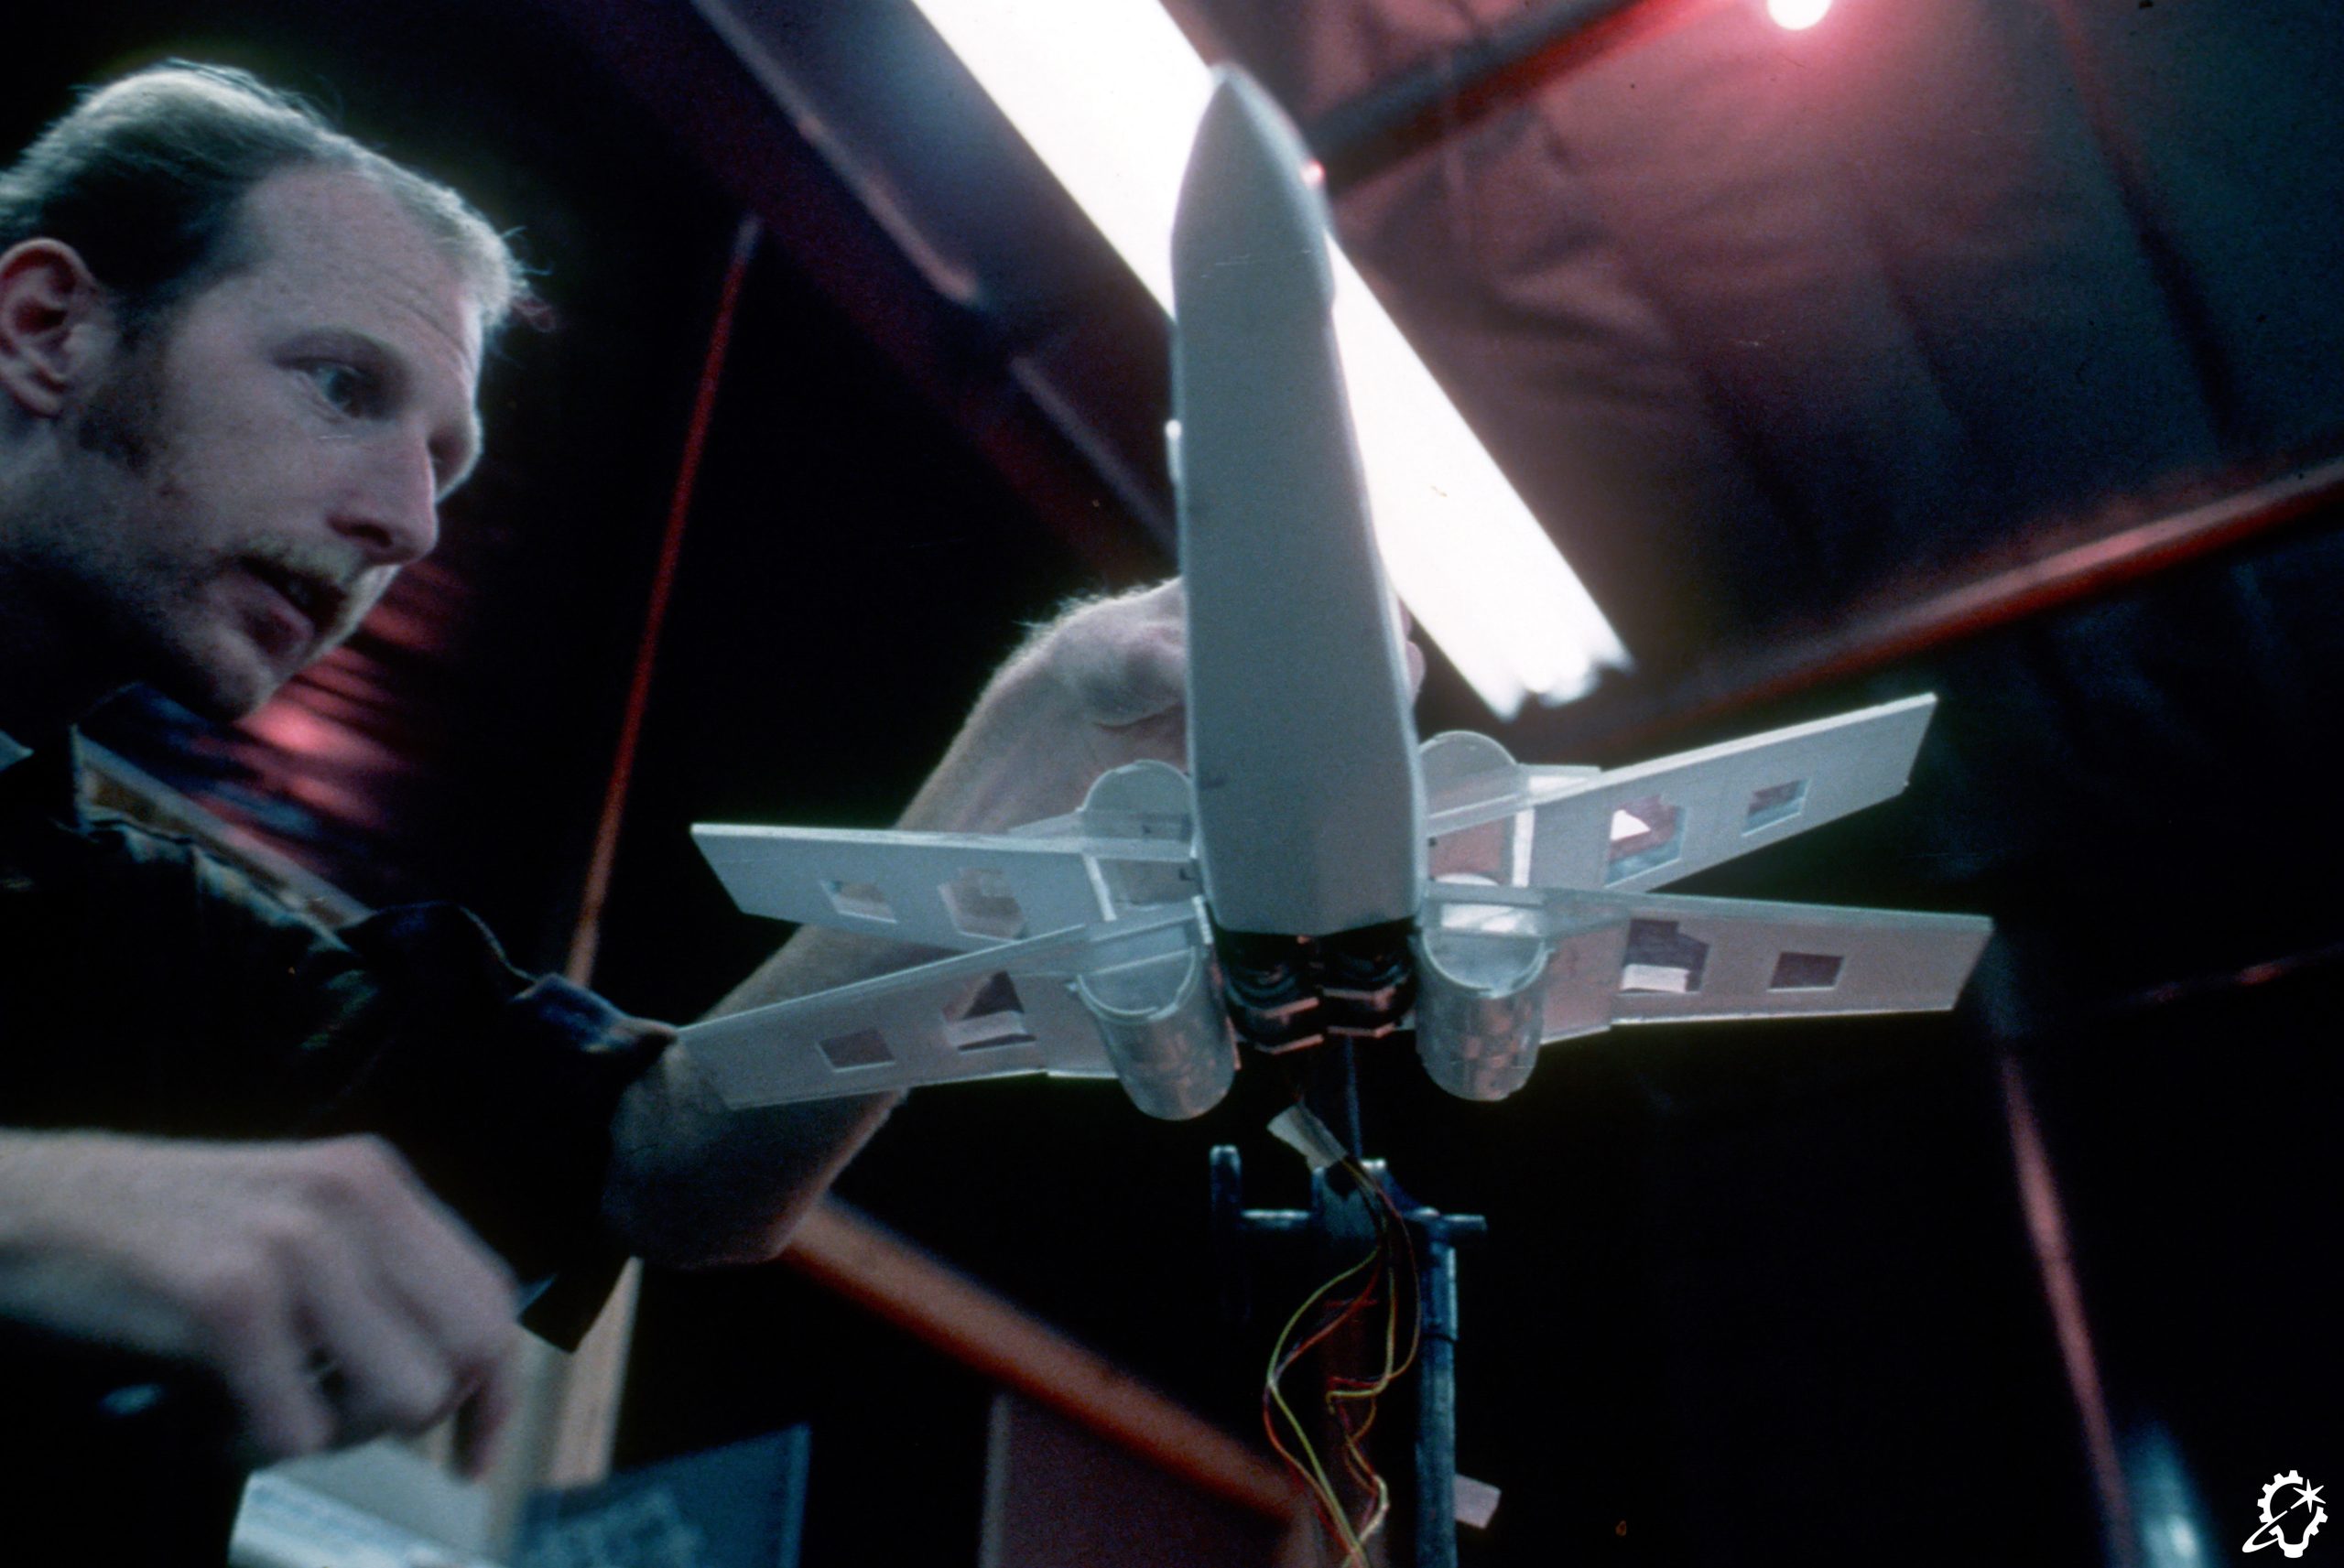
Notable landmarks of this prototype include the half-circle engine intakes we see in Ralph McQuarrie’s paintings from the time, as well as a much sleeker underside rear fuselage. The nose was a different shape, as this build followed the idea that the midline of the body would contour slightly upwards to meet the nose, as depicted in the McQuarrie painting. Most importantly for the design process, this initial series of parts shows that the back half of the lower fuselage is cut away, as the internal armature and motors would need more room to inhabit the shells. David Jones recalled this being a running design change. A careful examination of any hero X-wing will show that quite a bit of material needed to be cut from the sides of the fuselage as well, with long slots to allow the wing brackets to travel. This is very apparent when the wings are closed, but nearly invisible when these models have their wings open. It is a quirk of the hero design that is rarely noted or seen.
The next series of photographs shows a “proper” hero build in progress, now with a resin top shell, fully enlarged vacuum-formed lower shell, full-circle-shaped engine intakes, and the various details and engines being glued in place.
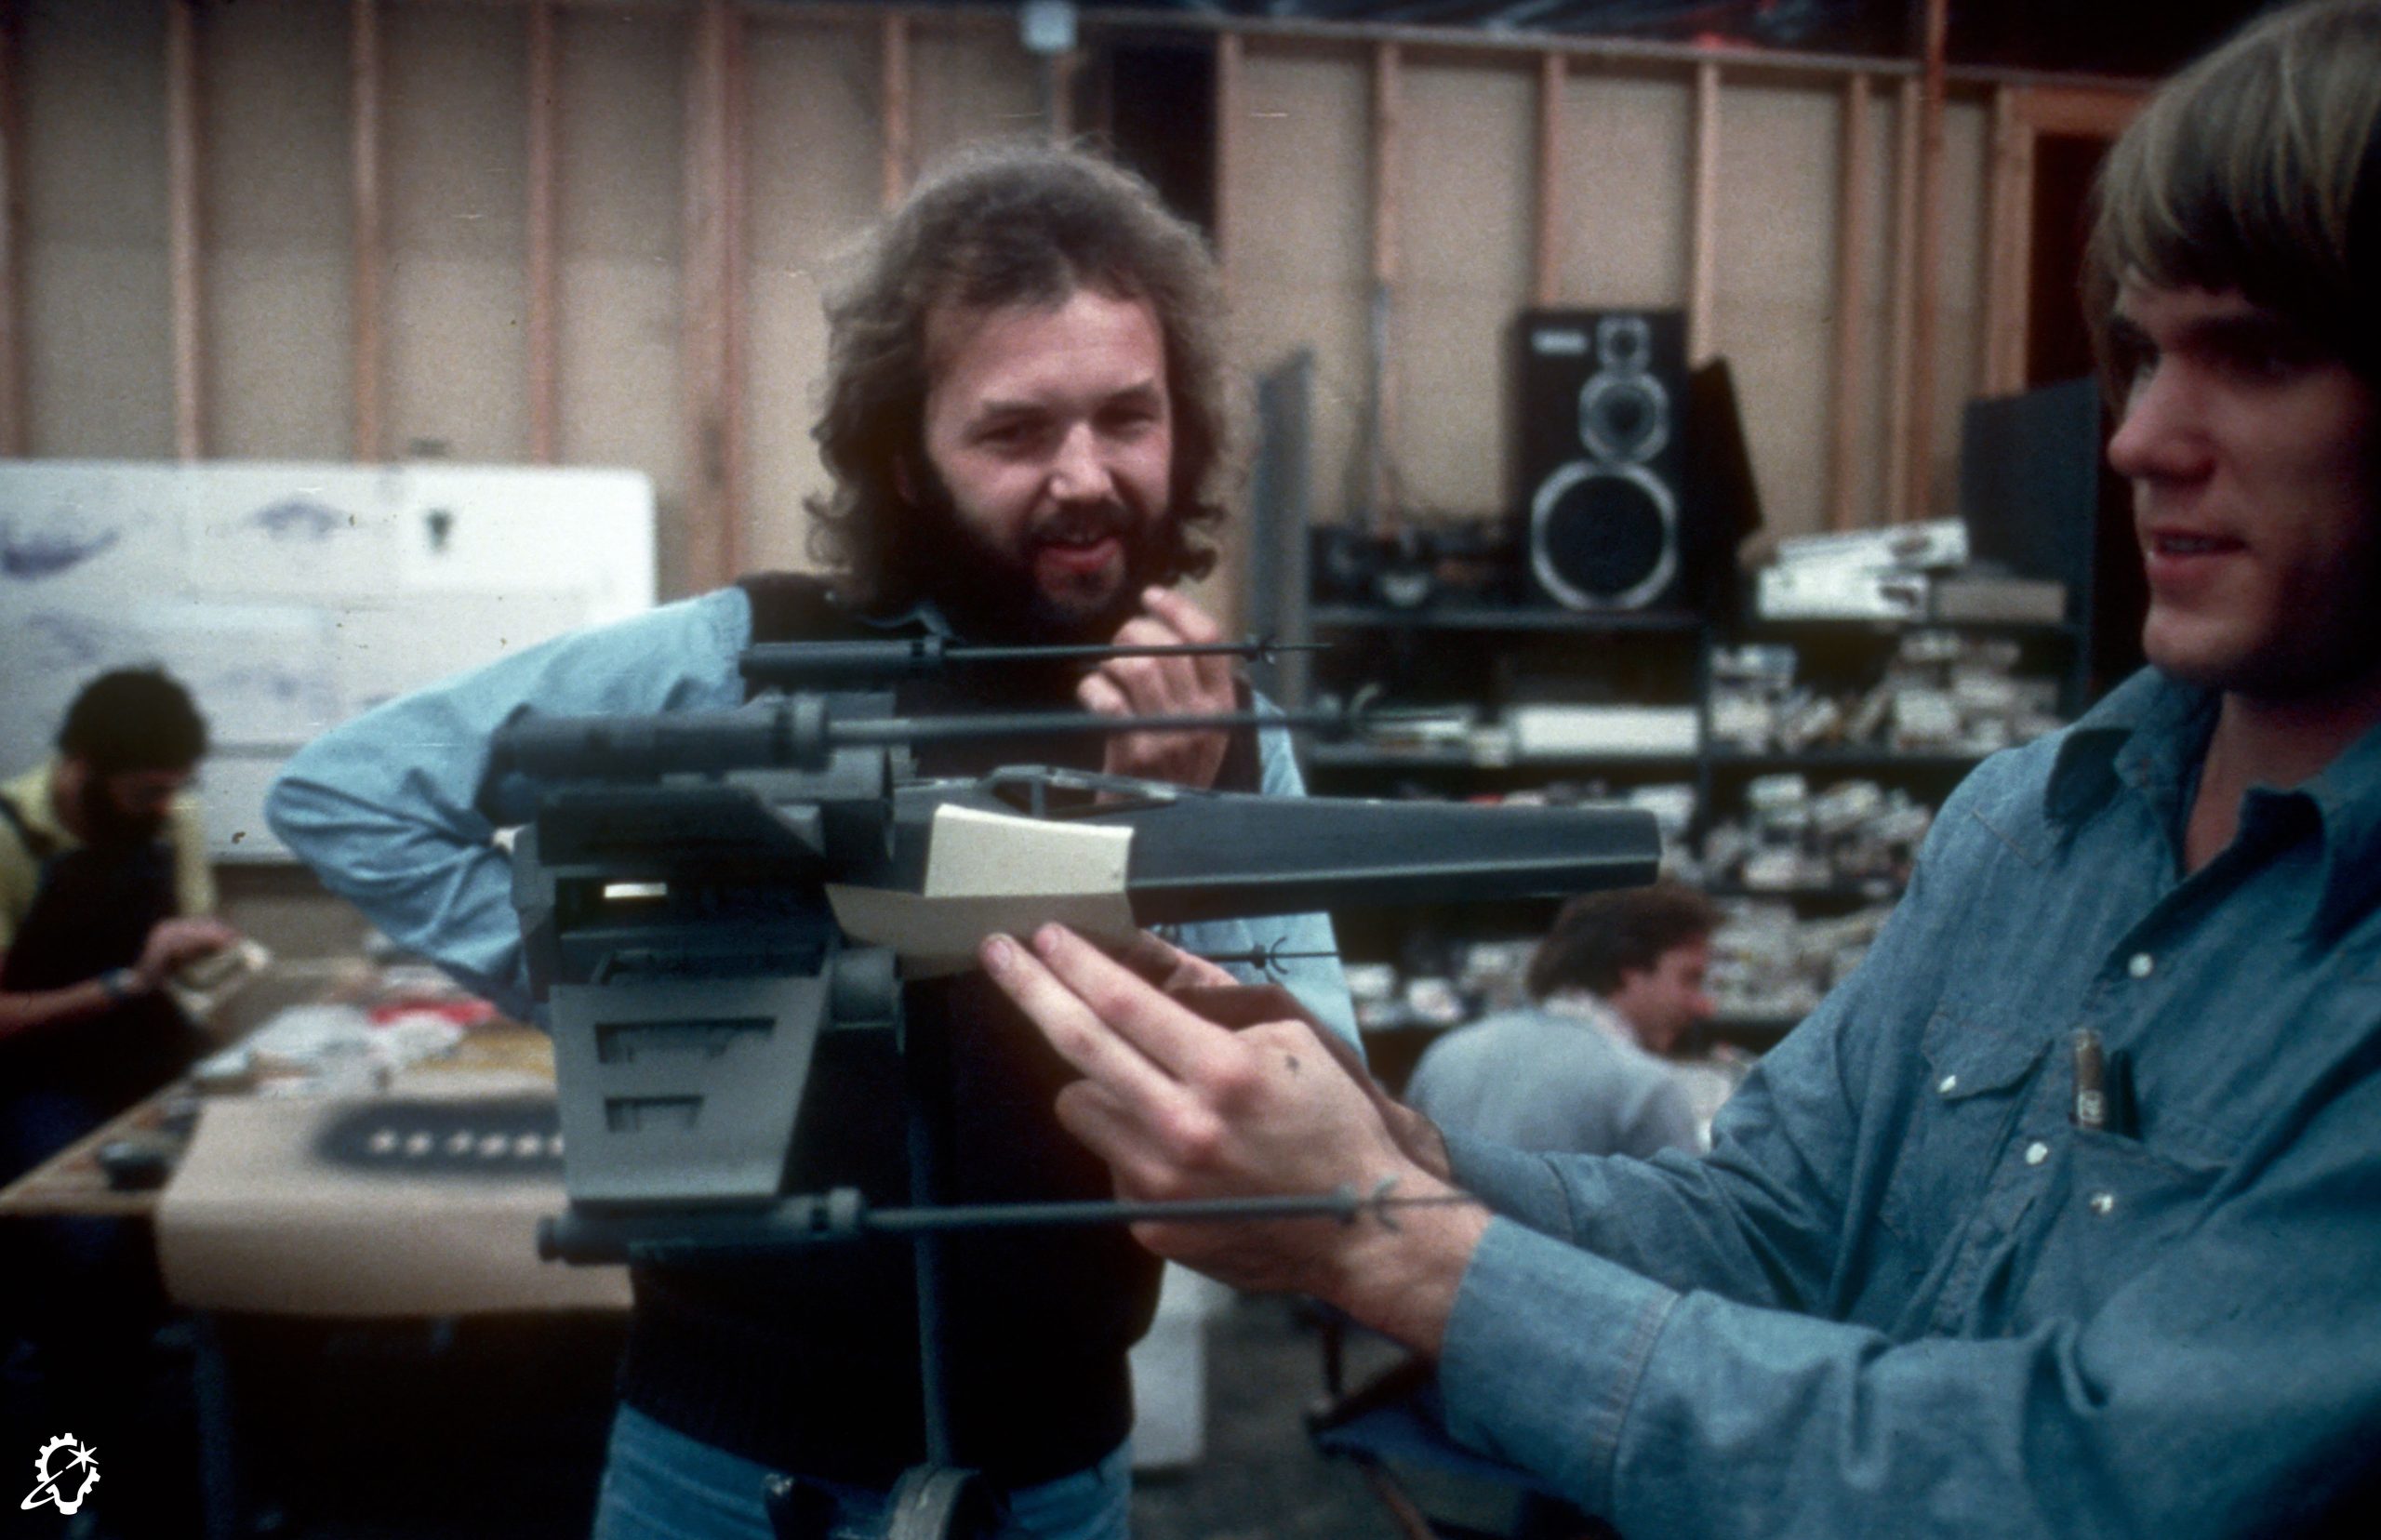
The Original Model: Blue 1
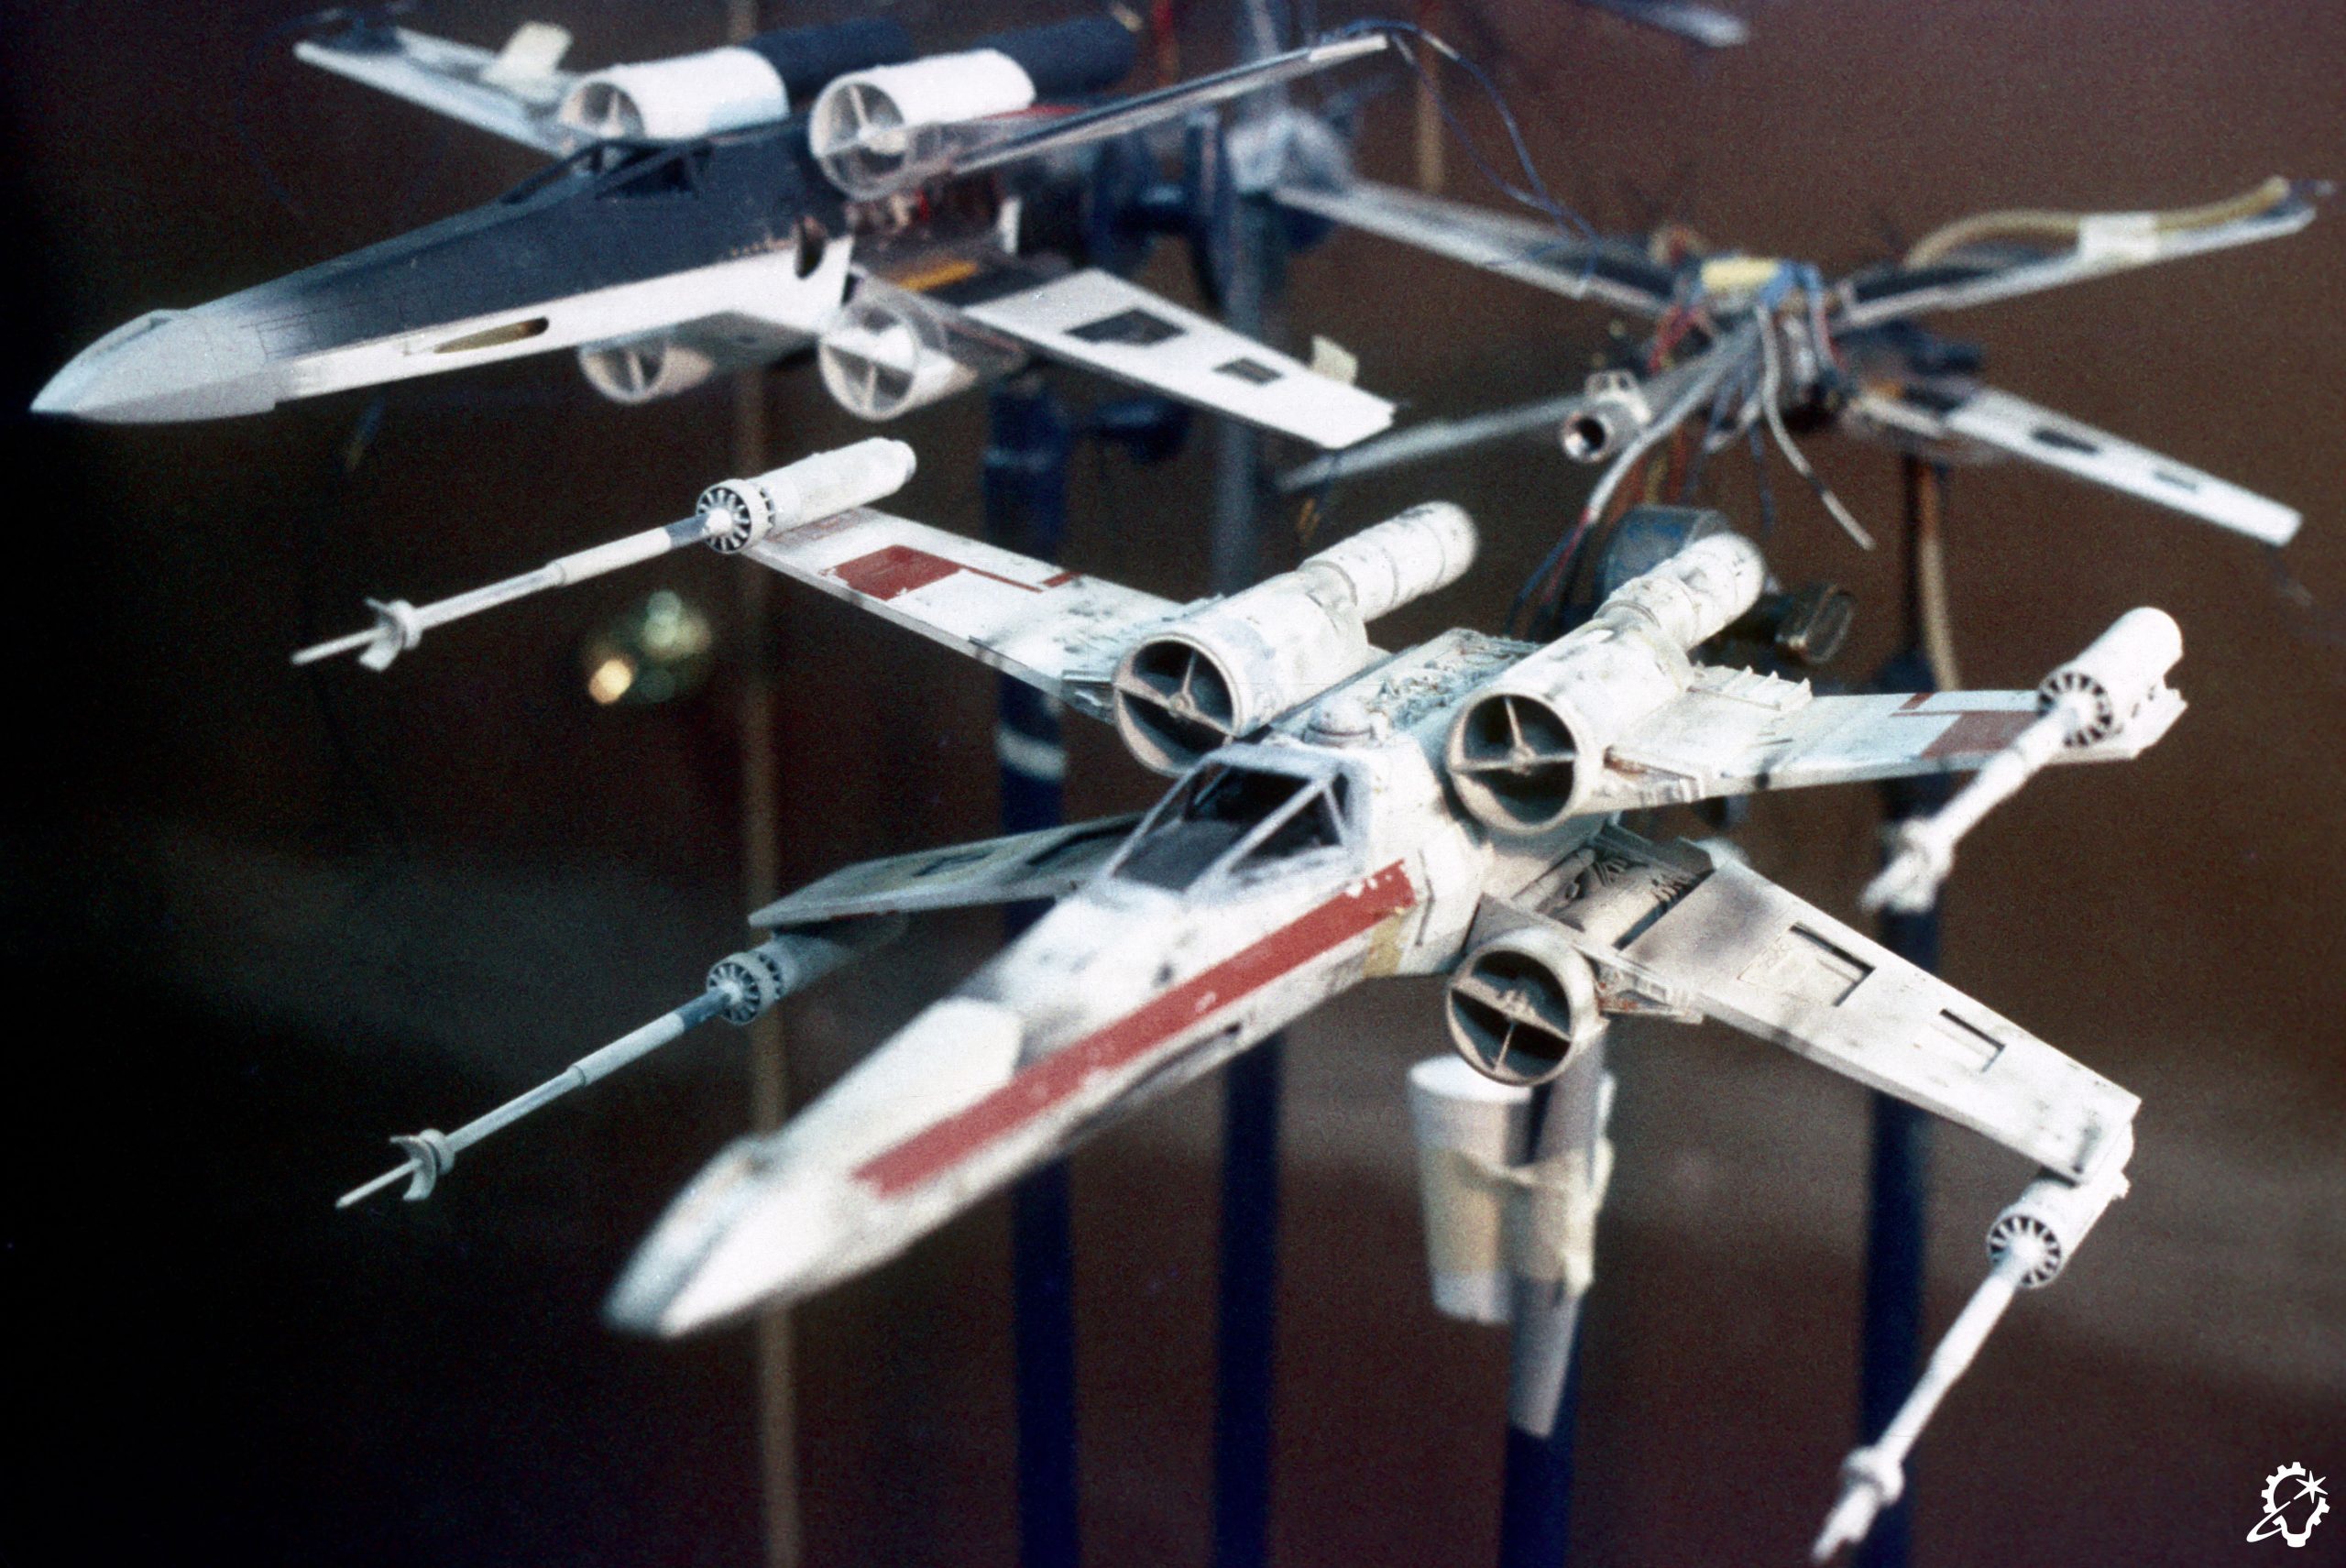
In December 1975, Lorne Peterson, Jon Erland, and Steve Gawley were working on wings and detailing three days before Christmas. Joe Johnston painted the model with Gawley. The model is Blue 1, the first X-wing ILM would build. It features a blue paint scheme instead of red, no cockpit or pilot figure, no droid, and no working electronics. But it is photographed in this state and shipped to production designer John Barry at Elstree Studios in England on December 26, to be used as reference for blueprinting and constructing the full-sized X-wing fighter set piece on a sound stage.
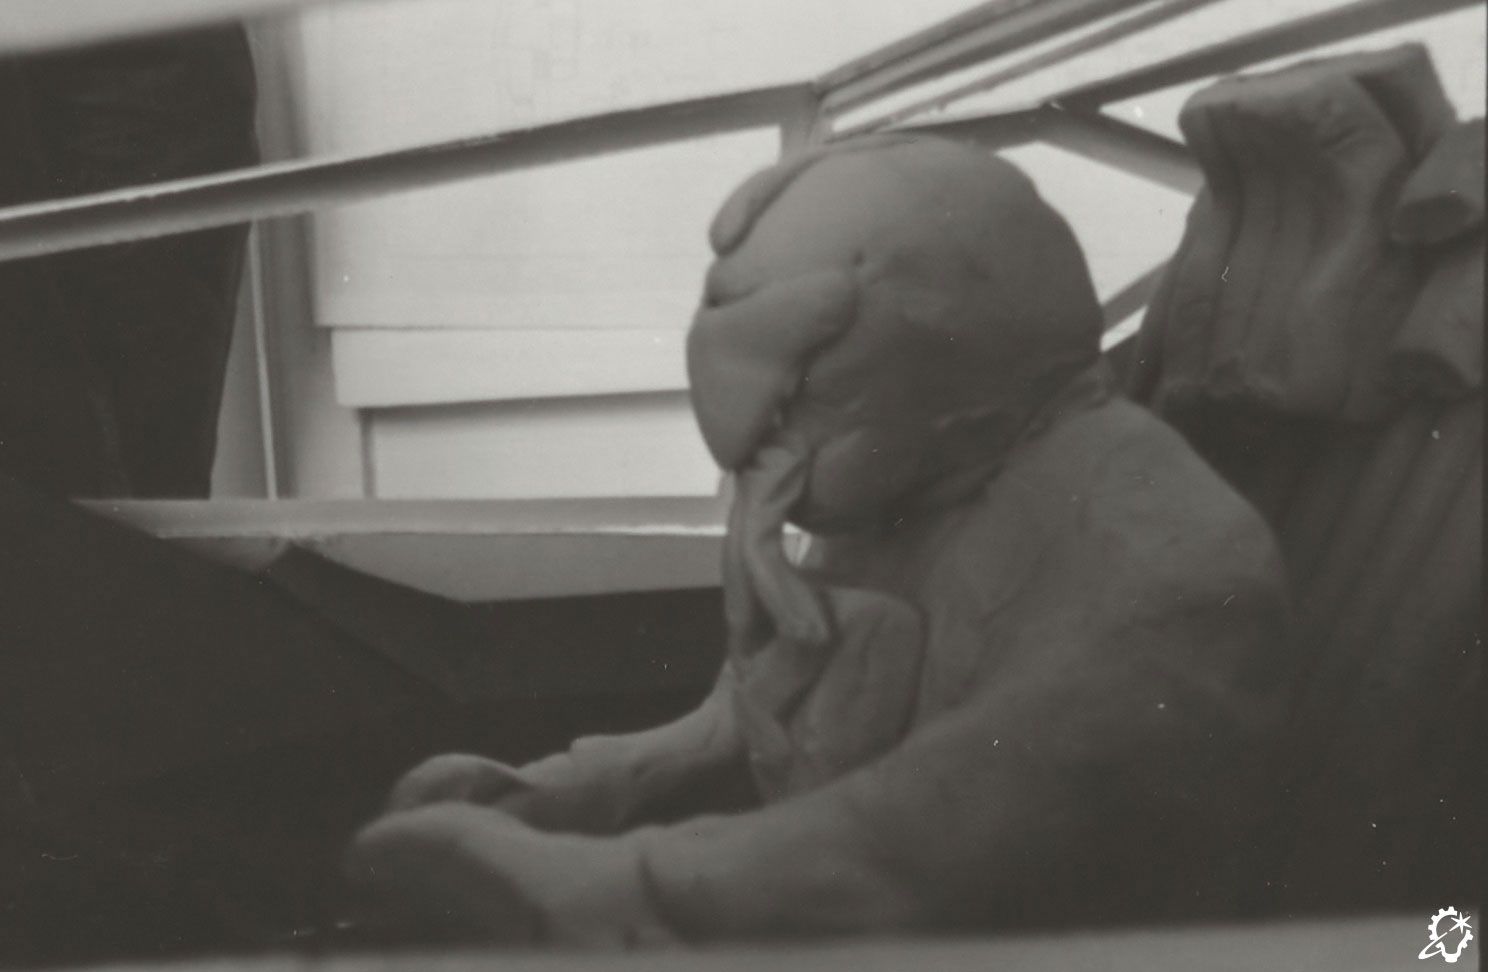
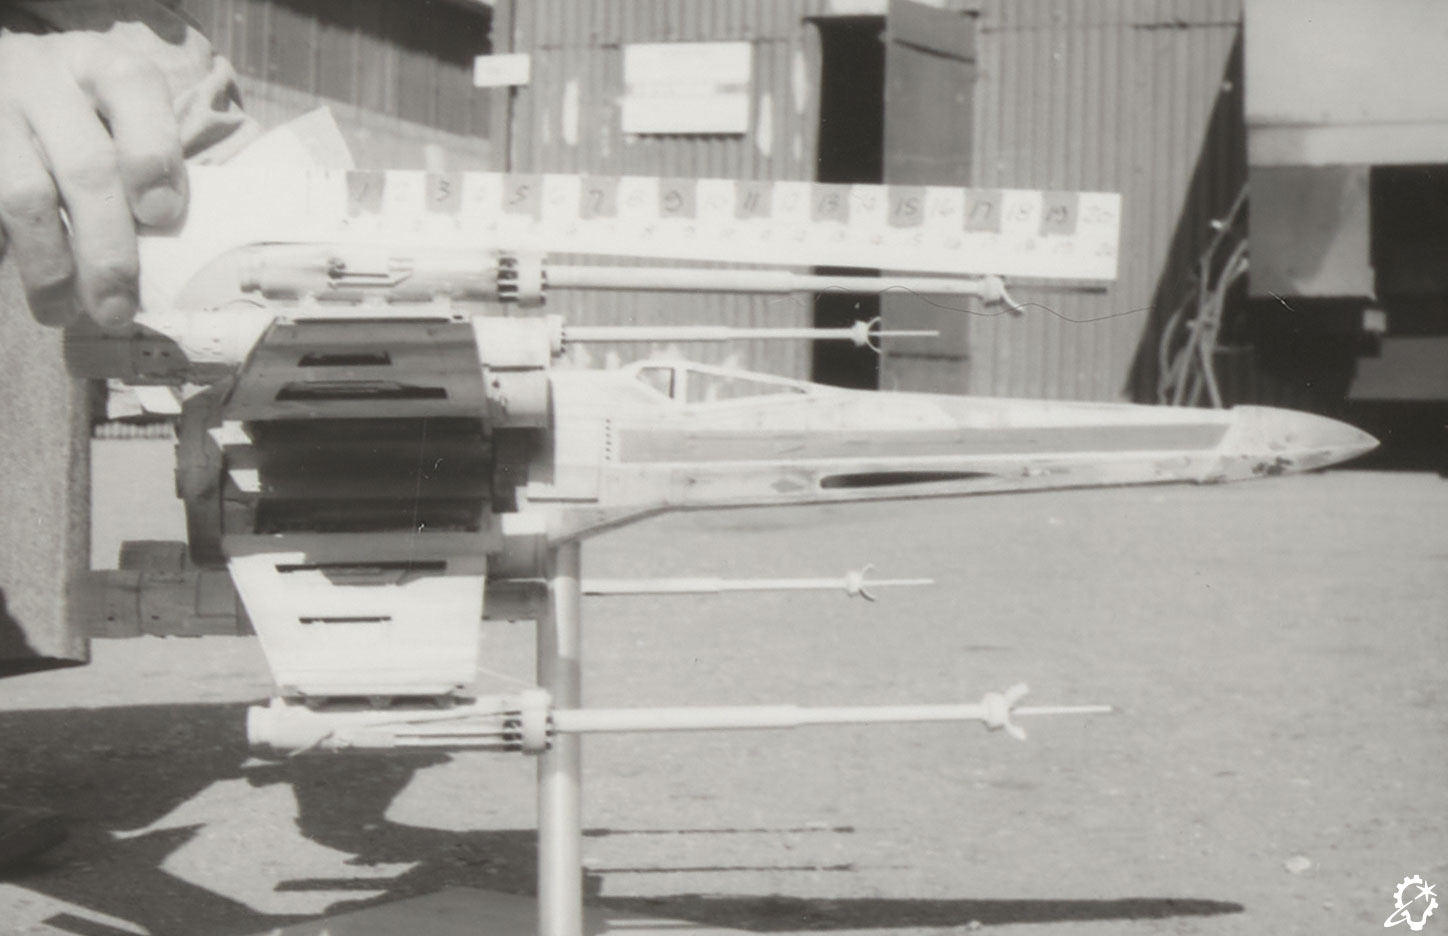

The images above appear to show Blue 1 and the Red Y-wing (also sent, in an incomplete state to England), along with a clay mock-up of a pilot and canopy/cockpit. This sequence of shots seems to show possible angles and focal lengths to inform the eventual build of the 1:1 cockpit sets that actors would be filmed in.
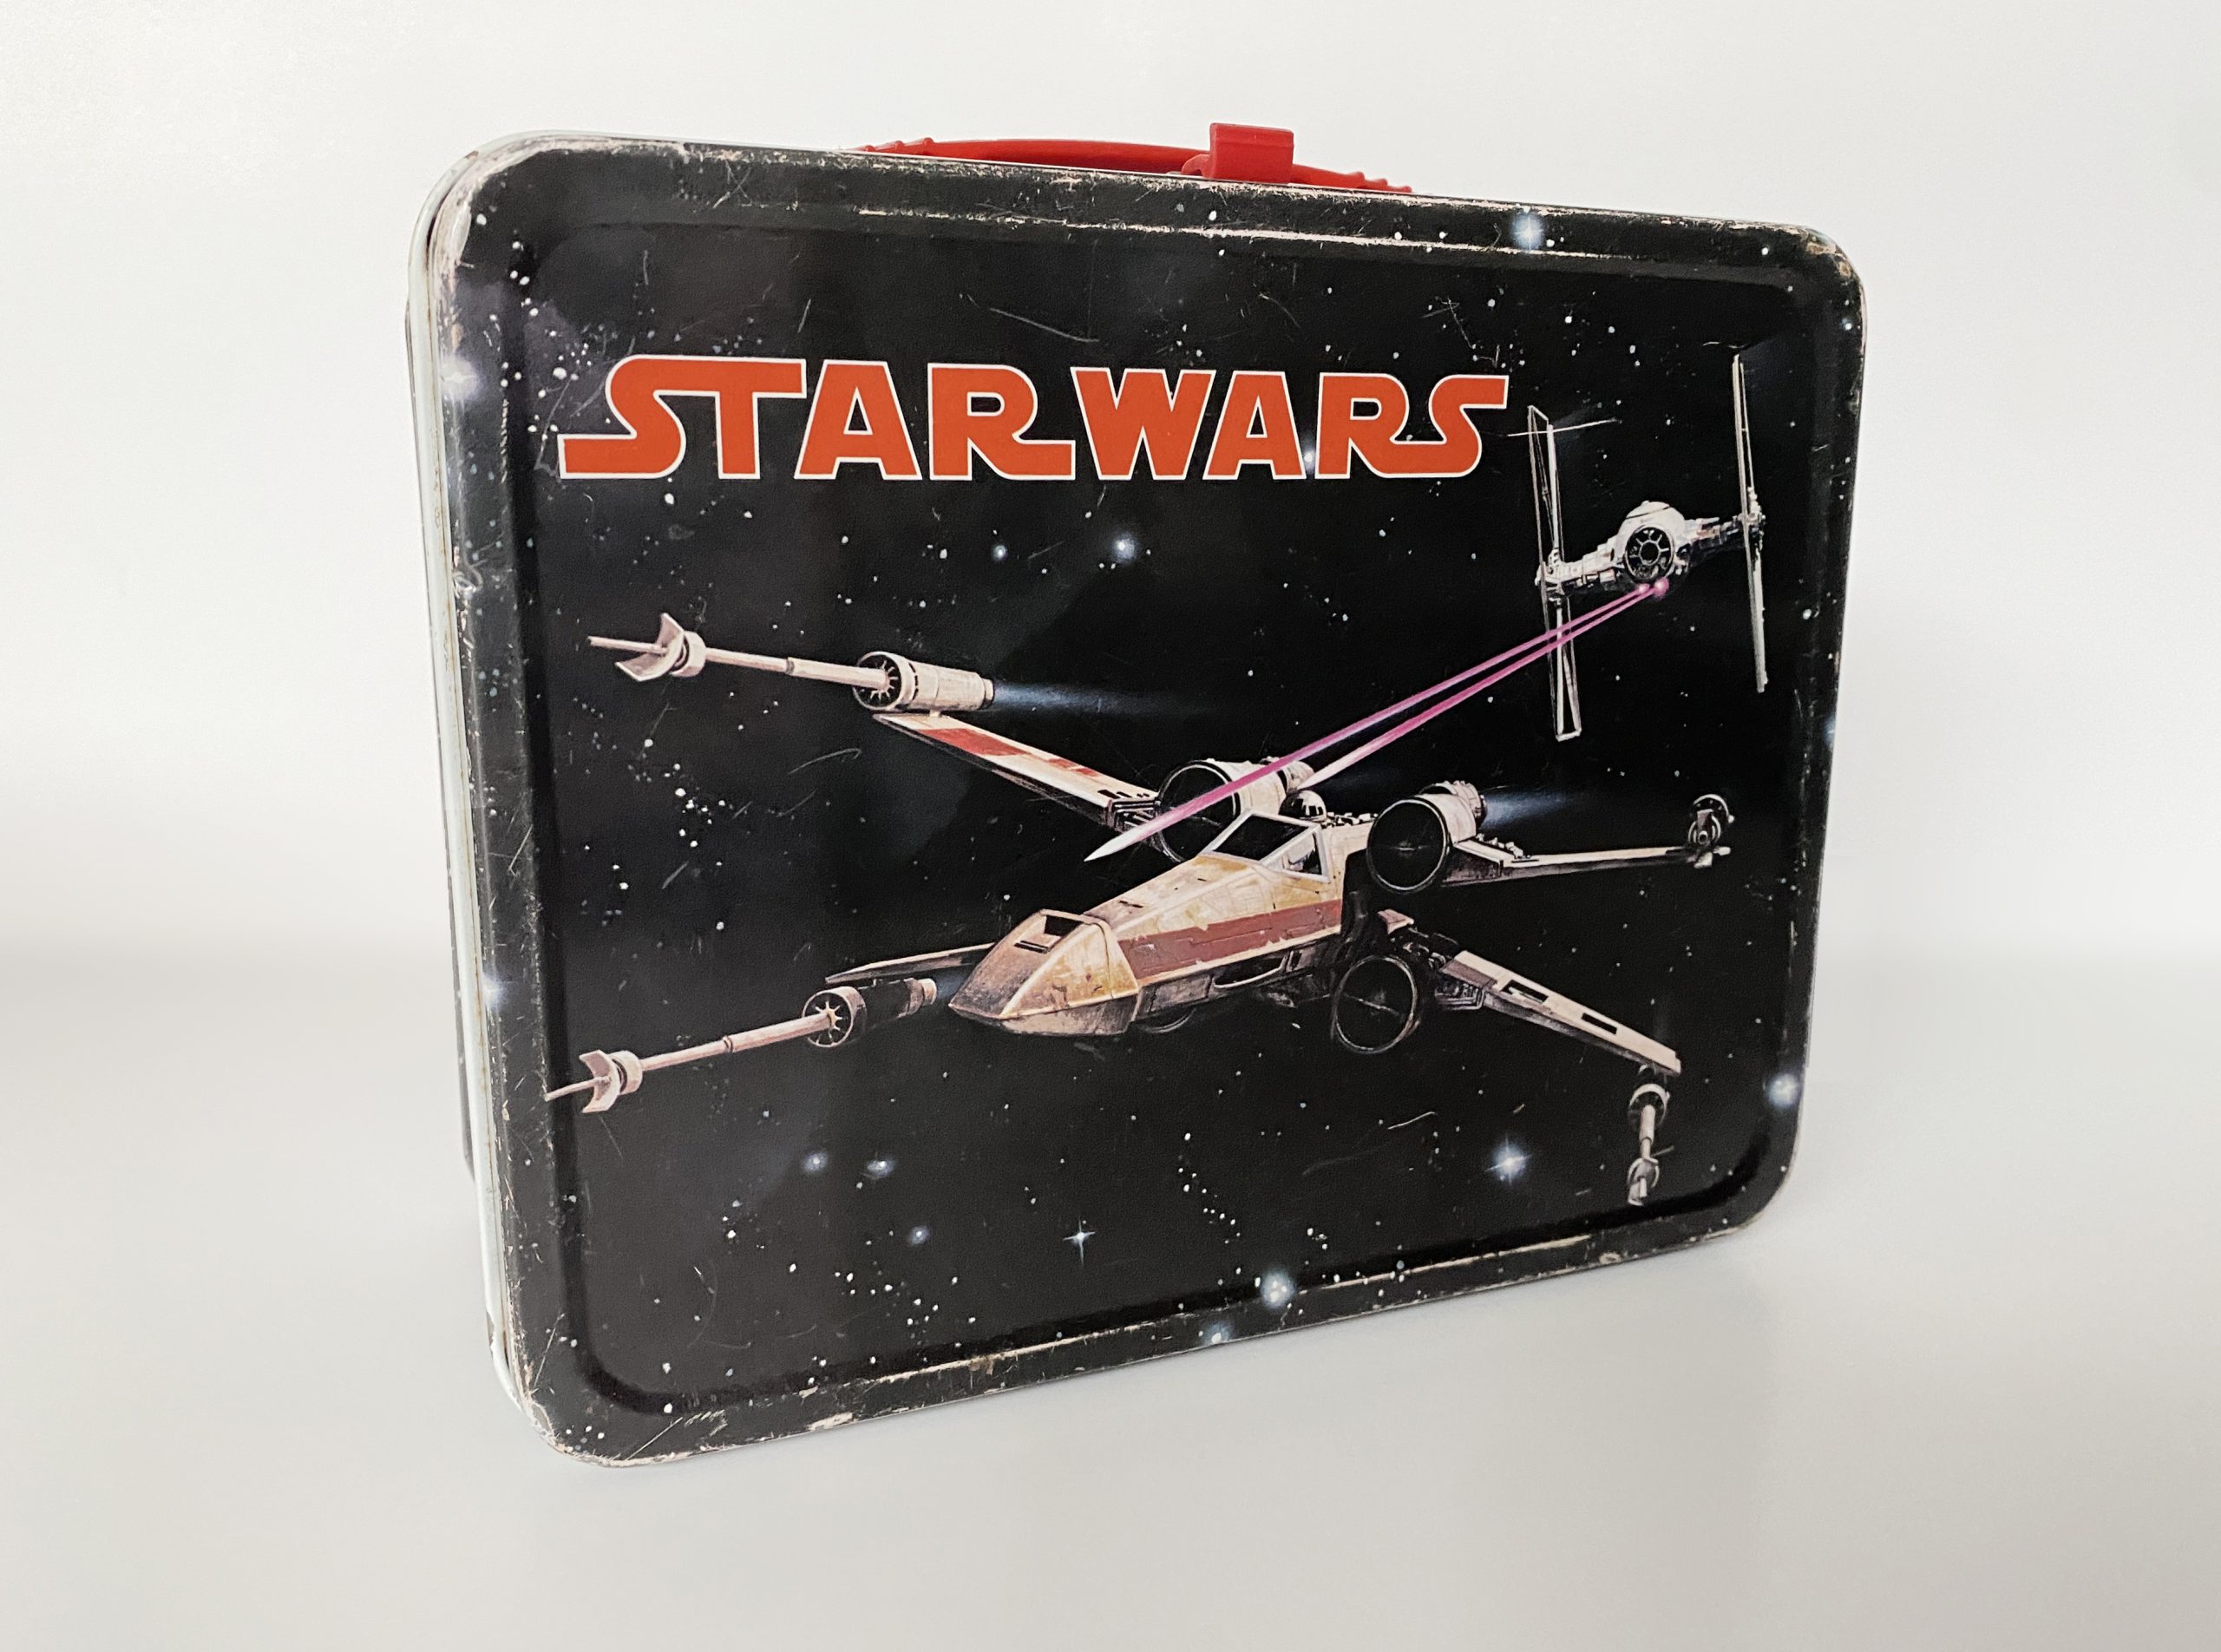
This model will be returned to ILM in the new year, and Grant McCune will finish the electrical plumbing. The model will be completed by breaking the canopy framing to allow a cockpit and a pilot to be inserted. The frame is somewhat restored with a styrene strip, and the model is redressed as the Red 2 Hero. This will go on to be the miniature that is photographed by Richard Edlund and composited with a TIE fighter behind it, featured on thousands of lunchboxes and promotional materials.
The “Hero” X-wing
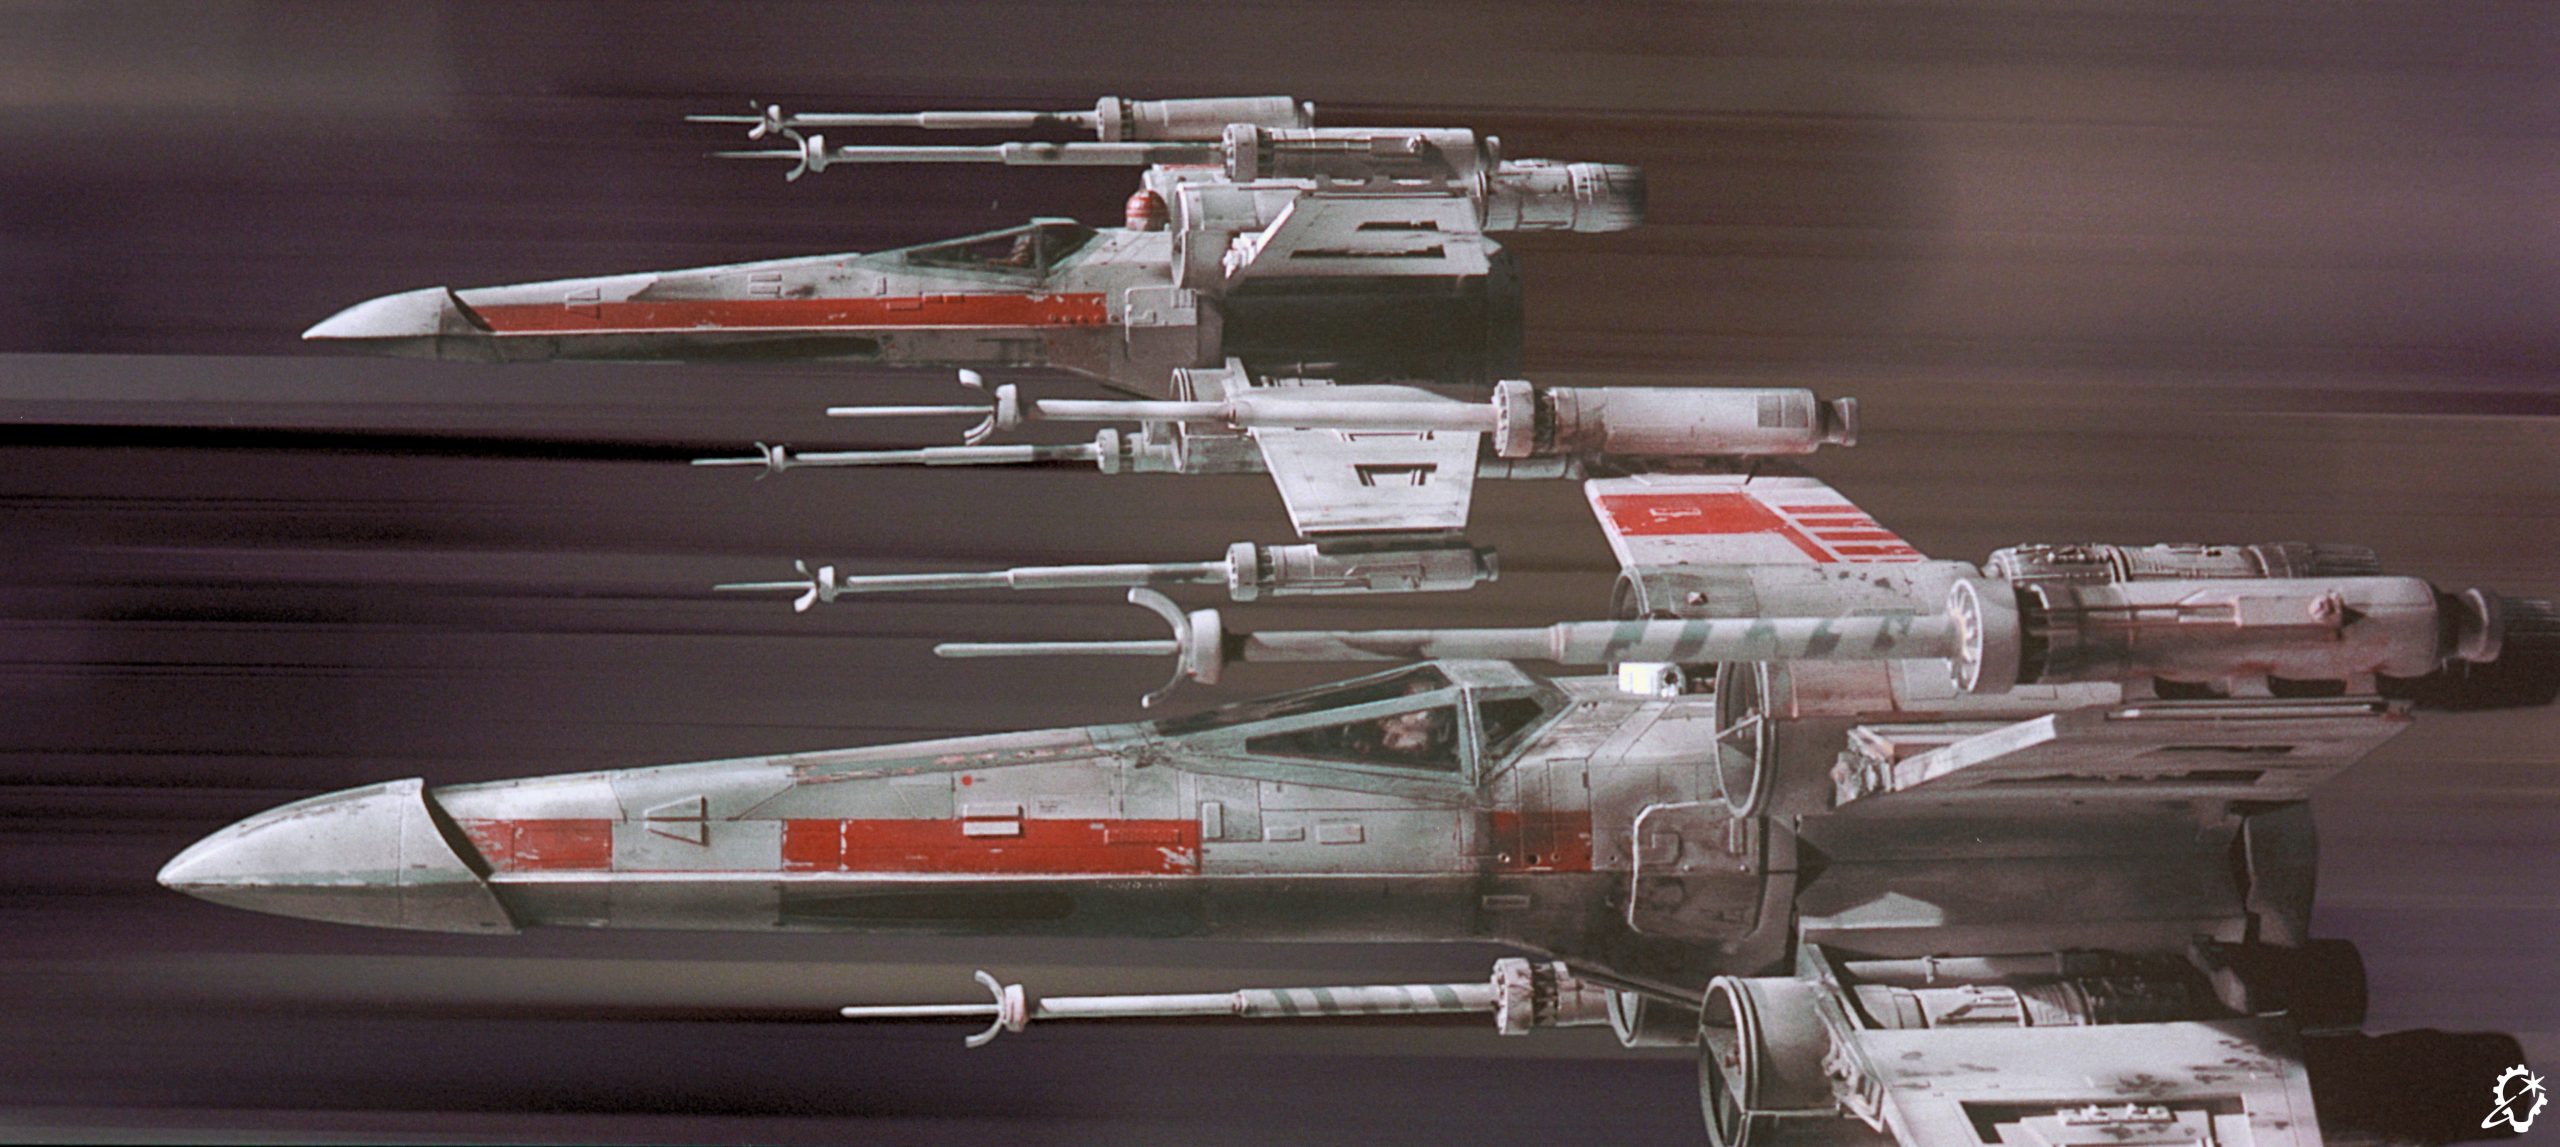
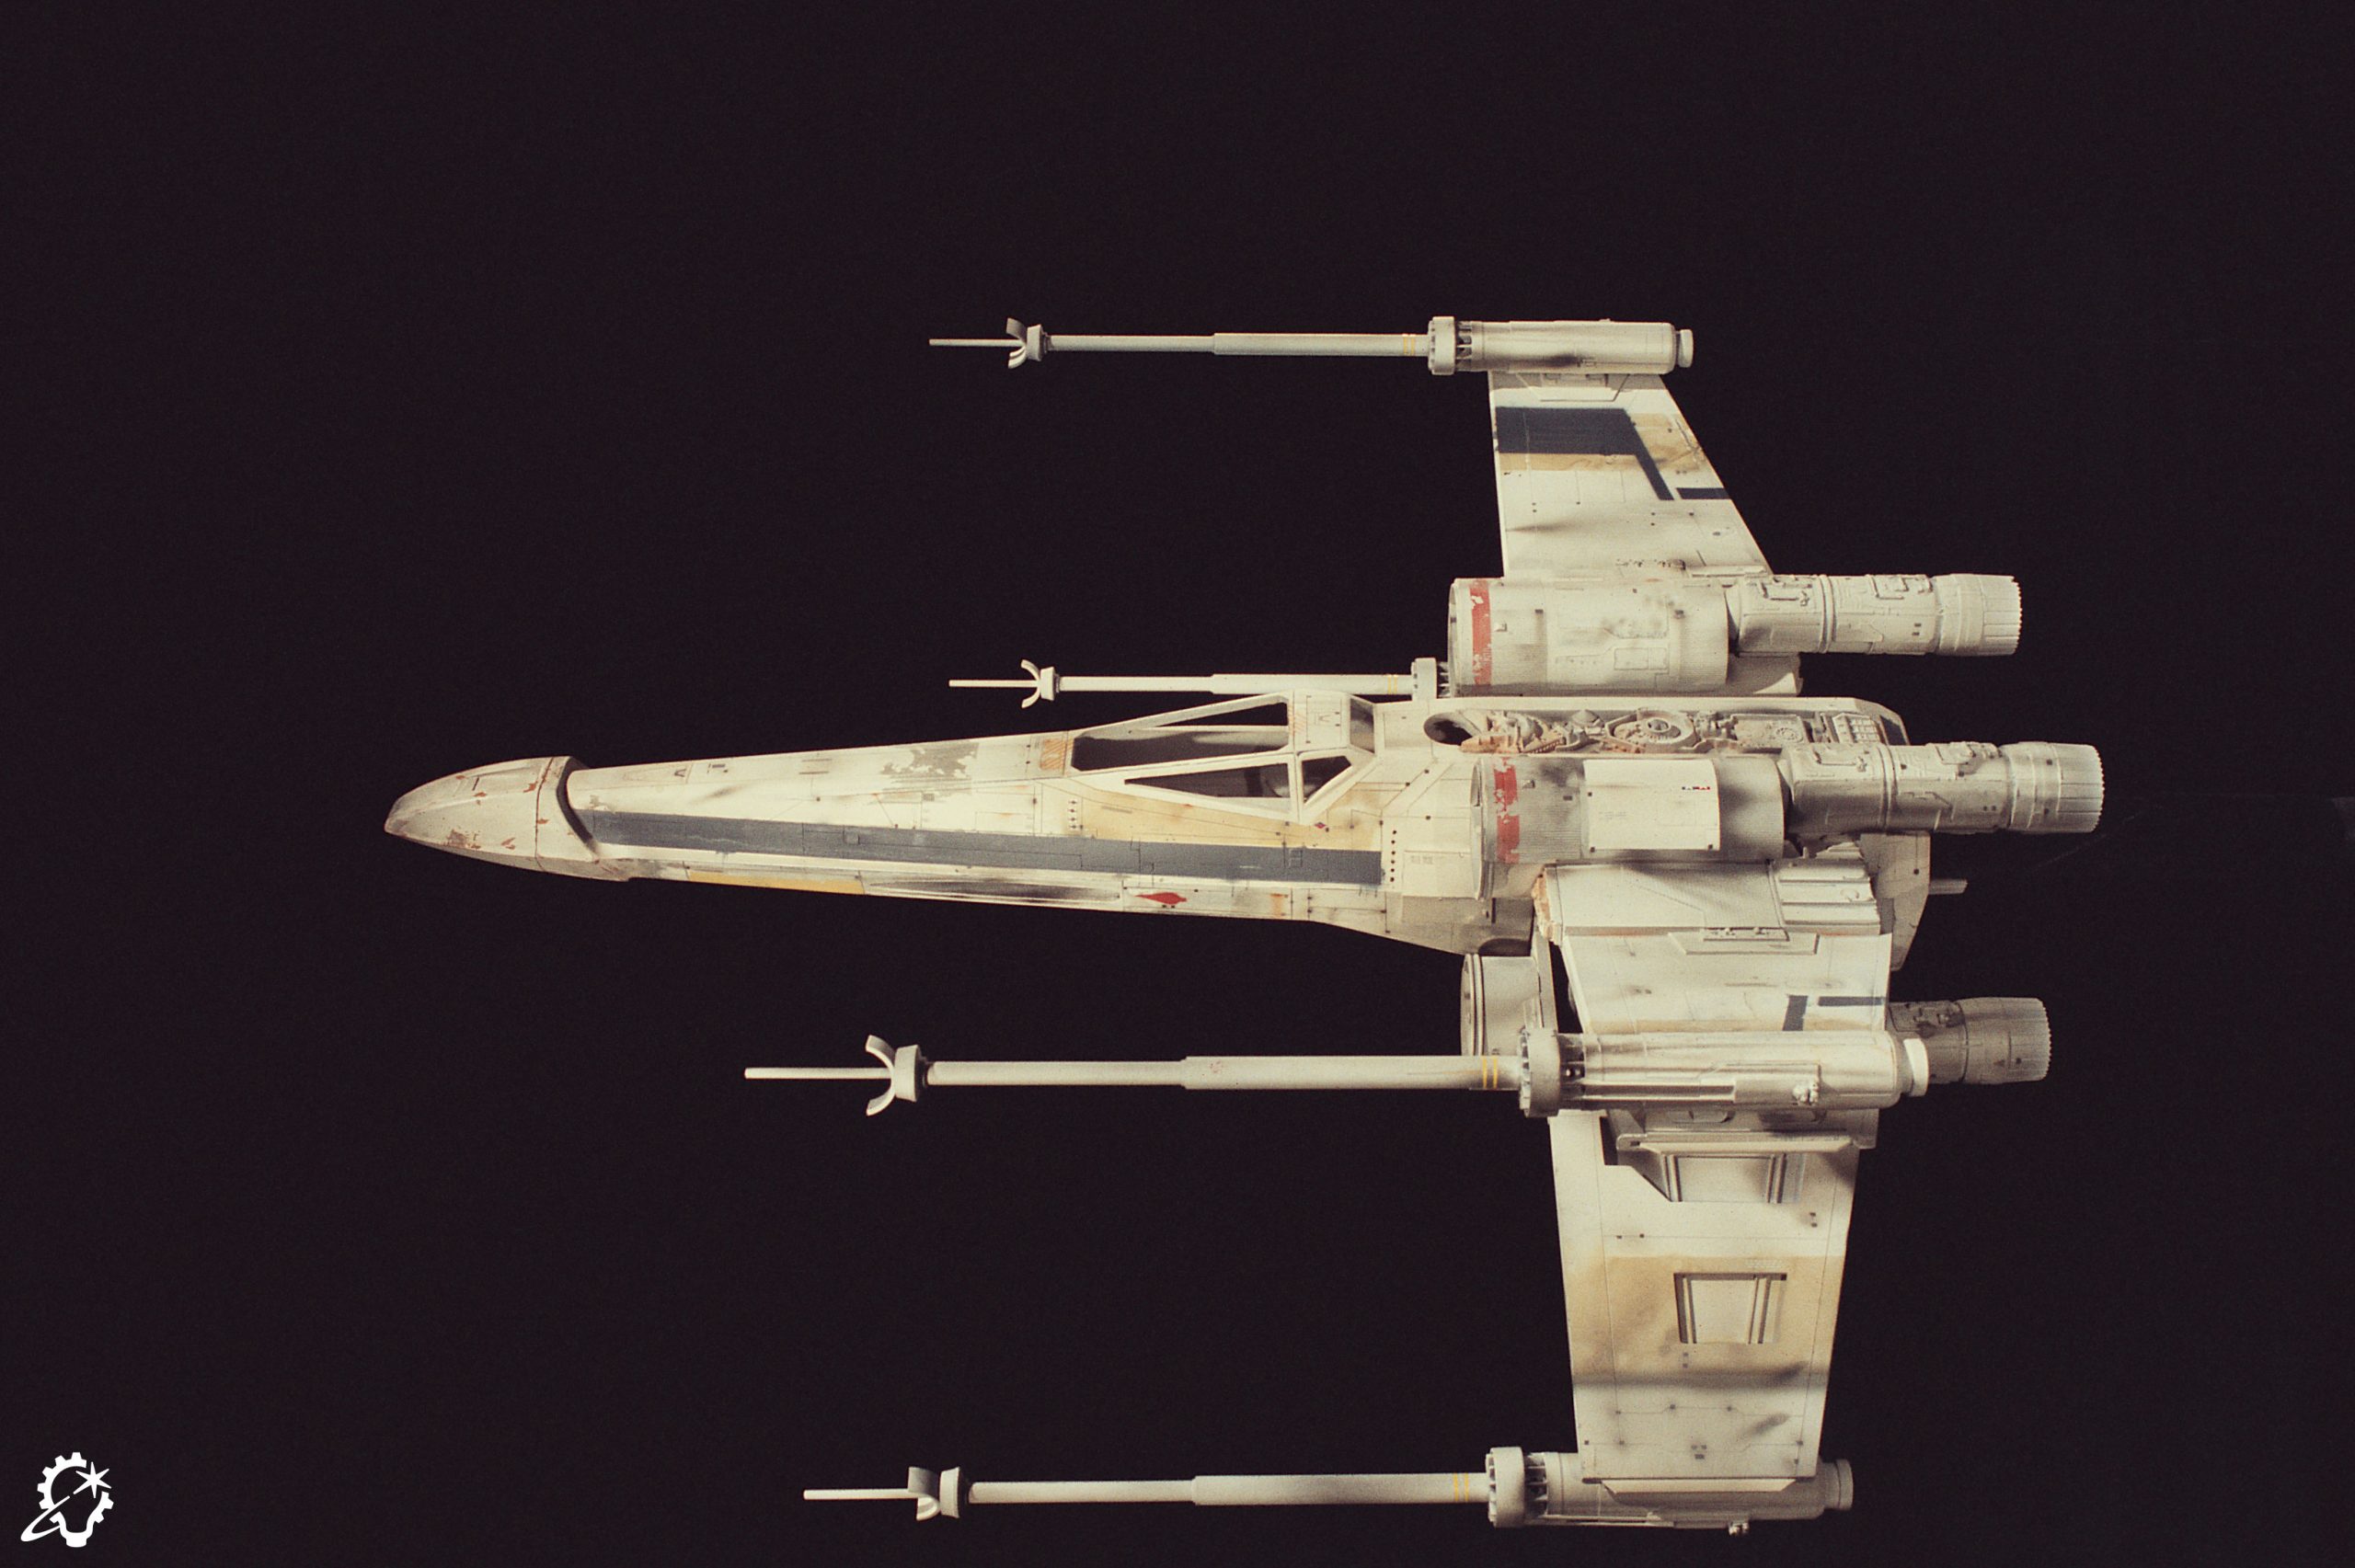
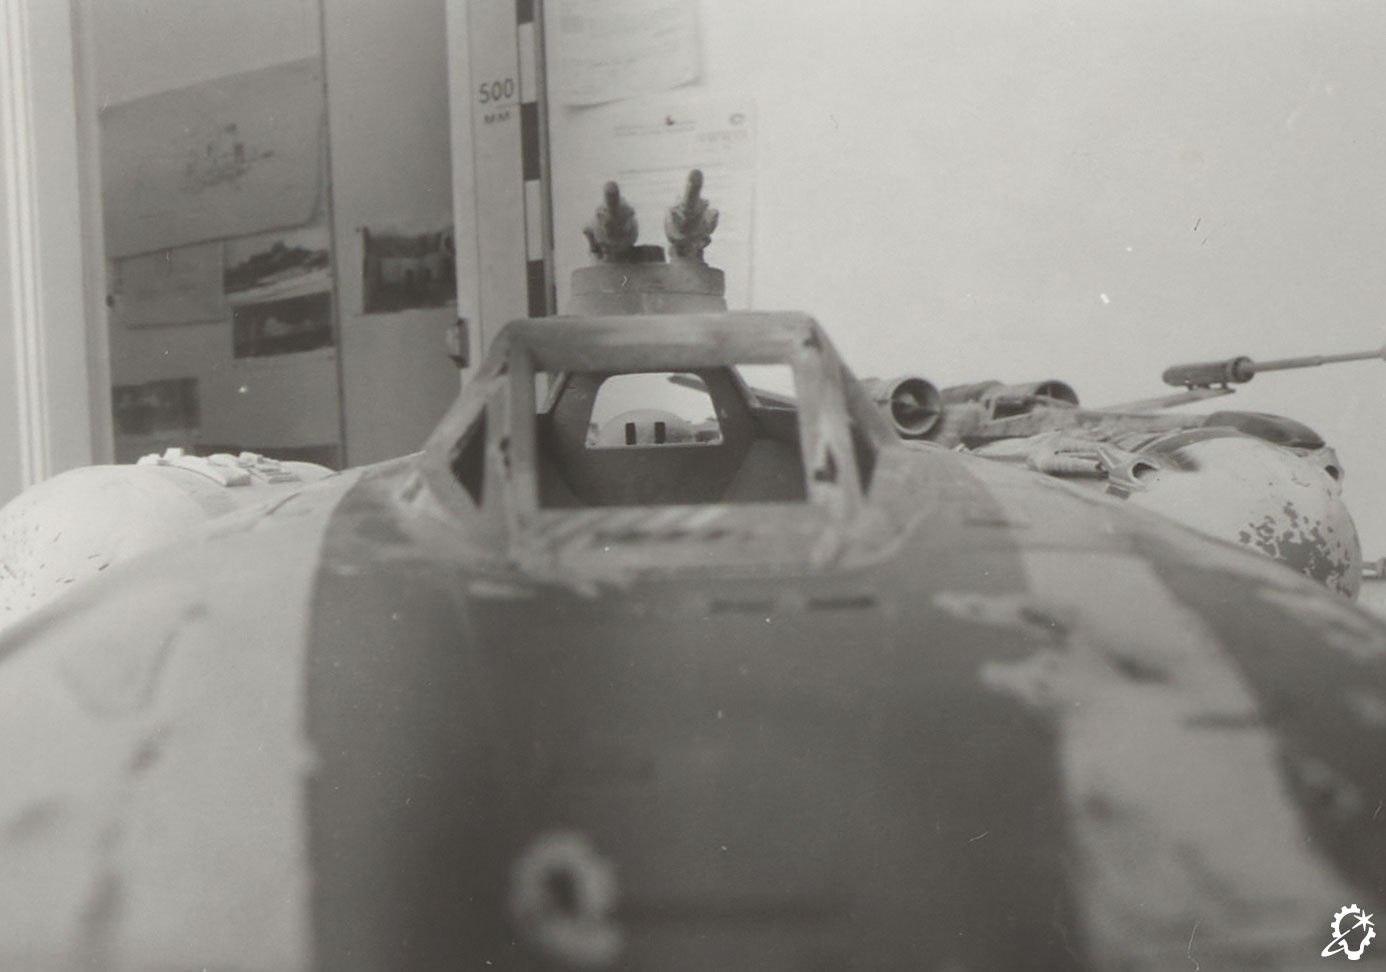
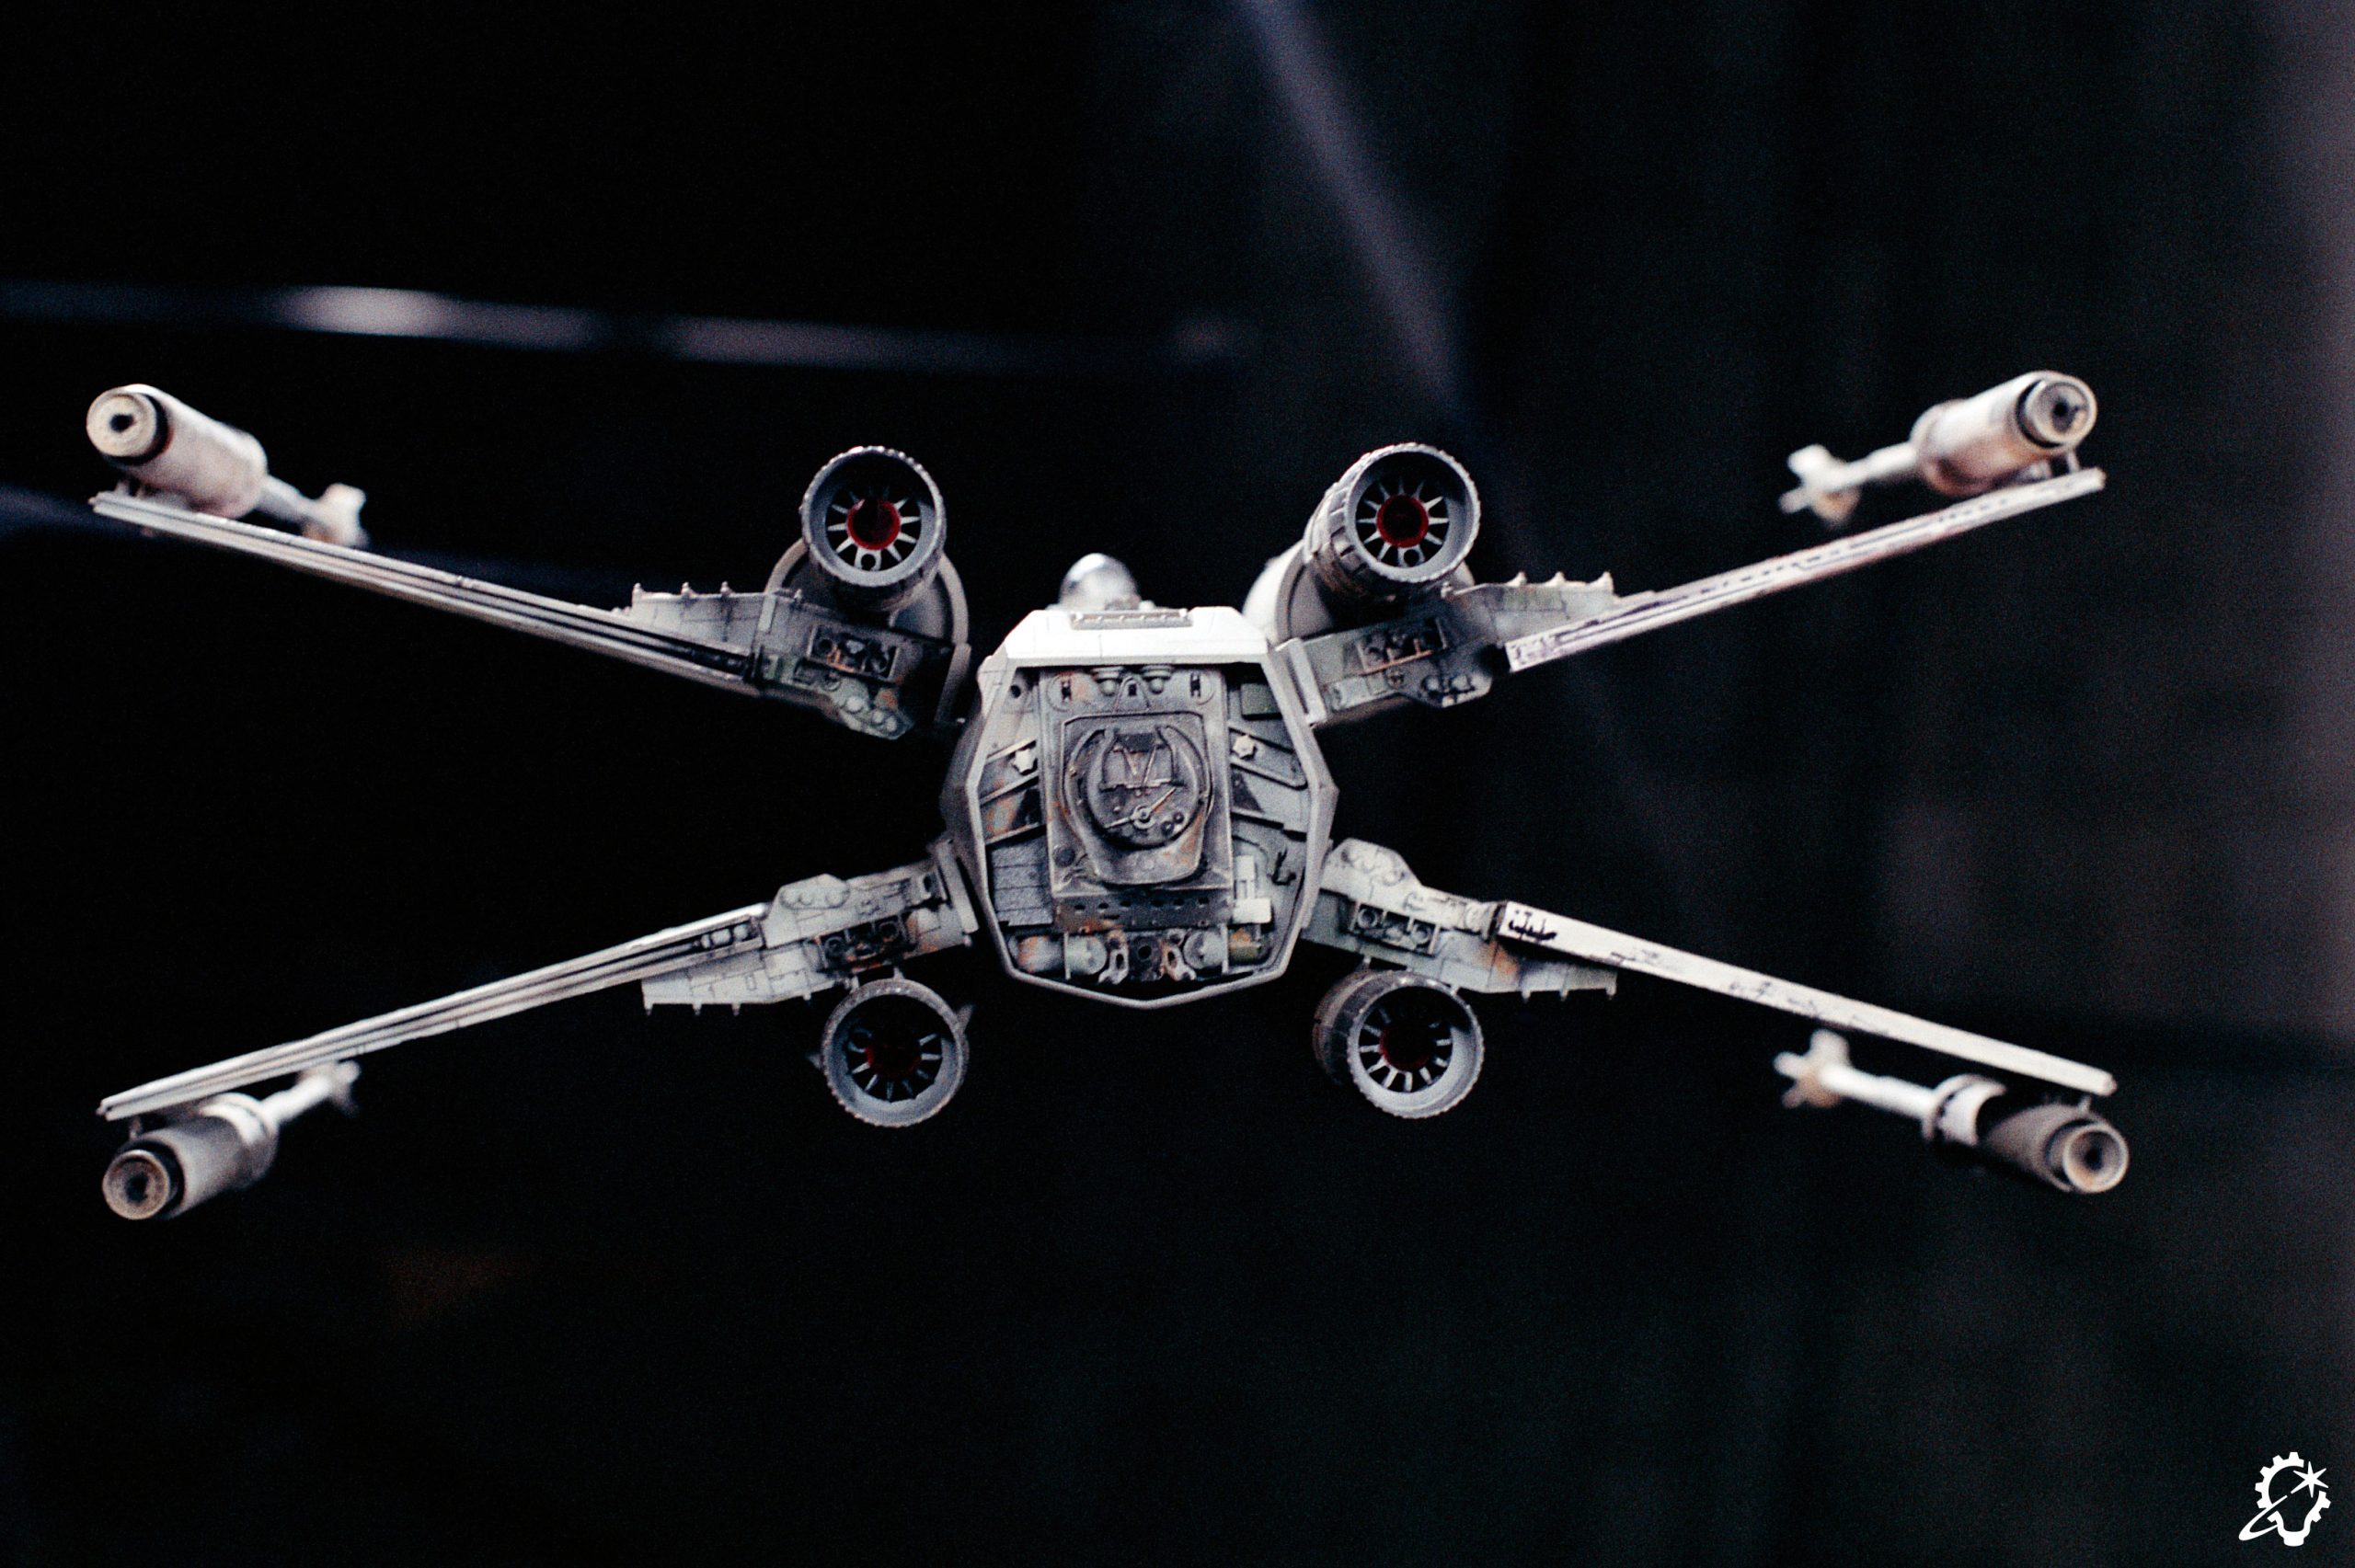
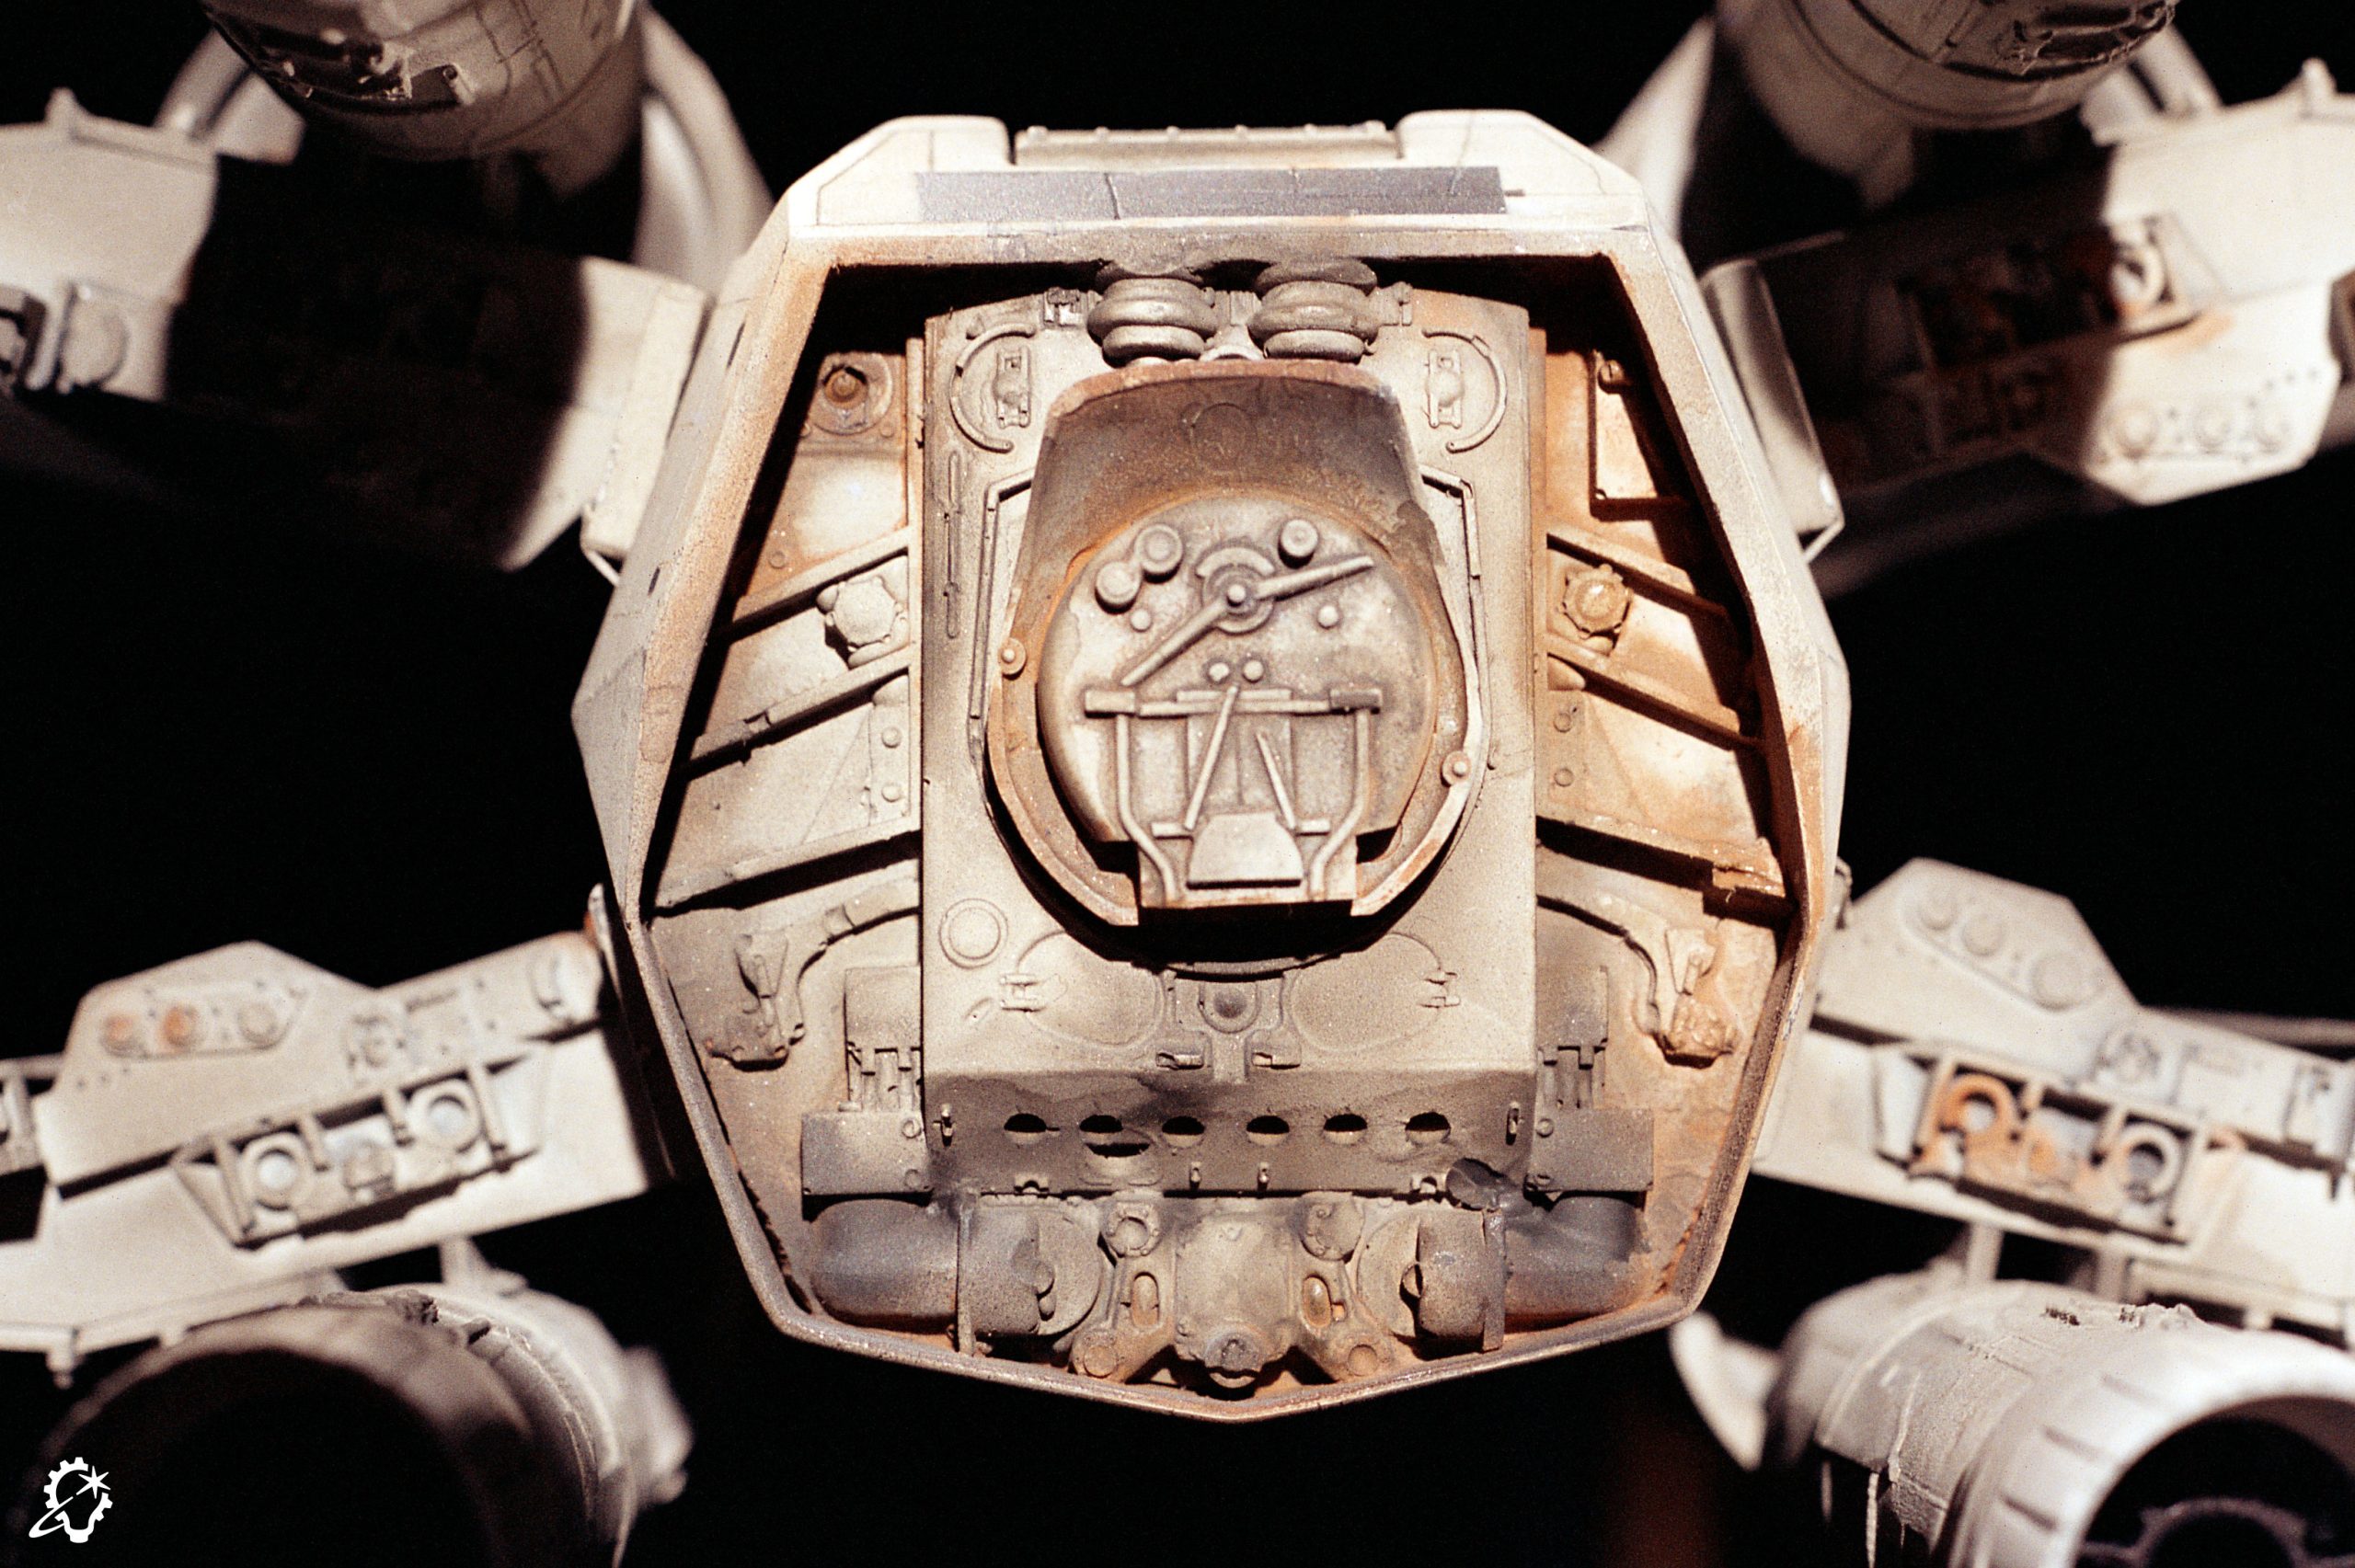
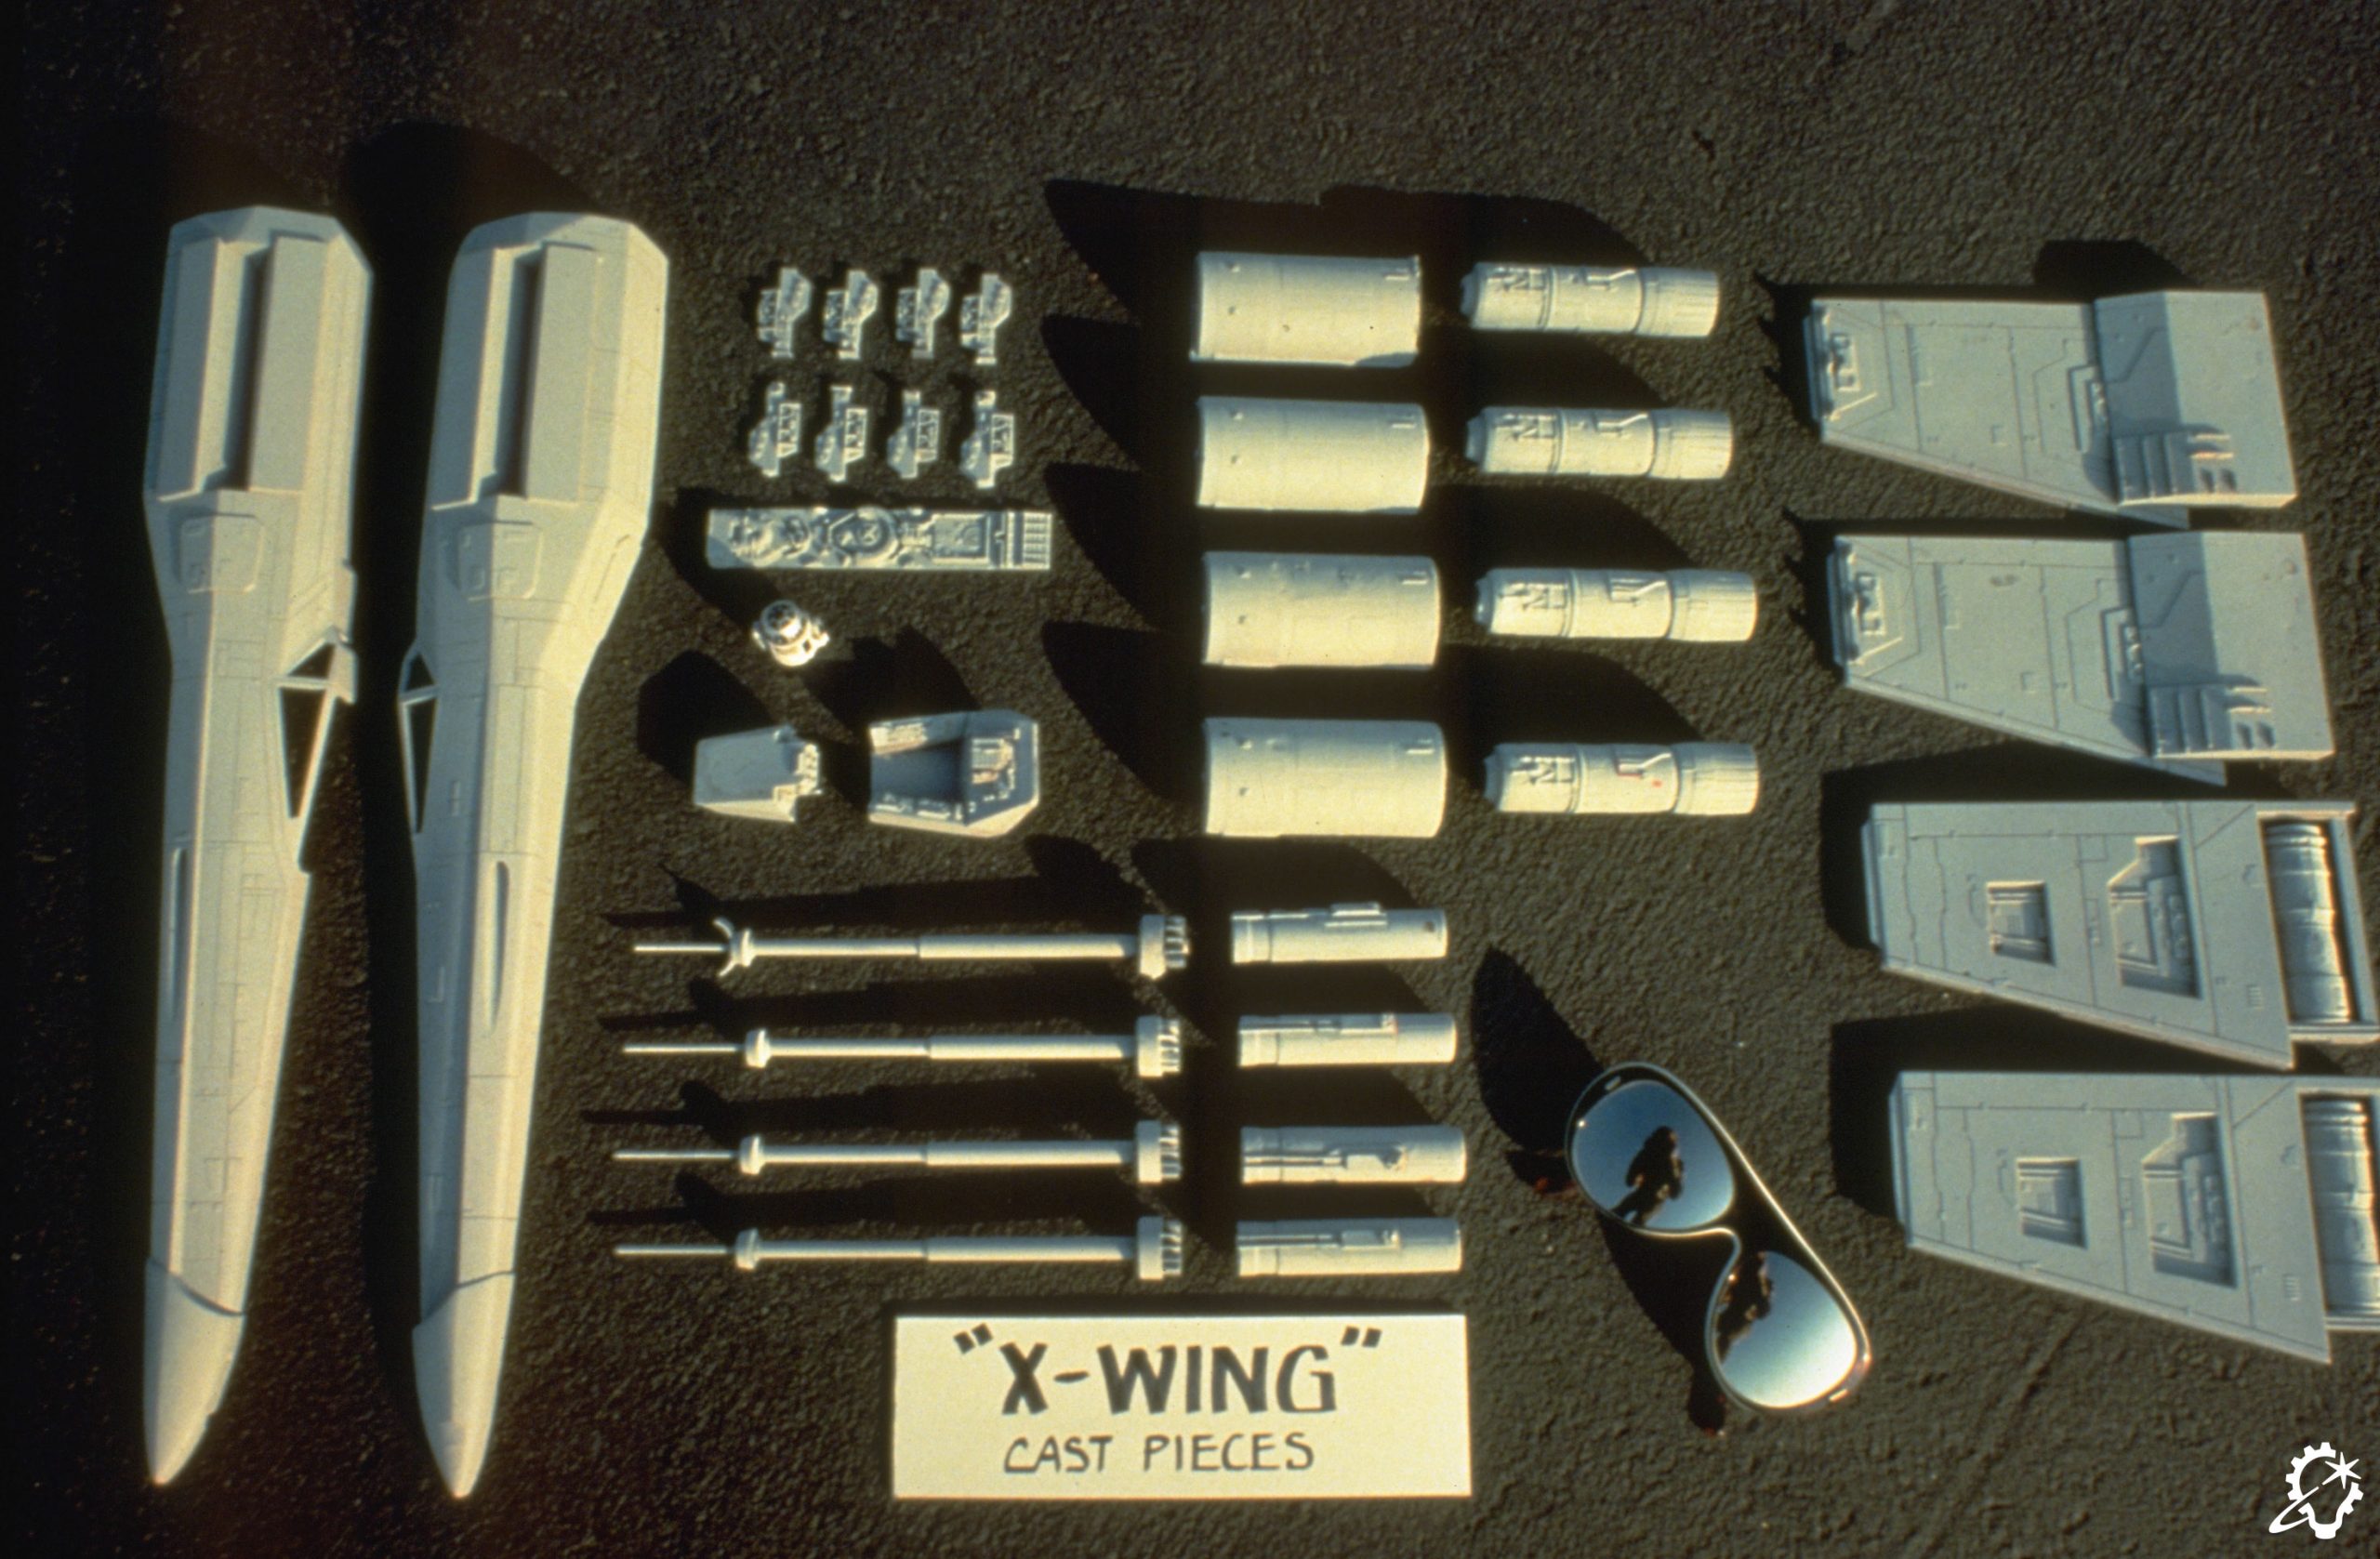
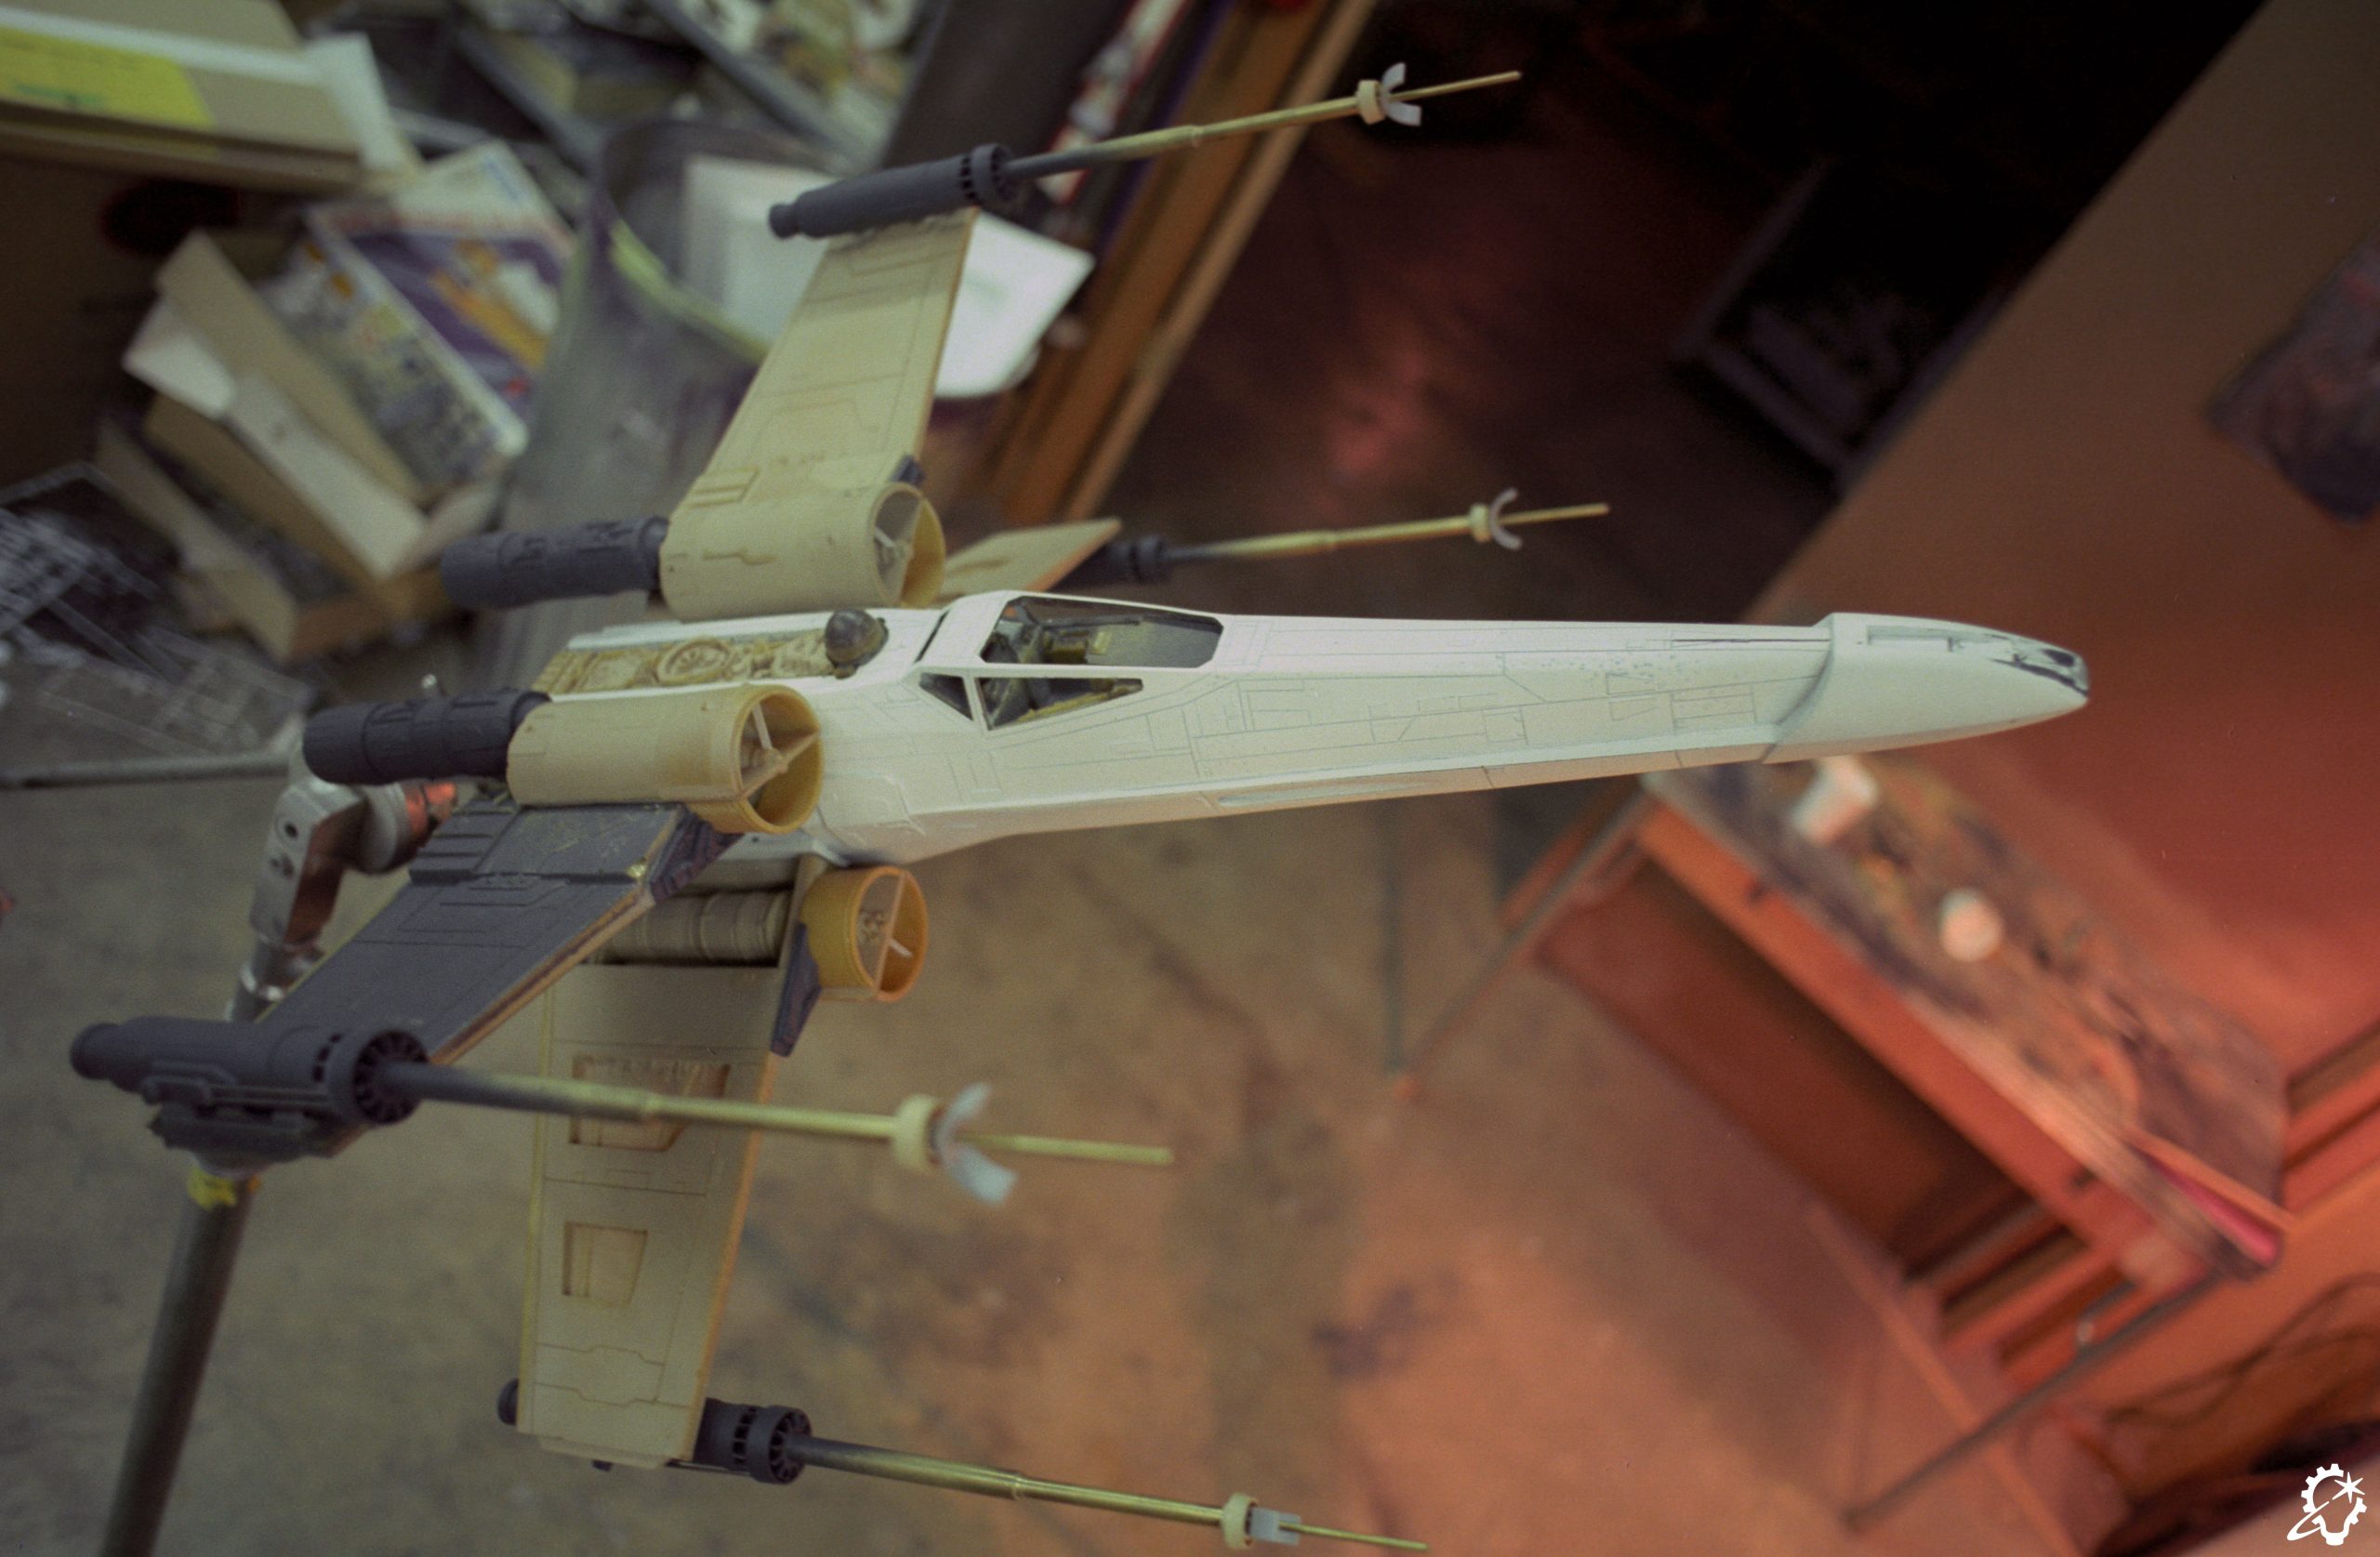
So what makes a Hero X-wing a “hero”? And what is a pyro? For the sake of clarity, let’s start by focusing on miniatures made for the first film. There were four Hero X-wings made, with a fifth unfinished example that appears to have stayed with the model shop through the production of the original trilogy. The four X-wings are painted to represent Red 1, Red 2 (formerly Blue 1), Red 3, and Red 5. Each fighter model is bespoke. Detail elements were patterned using styrene, acrylic, and various pieces from model kits, which were all then molded and cast, such as the rear butt plate, top “droid strip,” nose, droid, the two-piece cockpit, pilot, and elements of the laser cannons.
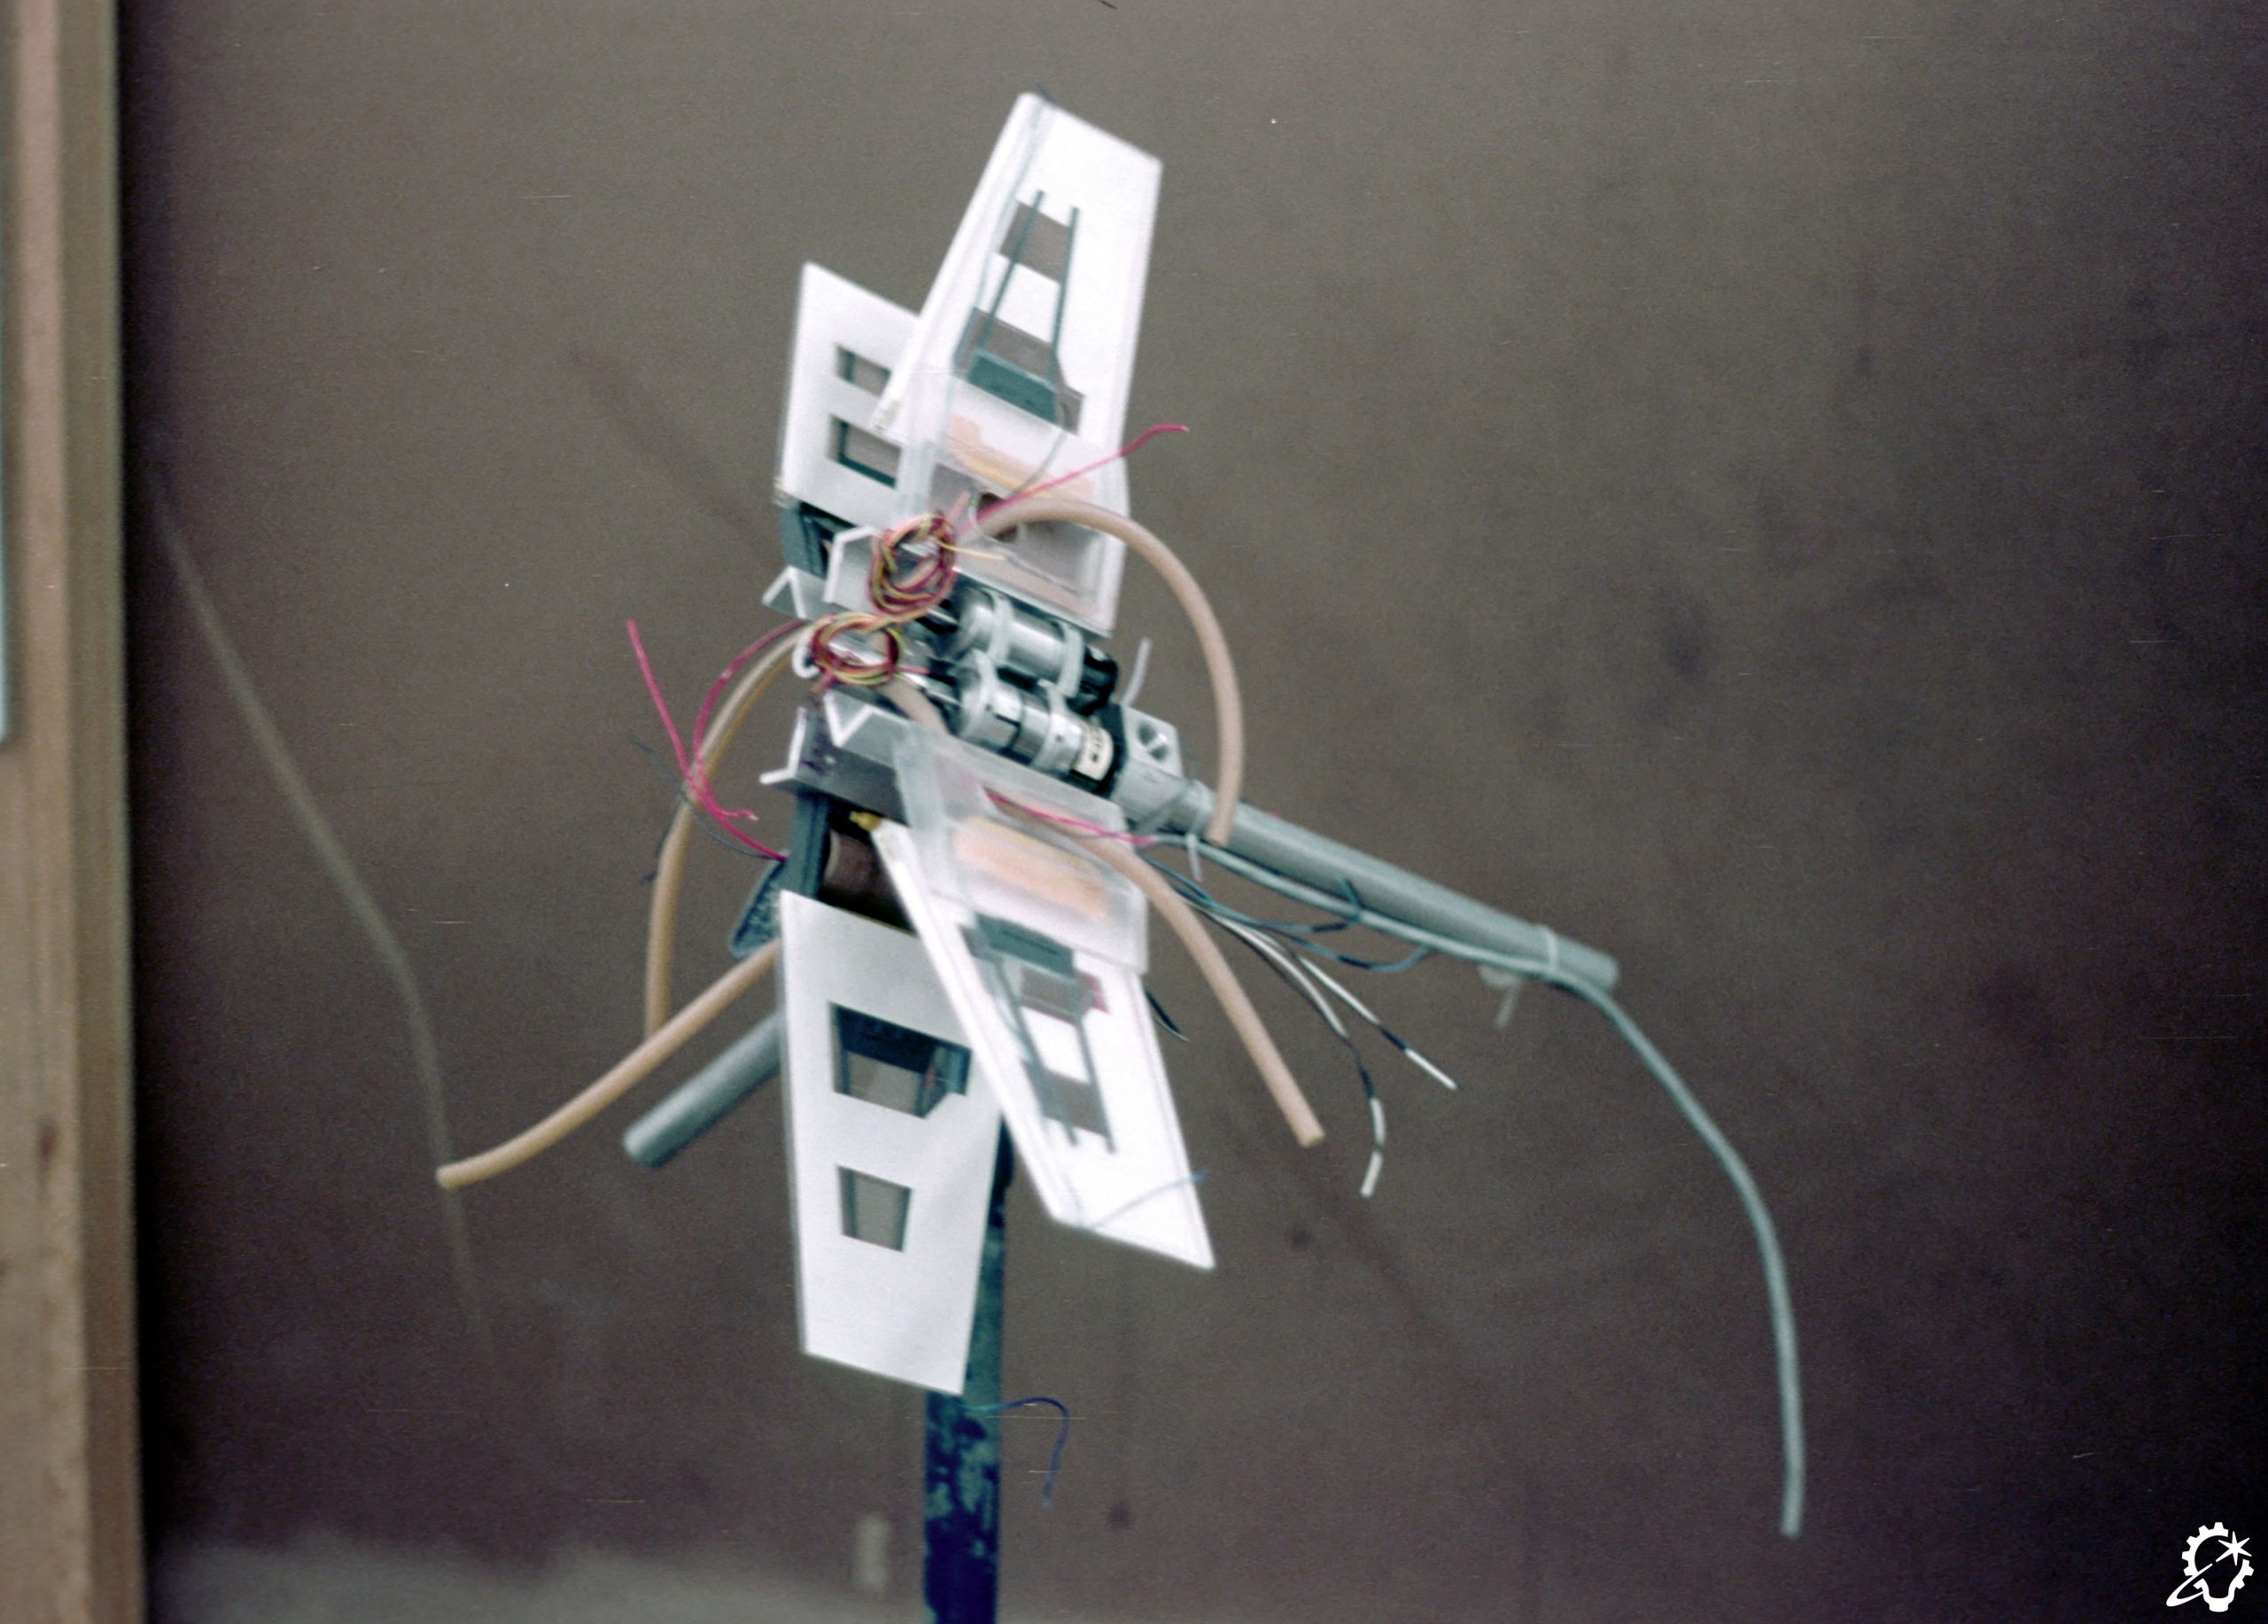
The armature was round metal stock, threaded at either end. This rod ran from nose to tail with the threaded holes providing the front and back mounts. Situated underneath the astromech droid is an octagonal-shaped block with threads on the top, sides, and bottom. Set screws are always present in one of these mounts, serving to anchor the octagonal block to the main armature rod. Behind this block sits the “scissor” mechanism for the wings, which consists of brackets that hold two motors in place along the underside, with the brackets ending with “L” shaped metal that serves as the main surface to affix the wings.
The motors each have a toothed gear that sits against a larger brass central gear parallel to the octagonal mount, and it appears that the motors, when engaged, would “crawl” along the surface of the central gear (which did not move) and this would open or close the scissor mechanism. At some point, someone added screws to the wing mounts with a rubber band stretched between them, which aided in the wings’ opening. It appears that the motors may have been underpowered to pull the wings open reliably or smoothly. Dennis Muren recalls that the motors worked smoothly when he filmed the models on stage, and agreed that the rubber band would have provided tension in the mechanism.
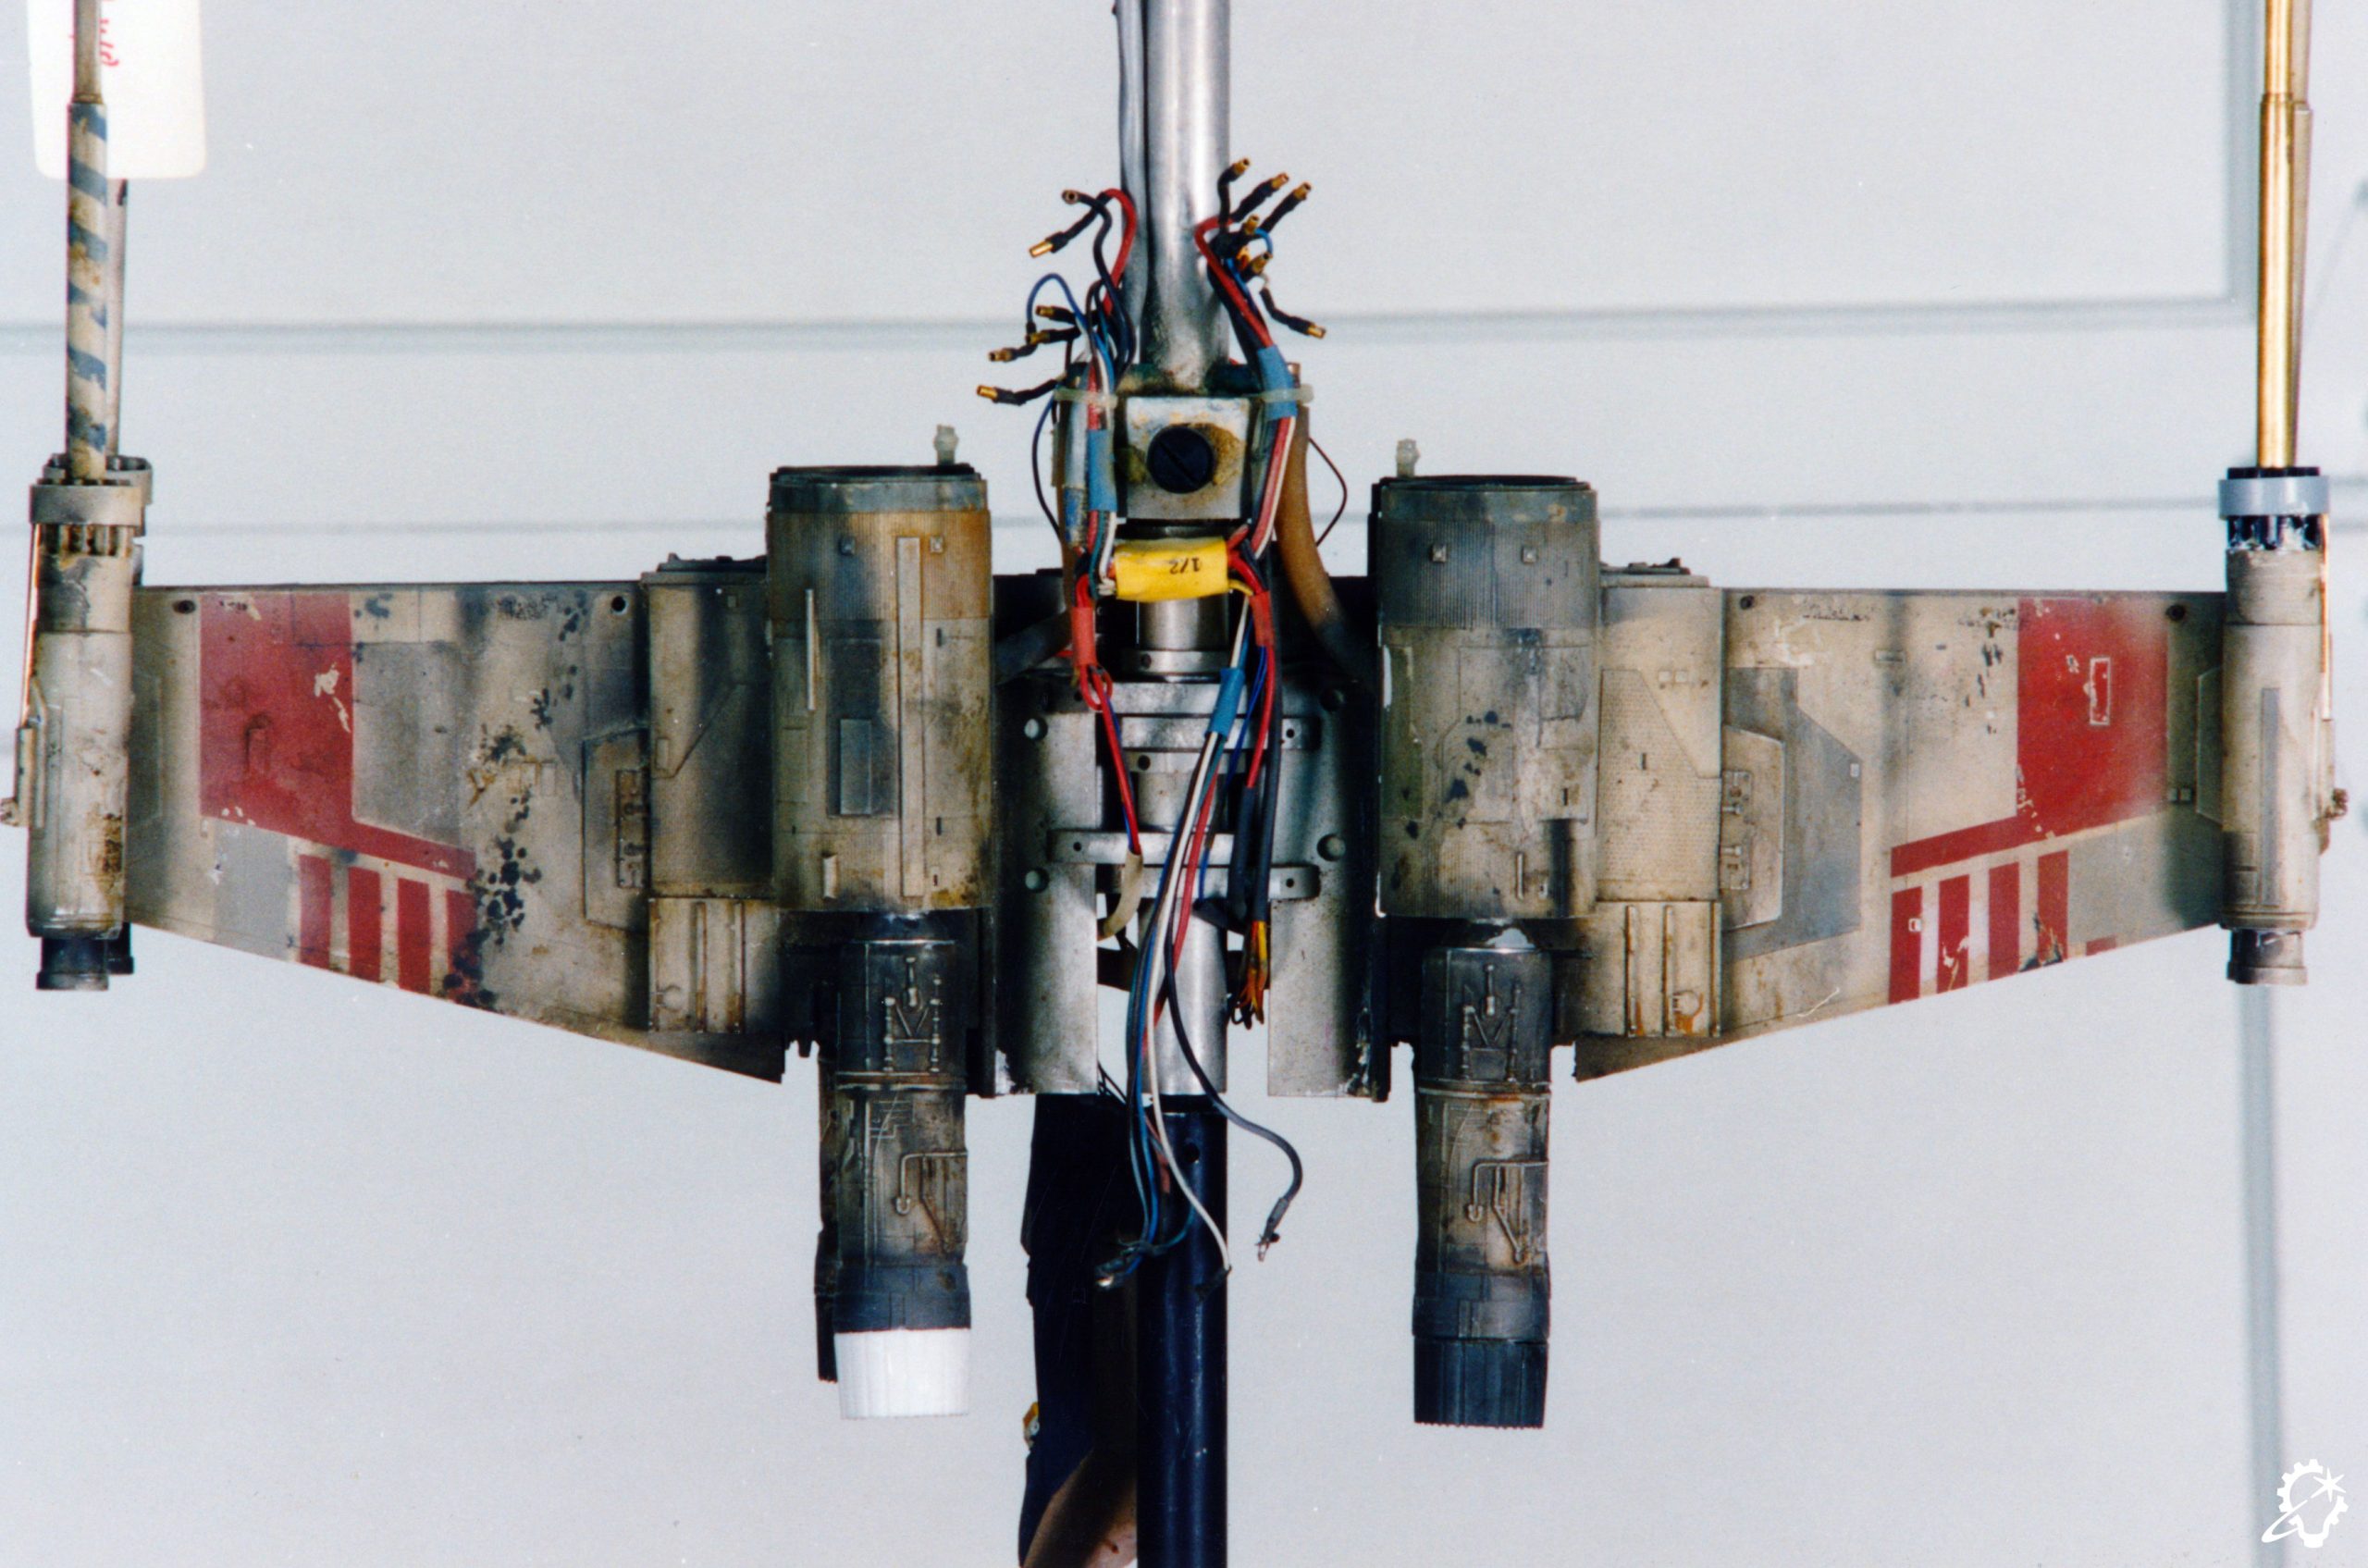
Plumbing made from surgical tubing was used to distribute cool air to the hot lights used at the time, and an electrical wiring loom was also created. Four sets of six wires were positioned at mount points – front, back, port, and starboard. These wires were capped with brass female pin plugs, and are very visible along the sides of the miniatures just aft of the canopy, and on the underside of the Sherman tank detail on the butt plate. These wires would provide power to the motors and the lighting to the four bulbs inside the engines at the exhaust.
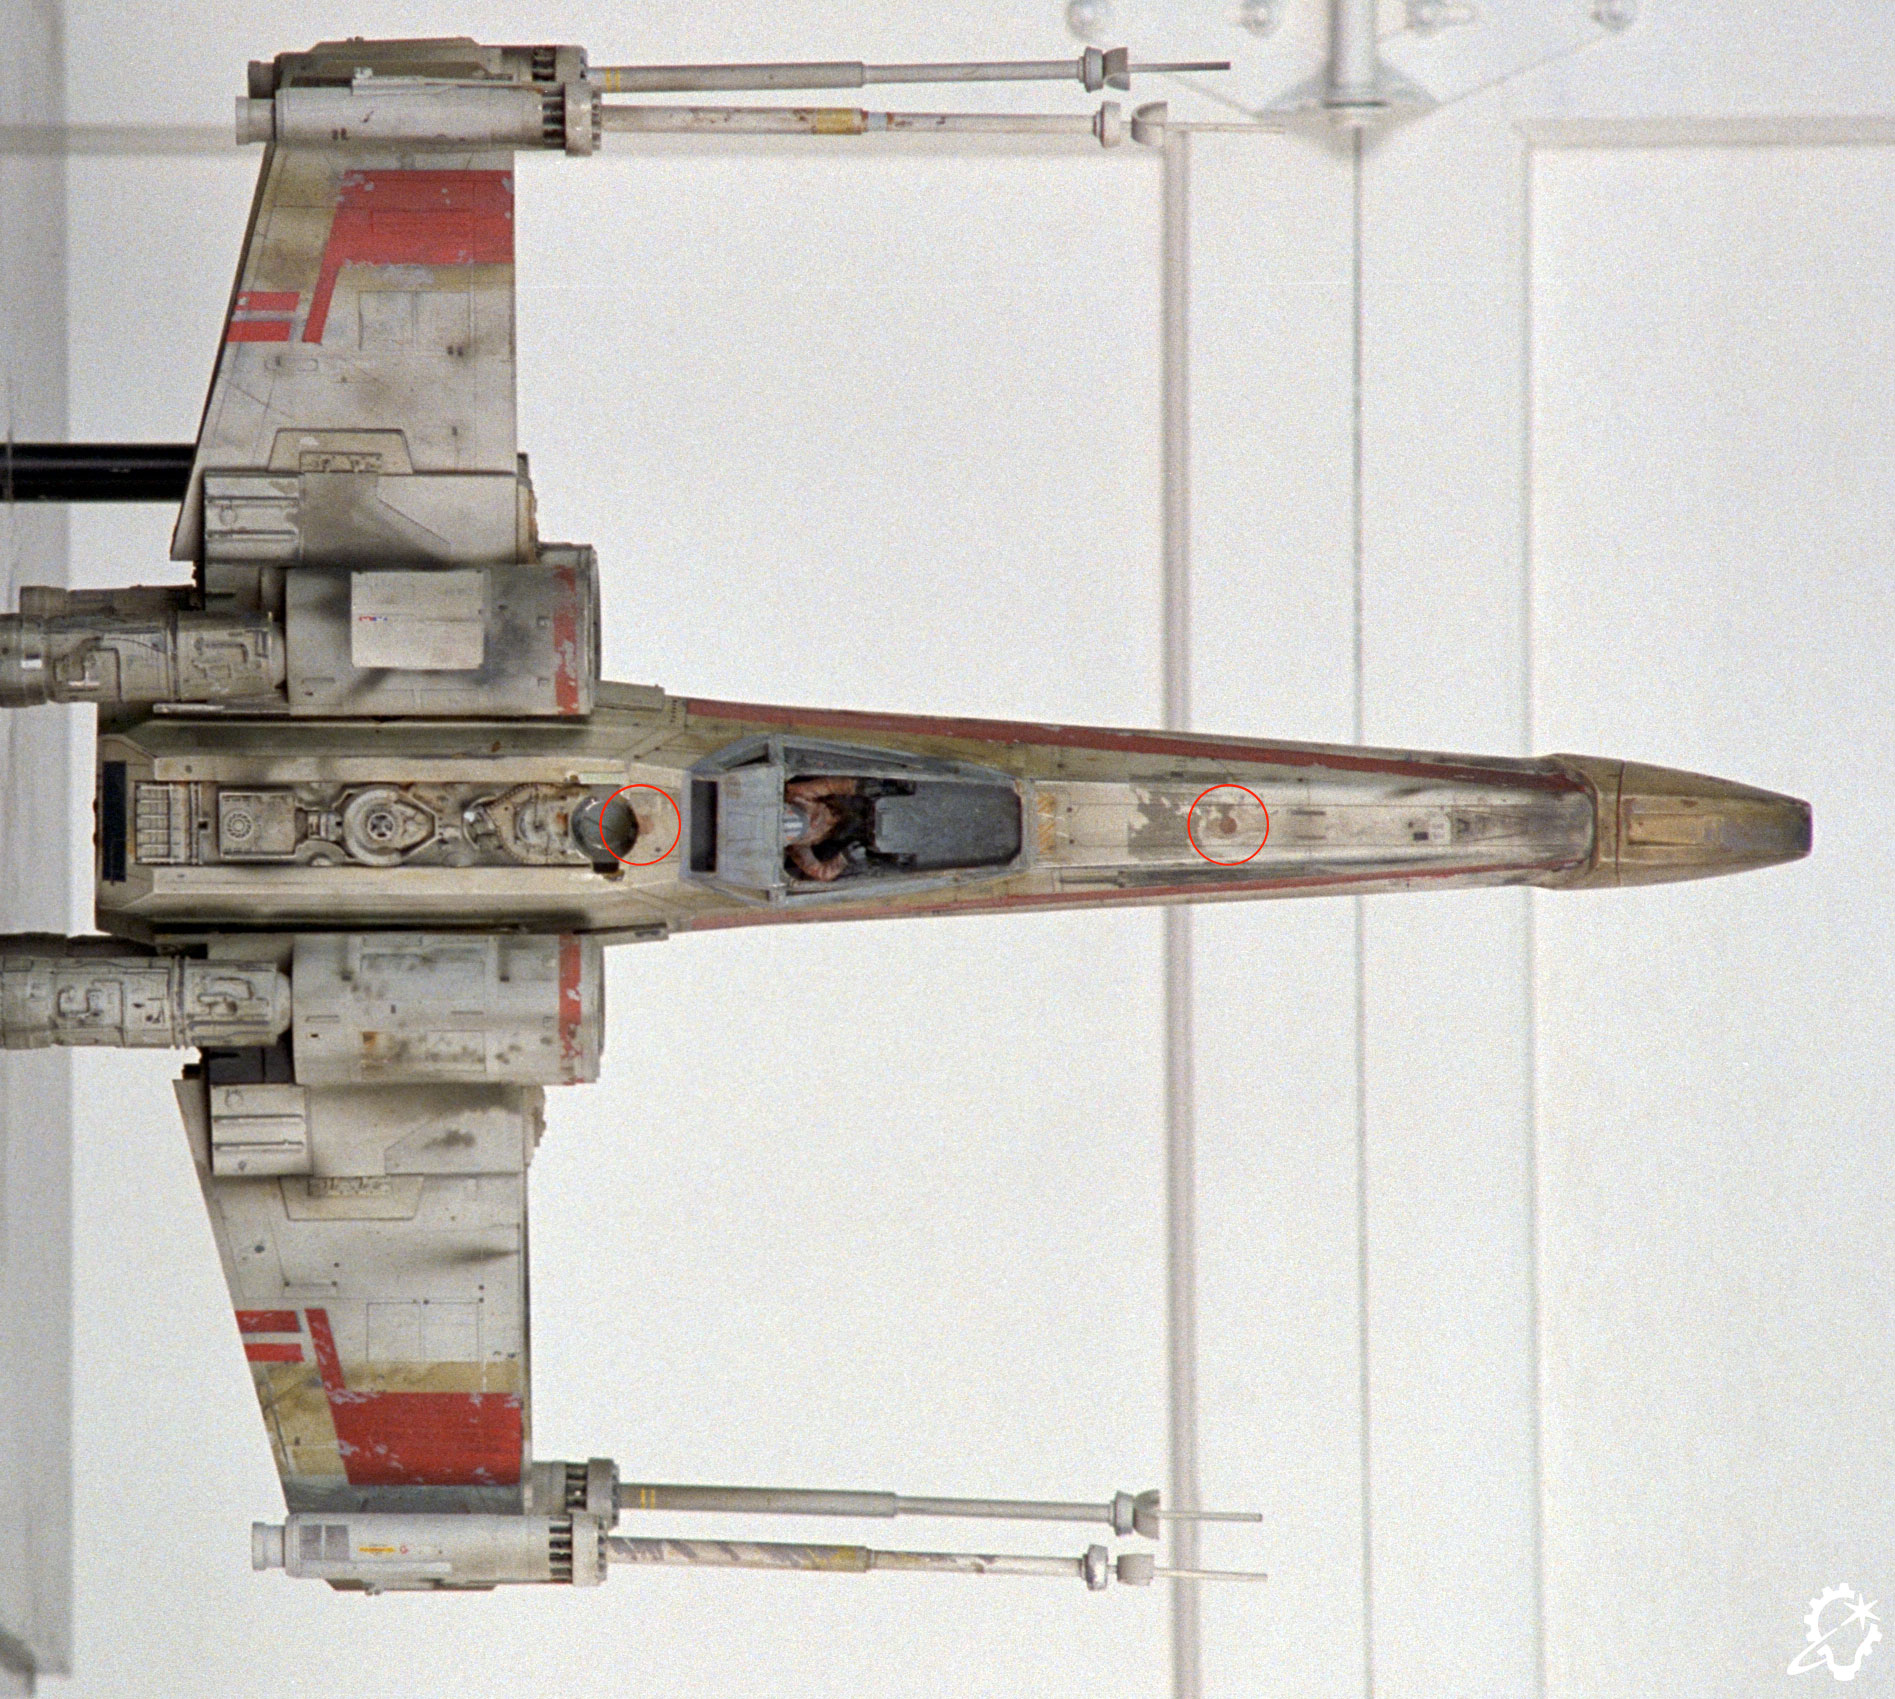
GE aircraft indicator bulbs were utilized for the engine lighting and were most likely sourced from Kasper Sales across the street on Valjean Avenue, according to Paul Huston. The bulbs are seated behind Aavid heatsinks (remember, the lights used at the time would be incandescent and would become hot), and in the center of the heatsink, a circle of hand-cut red lighting gel is glued to give the color to the engines that you see on screen. Curiously, the same bulbs are found inside the laser cannons, torpedo tubes, and, from an examination of Red 5, the cockpit. Muren doesn’t think that these lights were ultimately utilized, and the supposition for some is that they would be keys for the rotoscope artists to follow when animating things like the laser fire.
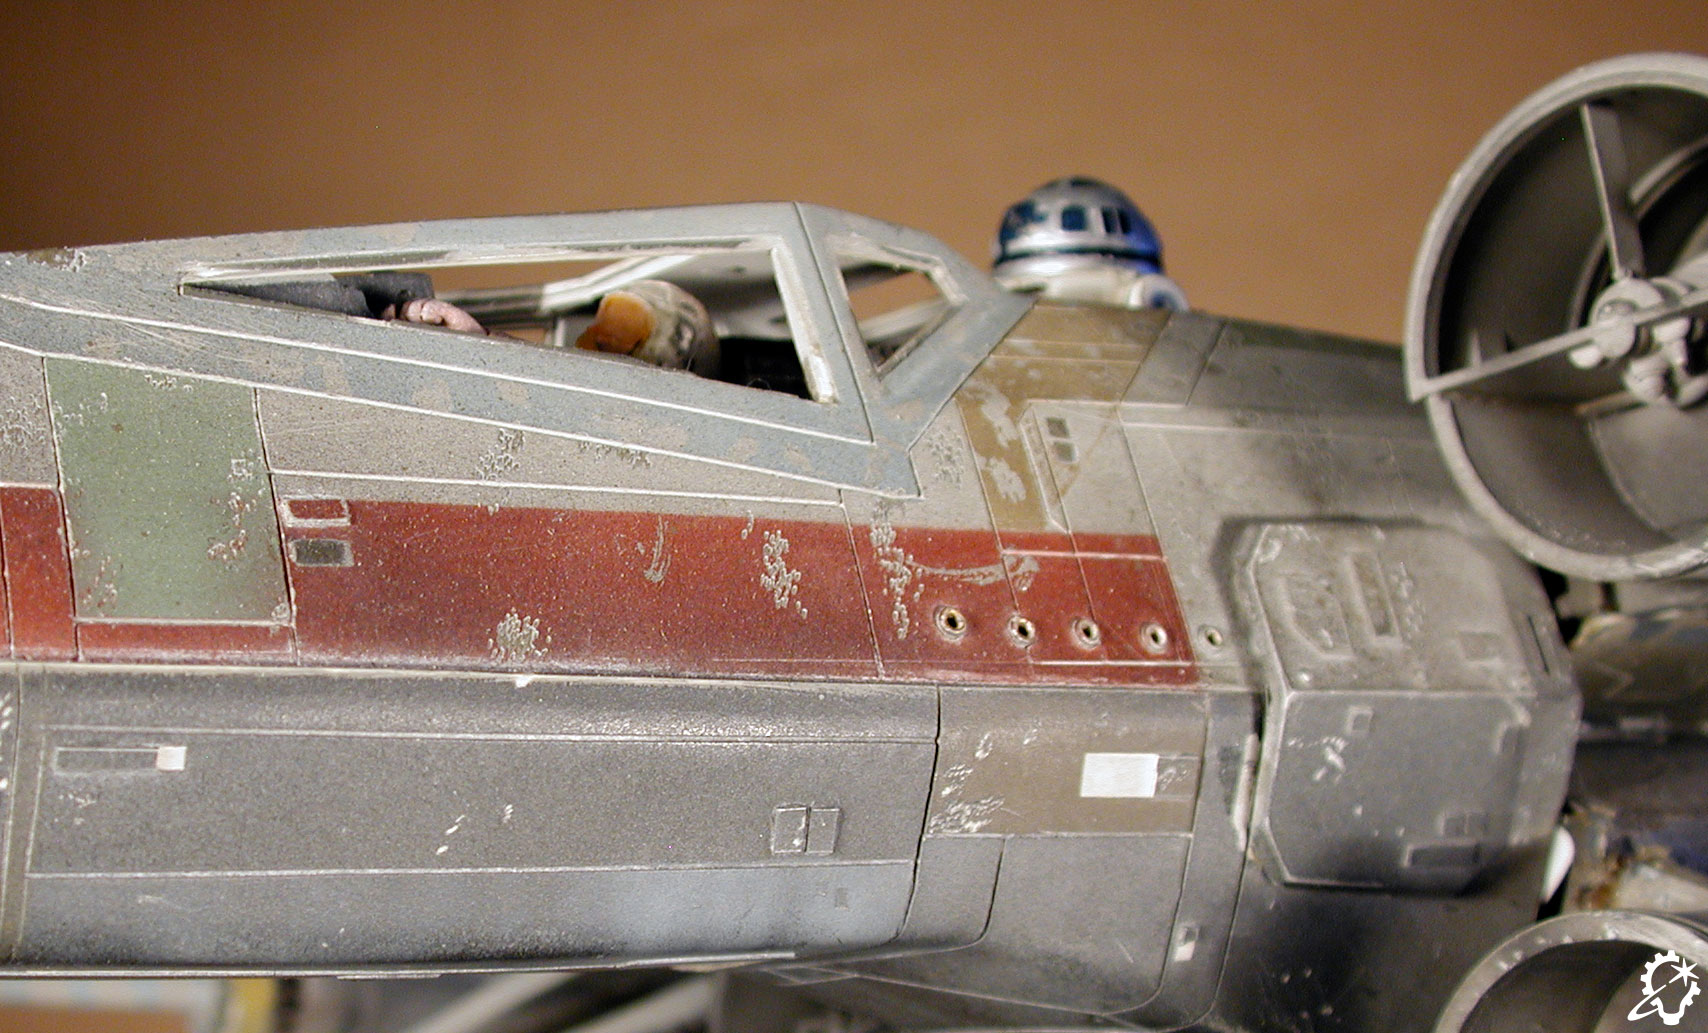
The wings on the Hero builds were constructed from machined acrylic and styrene. The outer face of the wing starts with an acrylic “box” that mounts to the armature’s “scissor” mechanism with two bolts. This box sits atop the main wing itself, which is made from 1/16th acrylic on the top and sides, and .040 styrene for the inner facing wing. This creates a hollow along the length of the wing. The wing box is dressed with a large Holgate and Reynolds HO Scale brick sheet panel, which is long out of production and prized by contemporary Star Wars model makers as it also appears in small rectangle chips elsewhere on X-wings and other filming miniatures.
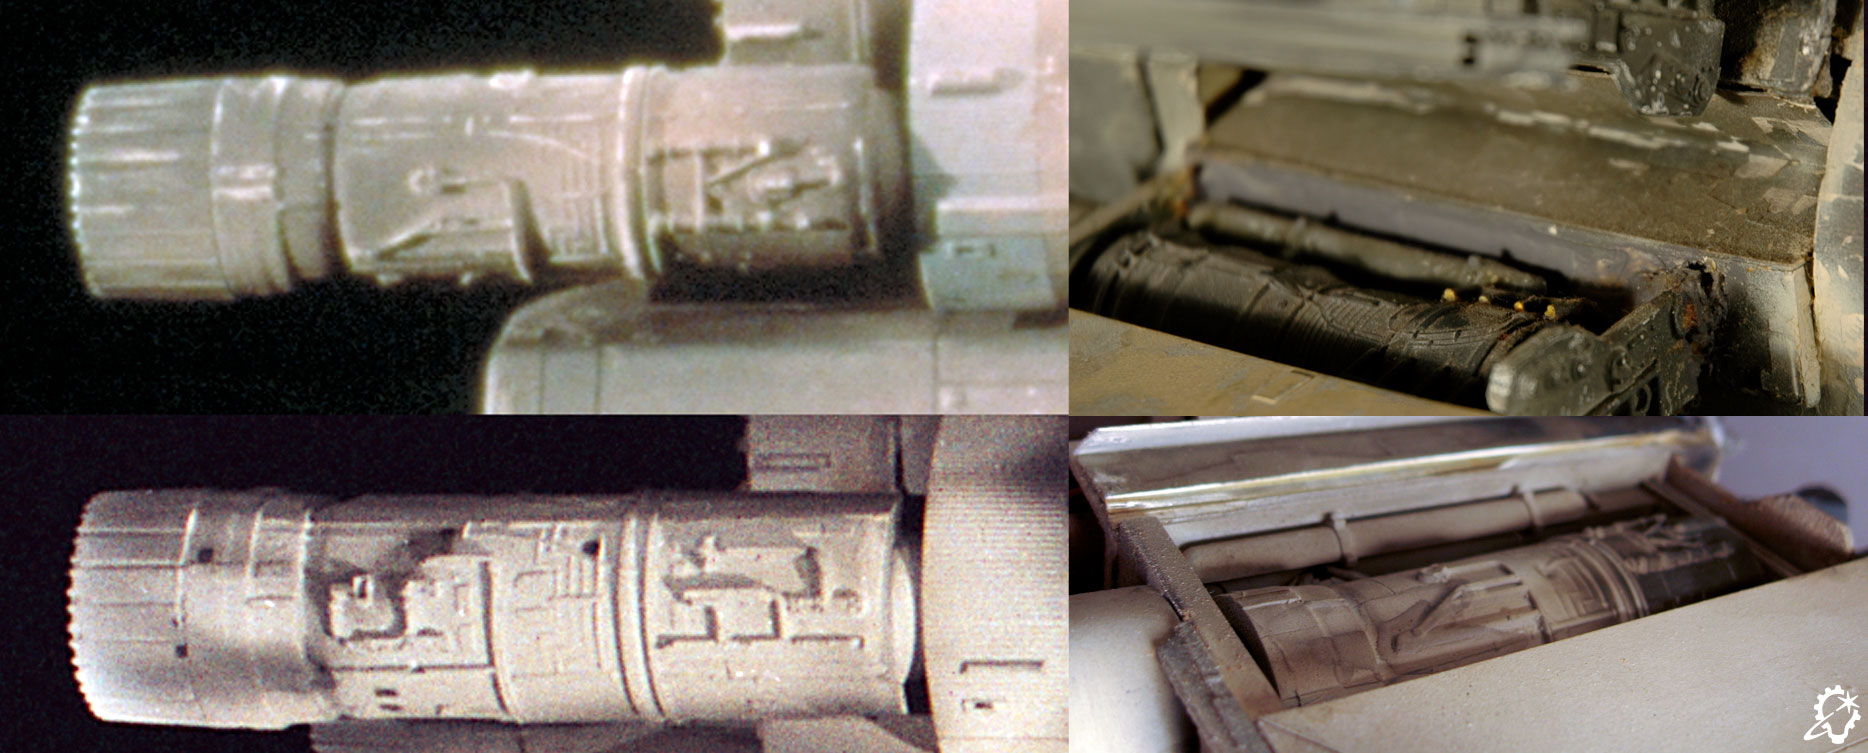
The acrylic box at the base of the wing also serves as the main mount for the engines, which are made from half of a 1/144 Saturn V rocket’s third stage and half of an engine bell (large and small sizes), 1/32nd Phantom turkey feathers and engine halves (cut up, reassembled, dressed with kit parts and in some cases molded and cast), Aurora Sealab pieces, styrene, and acrylic. The back half of this assembly has a machined metal tube with those aforementioned Aavid heatsinks inside. This metal tube is encased by the Phantom engine halves, which were patterned and cast (and curiously, in the case of Blue 1/Red 2, are uniquely patterned). This top wing ends with a mount for the laser cannons, which is a cast resin plate.
As it turns out, no two Hero X-wings were built exactly the same, so plating details and even the Saturn V pieces will vary from wing to wing and miniature to miniature. Even the small engine bell halves inside the engine’s “intakes” will have different pieces on the same model.
Laser cannons are made from a cylindrical assembly (cast resin in at least two heros) that features unique chip/panel detailing, back caps that are recessed to varying degrees on each build, and a cannon made from telescoping brass tubing (and in one instance, machined acrylic). The tips have a small resin-and-styrene “emitter” assembly, with the smallest-diameter brass tube creating the tip. On Red 1, there is solid red acrylic inside the laser cannons. On Red 3, a length of fiber optic material pokes out slightly. Both, we assume, would be lit by the bulbs inside the laser cannons, which sit inside the two stacked Aavid heatsinks on each cannon. These cannons are mounted on the wings with 3/16th brass tubing, with the wiring from their bulbs traveling down the tube mount, and through the wing plate hollow described below.
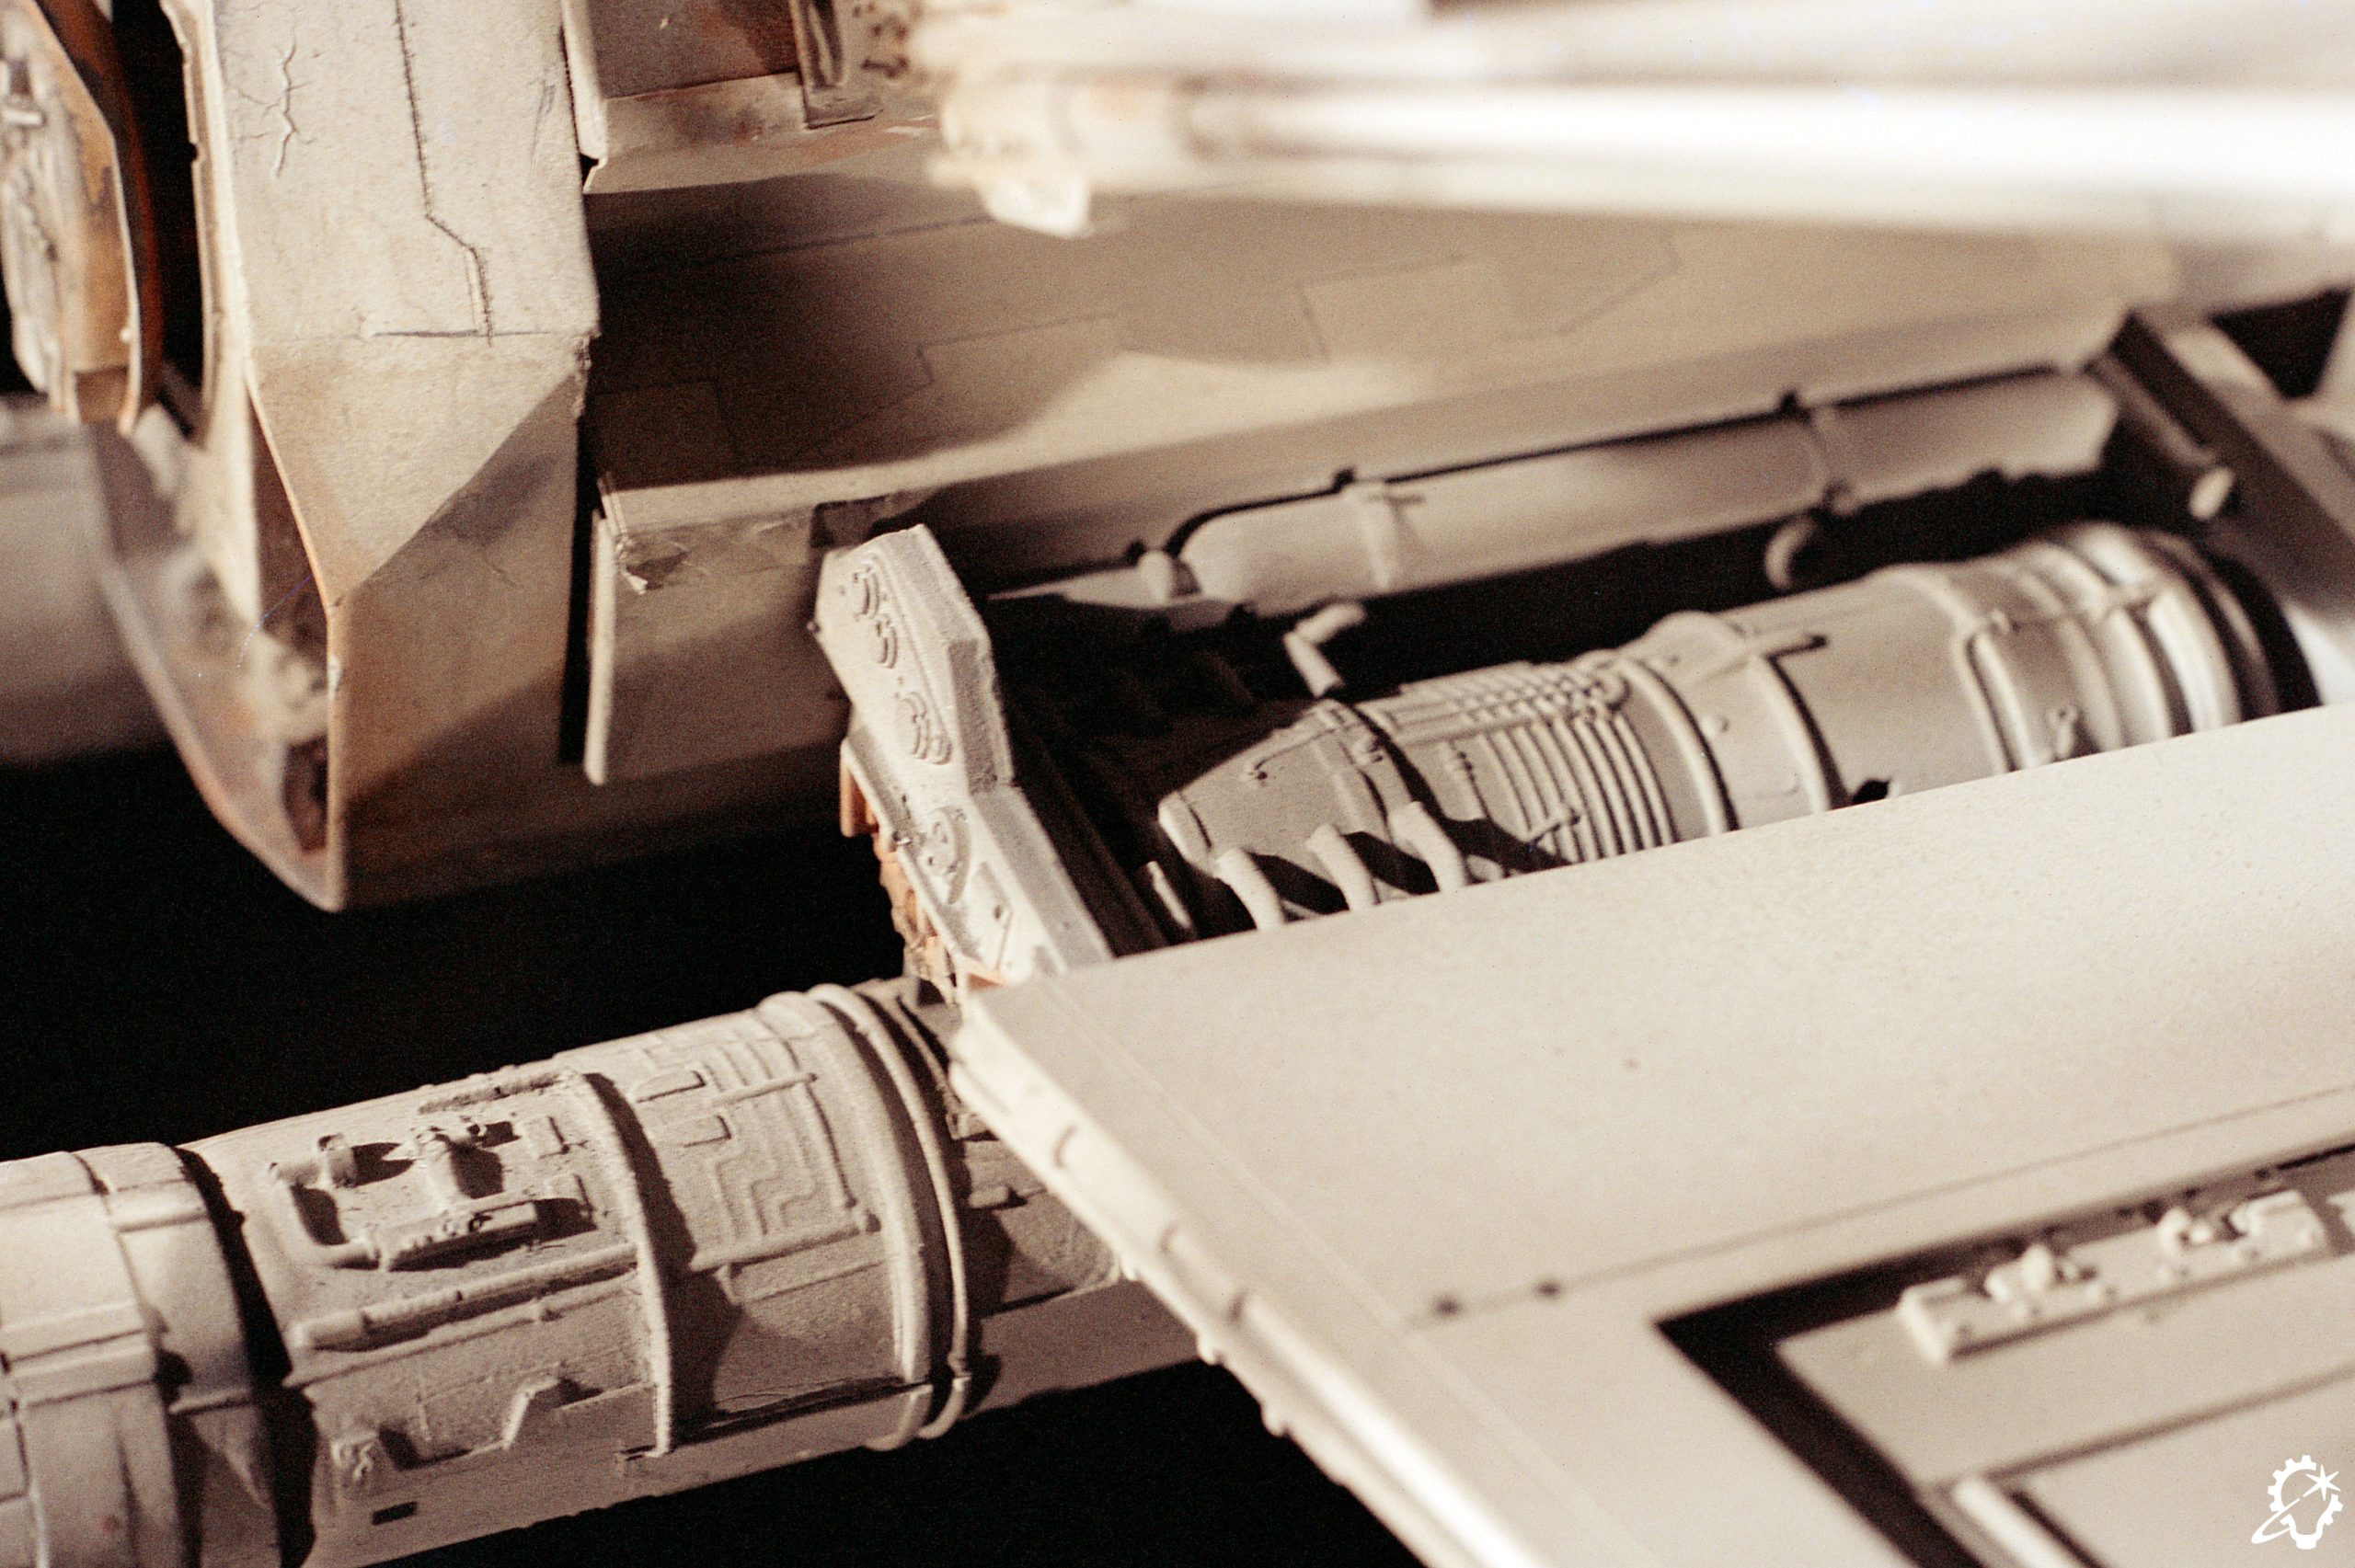
The inner wing plate features two cutouts. Plastruct “C” channel, styrene, and model kit parts were added to suggest the idea of mechanical detail. While the wing is oriented in this position, it would be easier to see the rest of this mechanical detail sitting in the wing boxes’ hollow. There are two detail plates from the Sealab inside this box, and they seem to sit opposite each other in each wing, top to bottom. The majority of the box’s space is filled with another Phantom engine half, either a patterned casting or a section of the styrene base part that was not used elsewhere.
Surgical tubing is visible here. It starts at the end of the metal tube inside the engine assembly up top, travels through the Saturn V’s third stage half, and emerges below into the wing box hollow, punching out of the Phantom half to become visible, and then directly into the body. Hero birds have one or two “cages” from the Sealab, adding to the idea that this is a functional engine area. Half of a Sealab’s air tank piece caps it all off and hides much of the surgical tubing and bolt heads.
Interesting, lesser-known wing features include a chamfered edge on the top of each wing’s leading edge. This has been somewhat obscured on Hero Red 1 by the reflective tape applied to these models on the leading and trailing edges of the wings. This tape shows hand-drawn pencil lines suggesting panel lines, a technique seen in some areas on these models, including the rear portions of the engines and the rear of the angled box that the engine assemblies rest on.
In speaking with Dennis Muren and Richard Edlund about the challenges in the revolutionary blue screen and compositing process they were refining at the time, both explained that when a model moves in certain ways and creates motion blur, thinner areas are prone to disappearing as the lighting drops off. So for the X-wing, this reflective tape was an attempt to ensure enough light would define the wings to keep them from disappearing during the compositing process. Muren also recalls experiments in which they would intensify the front lighting on a model, as a more dynamic movement would be programmed into it. He said they tried many things, and then analyzed the next day during dailies. If it didn’t work, they would abandon the idea.
The top shell, as stated before, is a cast resin. An examination of a surviving unused casting features faint panel-line engravings, an indentation for the “Droid Strip” to be placed behind the cockpit, and a solid back wall. The reverse shows two thicker rectangular stand-offs on the inside-facing surface that aided in affixing the top shell to the armature, with two screws puttied over. Over time, these puttied circles have, in some cases, fallen away, revealing screw heads along the top of the fuselage.
The wall thickness of this casting would be seen when the back wall was cut away to create a lip around the inset butt plate resin casting, as well as the wall thickness of the canopy bracing, which was made by cutting and filing material to the etched lines that described them – essentially what would be canopy glass, but in this instance, negative space. This explains why the back window on each of these models was uniquely shaped, as there was no surface etch to follow.
The cockpit was two cast resin pieces, with a pilot made from a figure from a 1/24th Harrier model kit, modified to feature a futuristic helmet. Then arms from other 1/24th kits were used, which again makes identifying the source kits a bit of a scavenger hunt for a researcher. The pilot castings were used in both hero builds (painted in multiple colors) and Pyro builds (painted a solid dark primer grey), with the cockpits being solid dark primer grey in both versions. Neither reflected the designs of the 1:1 sets and props seen in the live-action footage.
The lower shell is a vacuum-formed piece of styrene that was hand-scribed, with the side torpedo tube openings hand-cut and located by cutting brass tubes at angles and grafting them into place. Curiously, at the ends of these tubes, you will find those small incandescent bulbs. The handmade nature of these landmarks means that every one of the hero X-wings has unique panel lines, as well as unique “chip detailing,” which are small rectangular pieces of .010 styrene placed along wing and fuselage surfaces to help catch the light on set.
The vacuum-forming process creates a thinner-walled piece the deeper the draw is, meaning that for these lower shells, the wall thickness tapers to a very thin edge at the bottom rear of the fuselage. This is a signature look unique to the Hero X-wings. A nose cone finishes off the fuselage, which was cast in one piece and grafted into place in the front, with the gaps puttied and contoured over. Each nose was sliced in two at a slightly different spot, creating a permanently attached mount area on the body, with the separated front cone acting as the front armature mount cover. The nose cone has a proud cylinder and two brass locating pins that fit into corresponding holes on the front of the fuselage. When removed, the six power port female pin plugs can be seen encircling the hole to access the armature threads, three on each side.
Adding Detail
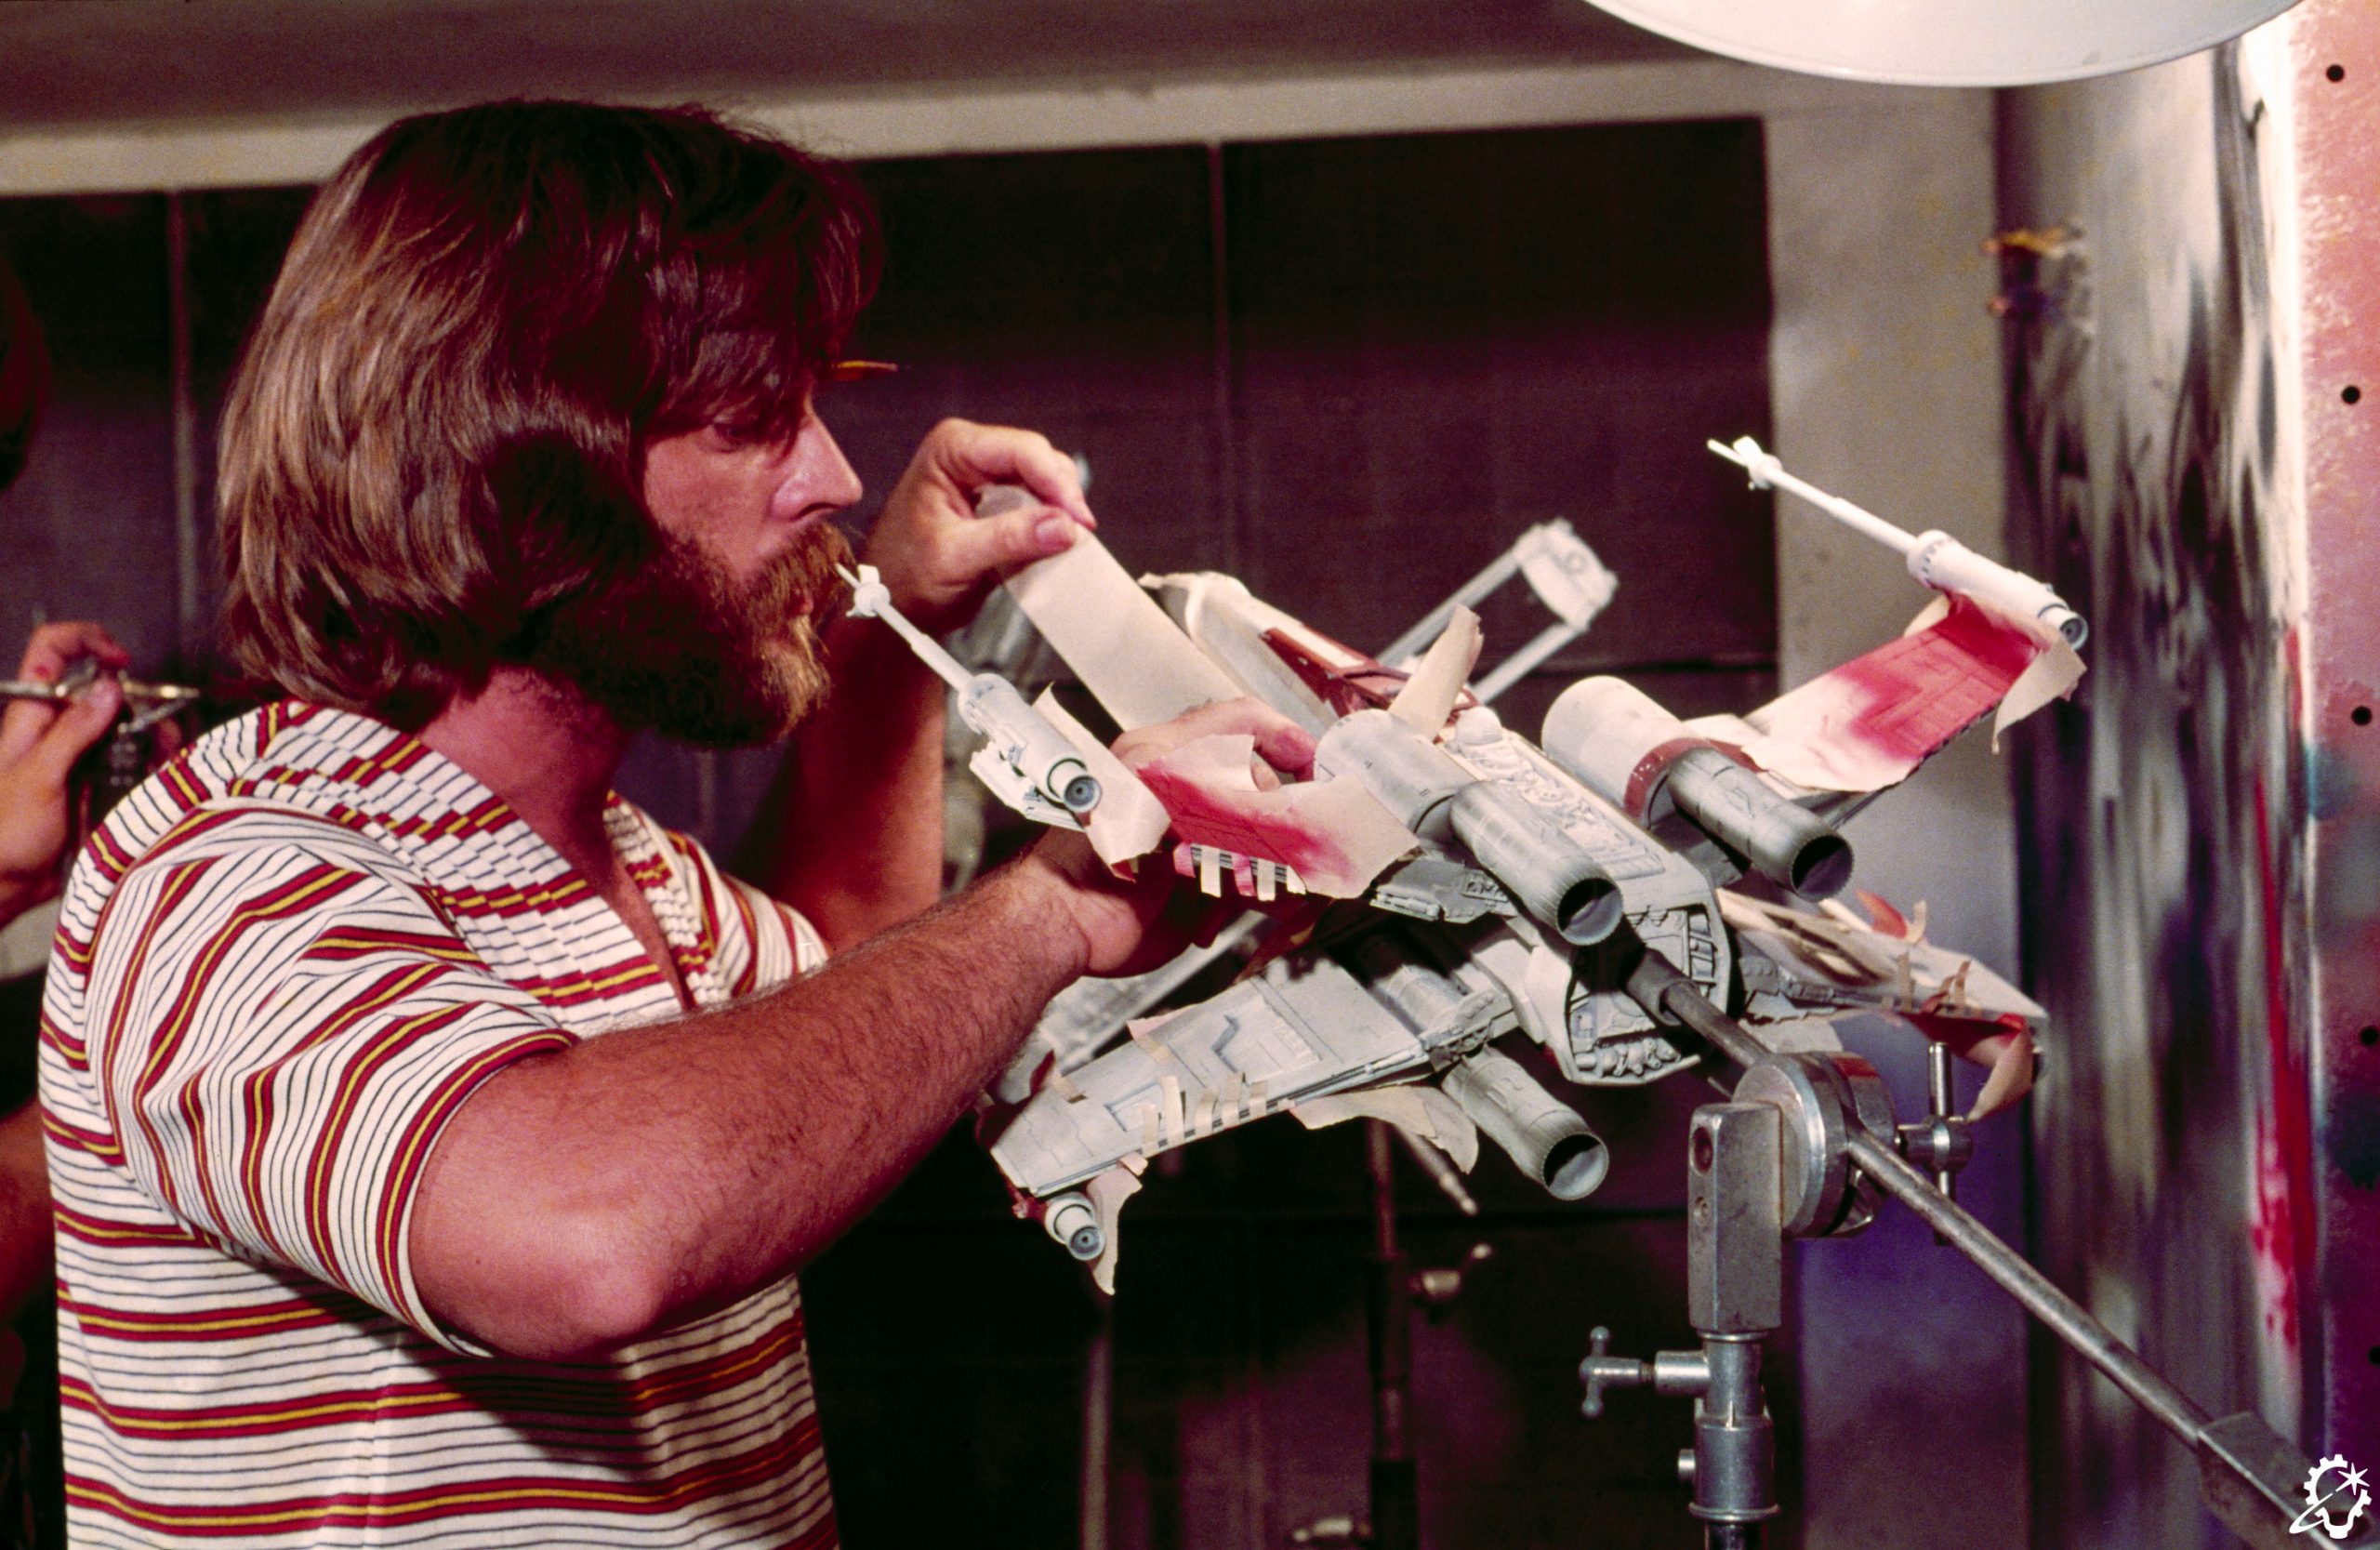
These models were all painted using automotive paints, Floquil enamel railroad paints, and primers from companies such as Nu Finish. Much has been said about the process over the past fifty years, and a fair amount of it can be contradictory. It wasn’t until a conversation I had with Dave Jones in the late 2010s that the proverbial light bulb clicked on, when he made an off-hand comment about how (paraphrasing) “everyone was experimenting and doing their own thing with the painting.”
That one observation neatly explained why some were painted with black primer and some with grey primer. Some were base-coated with Hot Rod White, which is a creamy warm white, and some were base-coated with Reefer White, a brighter white comparatively. This also neatly explains why Red 1 is so bright overall, and why Red 3 was warmer, even “muddier” in places.
Floquil made two very similar red colors, and it appears that both were used to make the stripe details. Lorne Peterson and others have described using Scotch-Brite and/or sandpaper for processes such as sanding back finishes to reveal the dark primer underneath, masking fluid applications for “chipping” detail, and varying the color on wing and body panels. Other processes included masking areas with tape and painting diluted washes; adding decals from Micromark (and other kits the shop used for miniature construction); applying dry transfers of small rectangles in black and dark grey with hand-cut frisket masks; and airbrushing misted coats and streaks.
Everything was used to varying degrees to create these unique models akin to the WWI Flying Circus. Each X-wing had recognizable painted landmarks, which deepened the “used universe” look and feel that made Star Wars as a whole feel so “real” to the viewer.

There was even an attempt to include “canopy glass” in some shots of the models on stage. Peterson remembers using slide glass, and it appears there are remnants of a tinted gel material on the surviving Hero Red 1. Some stage photos show this canopy glass, and if you look closely at any surviving X-wing, you will see remnants of adhesive or missing paint from where these panels were removed. It is usually mistaken for weathering, as it indeed looks the part.
The “Pyro” Models
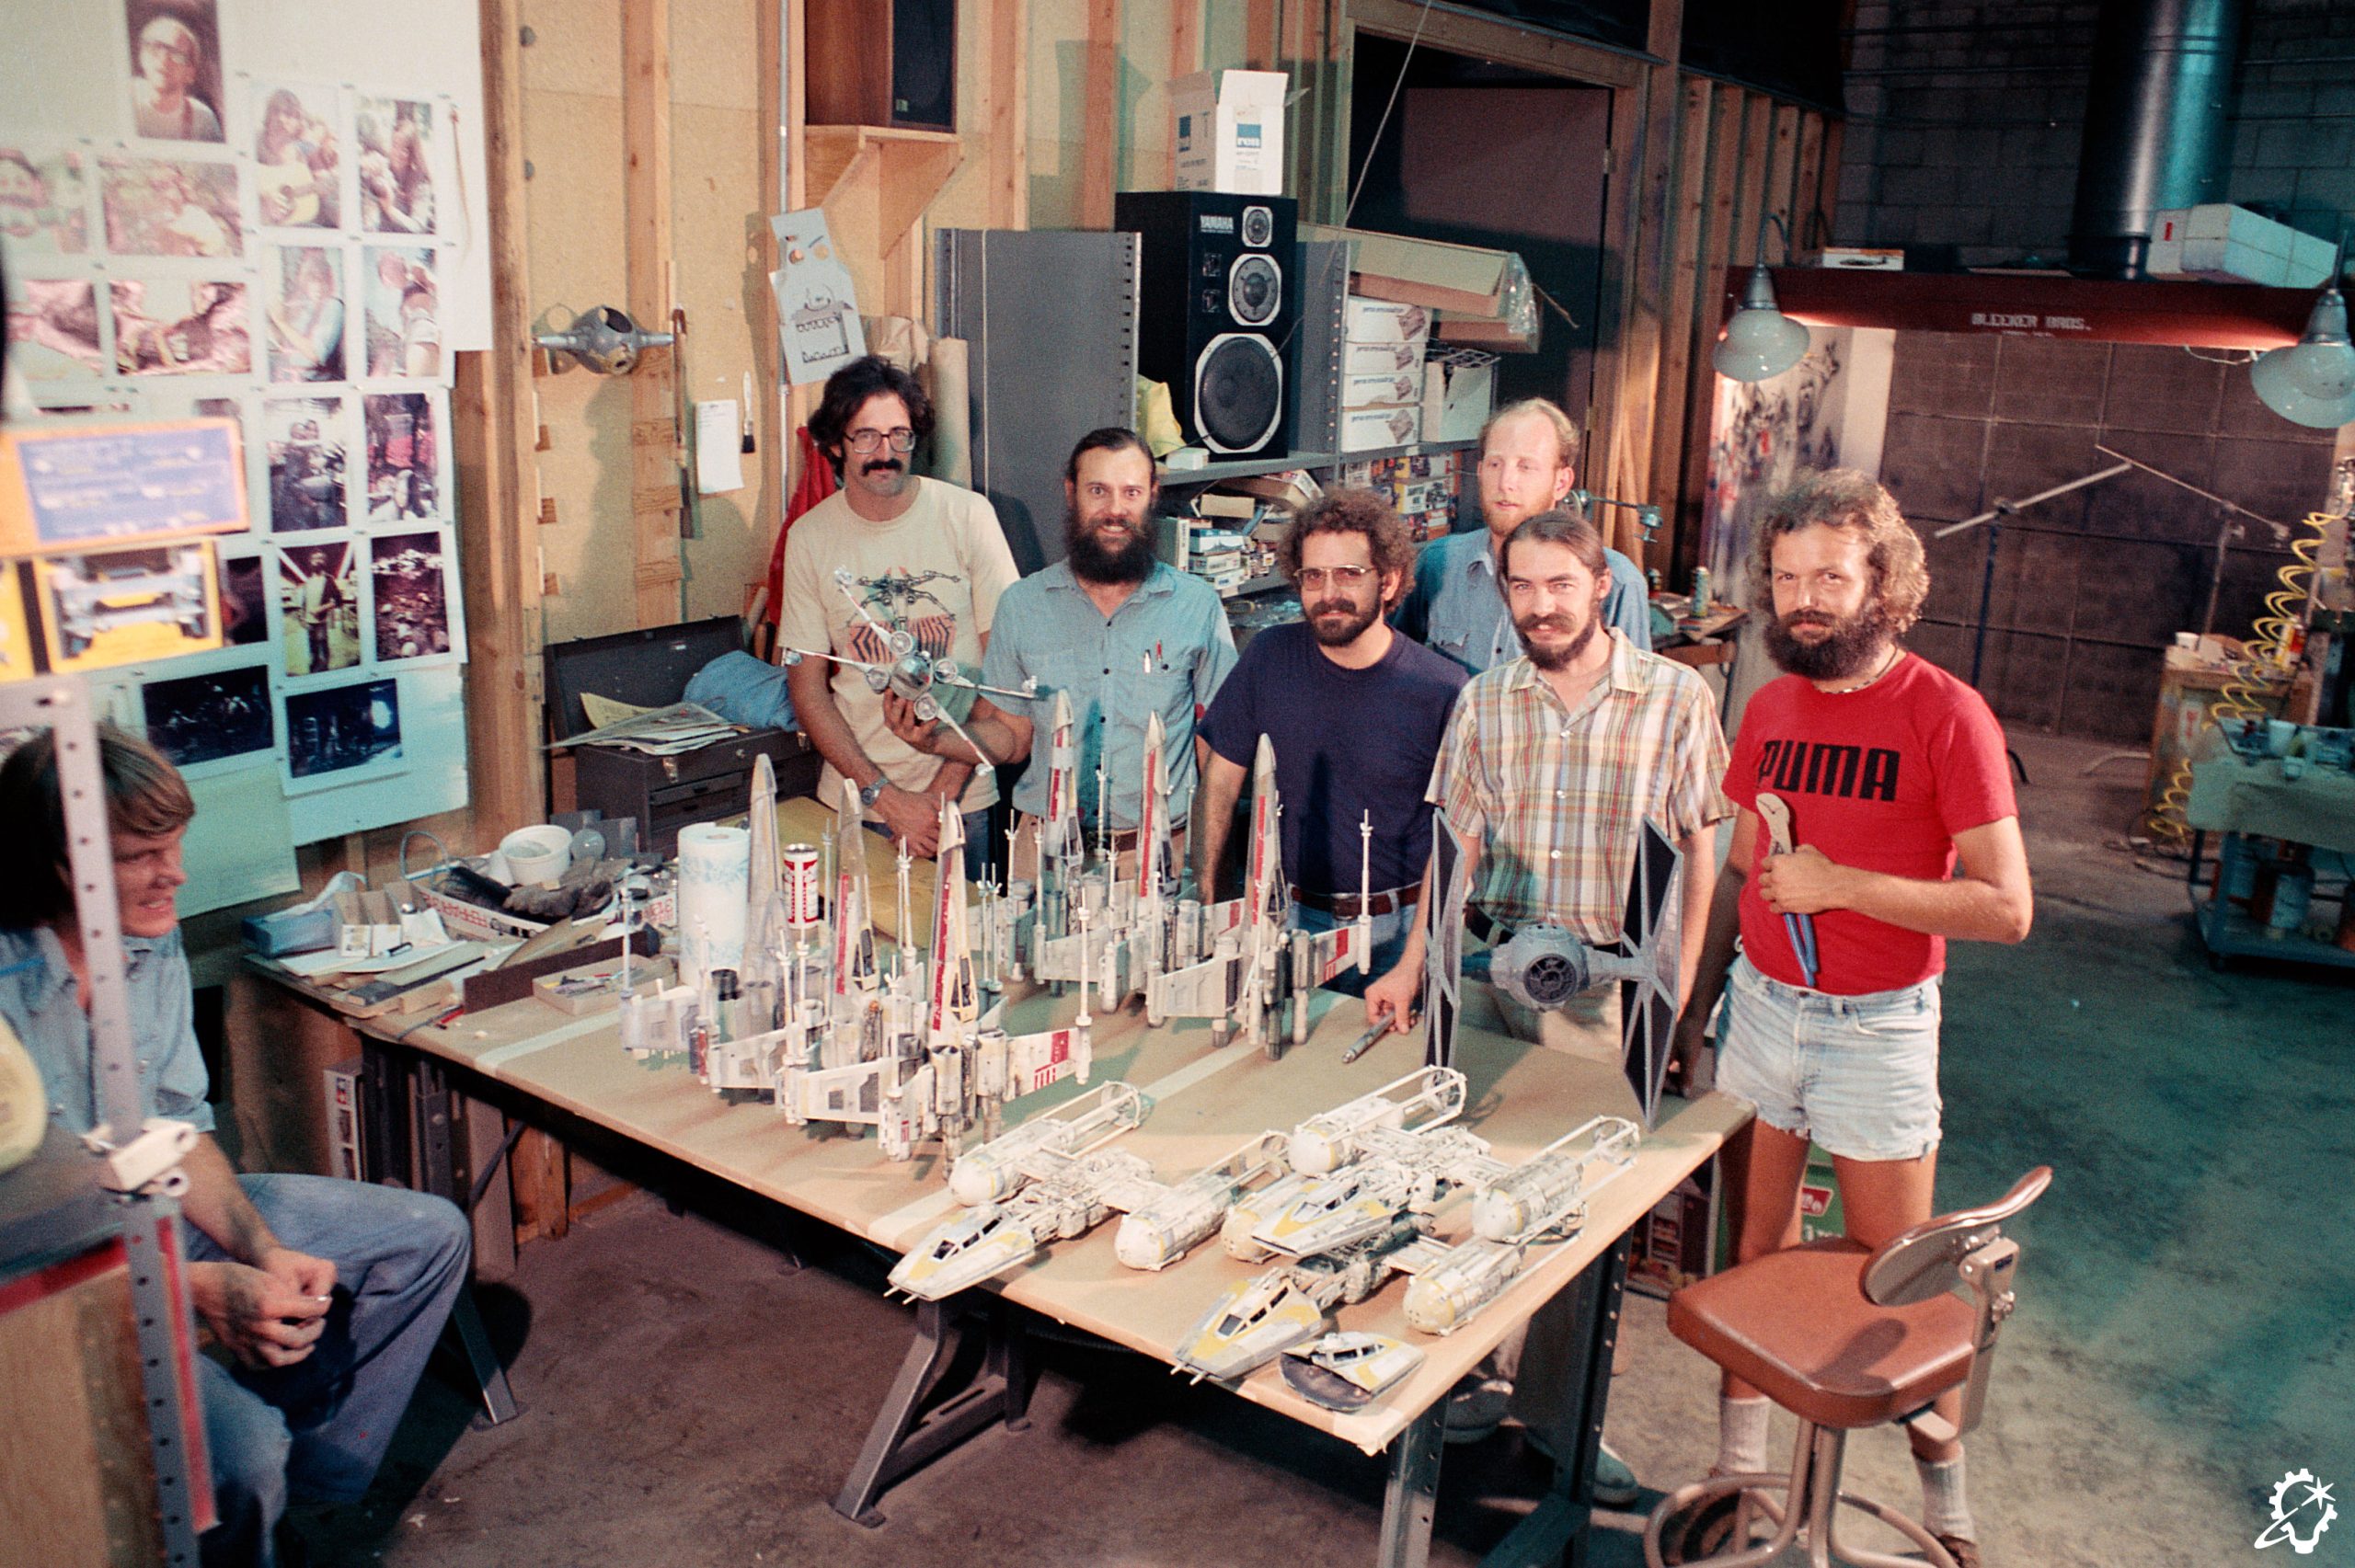
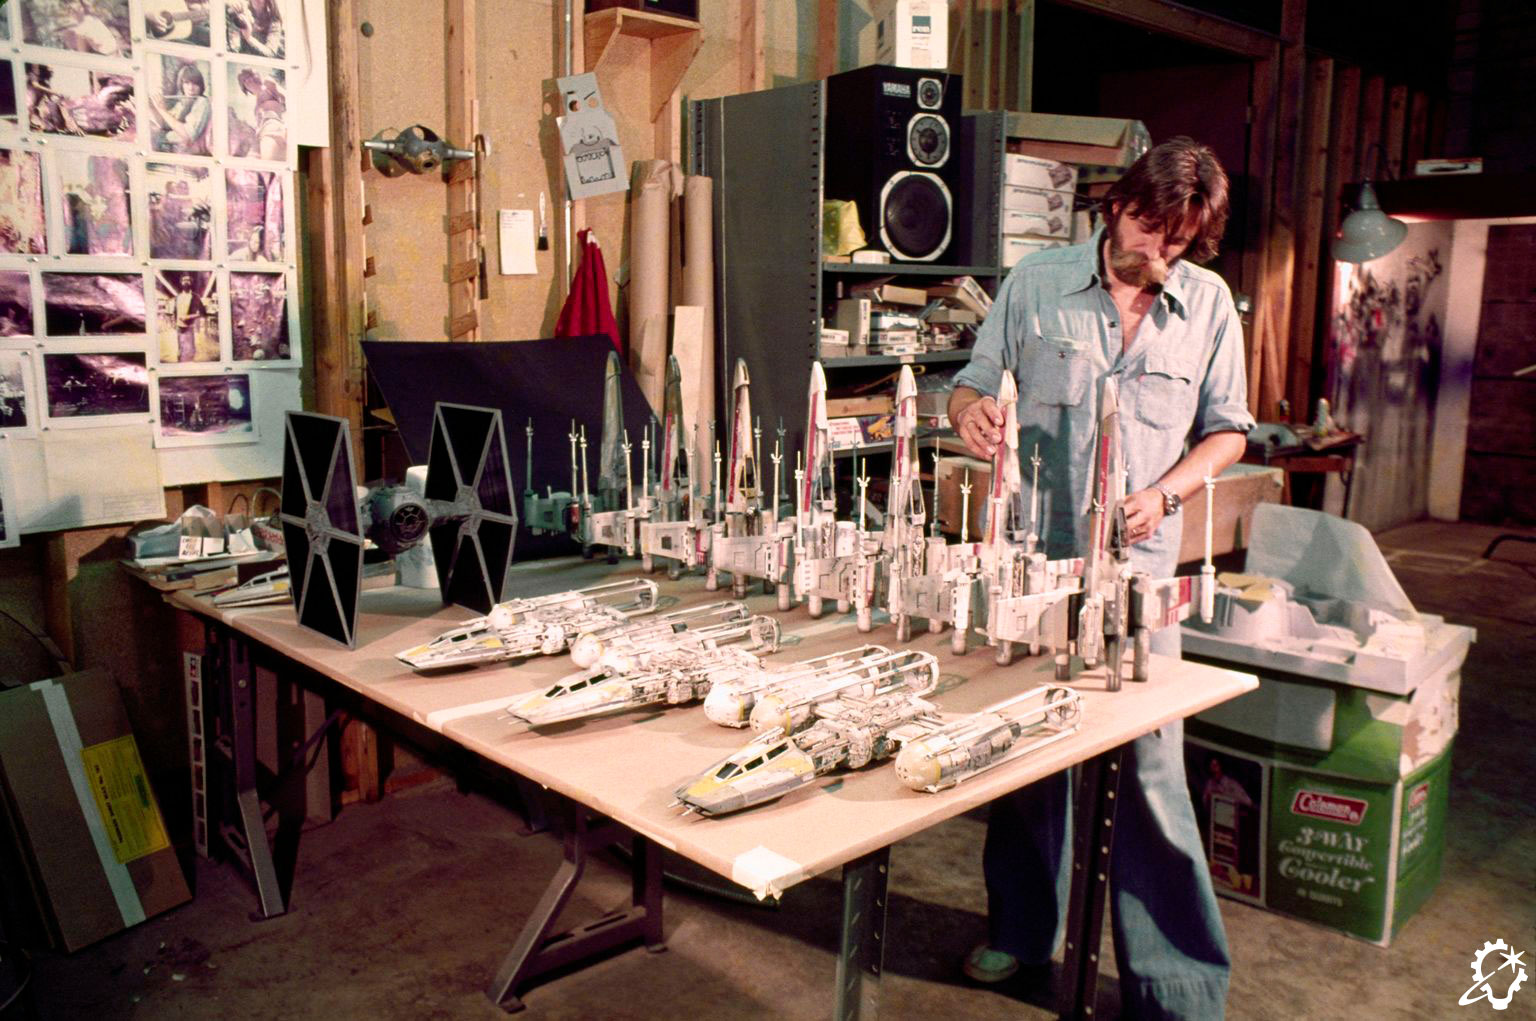
With the complexities of the X-wing Hero fighters, how did ILM then simplify the process for the Pyro models? In an interview after the film’s release, McCune stated there were nine Pyros made. These would have to be easier and quicker to make, given financial and time considerations. In speaking at length over the course of multiple years with Dave Jones, he explained about the master pattern he helped make for these Pyro versions of the X-wing.
Returning to the photographic sequence of events, the Pyros were an all-hands affair, with Lorne Peterson, Paul Huston, and Dave Jones constructing and assembling the Pyro builds and a “first wave” of Pyro X-wings painted by Joe Johnston, featuring a level of care and sophistication that was given to the hero builds. These well-painted Pyros were photographed by Richard Edlund and serve as a wonderful preservation of some of the work that was quite literally destroyed to get the pyrotechnic shots.
Many have described that the initial Pyros did not result in the explosions they wanted for the shots. Later Pyros would have to be made and would be more hastily constructed. Infamously, at least one, had “sticks” as stand-ins for the laser cannons, which made it into a final shot. It can still be seen in the current version of the film (look for Red 10’s demise for the shot).
The Pyro master pattern was created by taking a Hero top and bottom shell, mating them with the torpedo tubes, and grafting in a nose cone. The wing root area was fitted with a fixed wing mount, constructed in the open “X” mode, and then panel lines and chips were applied. This assembly was then cut vertically, so that the body was now a left and right shell. Dave Jones then poured liquid resin into the inside of this pattern to strengthen everything from behind. The thinking being that the weight of the wings would help to quite literally pull the body apart when they exploded.
Wings were constructed similarly to the Hero wings, but any undercuts were filled in on the underside, and the wings overall were slightly shorter (in the area where they ultimately attach to the hull). Laser cannons and engine assemblies were in brass, but also constructed and cast as simpler, more complete assemblies, and then everything was molded and cast.
This meant that every Pyro X-wing would lock in the locations of the nose, the torpedo tubes, the angle of the “X” wing deployment (they are noticeably a wider splay on the Pyros), the panel lines, and the chip detail. The body is overall shorter than a Hero and surprisingly skinnier as well, as there was width lost to the kerf of the physical saw blade used to cut the body in two, and then again but to a lesser degree when assembled, as the cast halves would have had their mating surfaces sanded slightly once cast, to remove any irregularities/flashing, or to ensure a flat plane. Some seem to have been constructed without a butt plate casting, and seemingly backfilled with foam so they could slide onto a C-Stand. On stage, they found that there would be better results if the bodies were pre-scored to break apart into smaller pieces, and surviving fragments will sometimes show these odd zigzag shapes carved into the castings.
Over the years, photographs have helped identify these pyros. Red 1, Red 3, Red 4, Red 6, Red 10, and Red 12 have been identified. Red 1 closely followed the Hero’s paint job, but at some point was partially detonated, and then was repaired and partially repainted. Curiously, two more stripes were added to it and the Hero, to make it appear as Red 3. Red 3 bears little resemblance to the Hero Red 3, and Red 6 seems to have been detonated and then donated some of its parts, becoming Red 10. The stripes top out at 6 on the wings, and for 10 and 12, ILM simply took a thin length of additional tape when masking for paint, and cut the 6 bars in two, so that when painted, they became shorter stacked markings.
Many pieces of Pyro X-Wings have surfaced over the years. Some have been positively identified as one of those mentioned above. But many pieces have no photographic reference, which perhaps speaks to the speed at which the later Pyro builds were created.
These Pyro molds (and castings pulled after the film, which were themselves used to mold and cast again) are where all “lineage” post-production castings originate, including the first licensed replica created by Icons in the 1990s. When compared to a production pyro casting from 1976, dimensional shrinkage will be noticeable, making the Heros look massive in comparison!
These kinds of details and observations are what drive people like me to learn as much as possible about the filming miniatures of Star Wars. Every new piece of information about the construction of these filming miniatures would encourage me and others to refine recreations of the X-wing miniatures, and there is no greater satisfaction as a modelmaker than to see how close the builder community has gotten as we have continuously improved the builds over the last twenty-five years. Part archaeology, part artistry, and part friendship, the journey to get to the center of these models has been illuminating and gratifying.
The amount of heartfelt thanks to individuals is massive, but I would be remiss in not specifically mentioning Lorne Peterson, Dave Jones, Bill George, Dennis Muren, Paul Huston, Jon Erland, Gene Kozicki, Richard Edlund, John Goodson, Sean House, Hiroshi Sumi, Ed Minto, Craig Underwood, Bryan Babich, Mike Salzo, Dave Mandel, and my supernaturally-cool-with-this-stuff wife, Lisa Eaton. You can find a few X-wing replicas I have made here: www.jasoneatonstudio.com.
—


